node.js 核心模块
path
基本概念
node.js 内置模块,可以使用 require 导入并使用,用来处理文件/目录的路径。
比如提取文件路径、后缀,资源路径拼接等。
常用 API 介绍
basename()获取路径中基础名称dirname()获取路径中目录名称extname()获取路径中扩展名称isAbsolute()获取路径是否为绝对路径join()拼接多个路径片段resolve()返回绝对路径parse()解析路径format()序列化路径normalize()规范化路径
案例分析
获取路径基础名称
console.log(__filename) // D:\workspace\notes\node\core_module\_path\index.js
console.log(path.basename(__filename)) // index.js

// 支持传入第二个参数,表示扩展名,如果没有设置返回完整文件名称带后缀
// 第二个参数作为后缀时,如果匹配,不会返回该后缀
console.log(path.basename(__filename, '.js')) // index
console.log(path.basename(__filename, '.ts')) // index.js

// basename 同样可以用来解析文件夹路径
console.log(path.basename('/a/b/c')) // c
// 如果目录中存在路径分隔符,会忽略掉
console.log(path.basename('/a/b/c/')) //console.log(__filename) // D:\workspace\notes\node\core_module\_path\index.js
console.log(path.basename(__filename)) // index.js
// 支持传入第二个参数,表示扩展名,如果没有设置返回完整文件名称带后缀
// 第二个参数作为后缀时,如果匹配,不会返回该后缀
console.log(path.basename(__filename, '.js')) // index
console.log(path.basename(__filename, '.ts')) // index.js
// basename 同样可以用来解析文件夹路径
console.log(path.basename('/a/b/c')) // c
// 如果目录中存在路径分隔符,会忽略掉
console.log(path.basename('/a/b/c/')) //获取路径目录名(路径)
// 返回路径中最后一个部分的上一层目录所在路径
console.log(path.dirname(__filename)) // D:\workspace\notes\node\core_module\_path

console.log(path.dirname('/a/b/c')) // /a/b
console.log(path.dirname('/a/b/c/')) // /a/b
// 返回路径中最后一个部分的上一层目录所在路径
console.log(path.dirname(__filename)) // D:\workspace\notes\node\core_module\_path
console.log(path.dirname('/a/b/c')) // /a/b
console.log(path.dirname('/a/b/c/')) // /a/b获取路径扩展名
console.log(path.extname(__filename)) // .js
console.log(path.extname('/a/b/c')) // 空字符串

// 匹配最后一个 . 出现的位置,然后返回 “.” 到结尾的内容
console.log(path.extname('/a/b/index.html.js.css')) // .css
console.log(path.extname('/a/b/index.html.js.')) // .console.log(path.extname(__filename)) // .js
console.log(path.extname('/a/b/c')) // 空字符串
// 匹配最后一个 . 出现的位置,然后返回 “.” 到结尾的内容
console.log(path.extname('/a/b/index.html.js.css')) // .css
console.log(path.extname('/a/b/index.html.js.')) // .解析路径
console.log(path.parse('/a/b/c/index.html'))
// {
//   root: '/',
//   dir: '/a/b/c',
//   base: 'index.html',
//   ext: '.html',
//   name: 'index'
// }

console.log(path.parse('/a/b/c'))
// { root: '/', dir: '/a/b', base: 'c', ext: '', name: 'c' }
console.log(path.parse('/a/b/c/'))
// 路径结尾分隔符会被忽略
// { root: '/', dir: '/a/b', base: 'c', ext: '', name: 'c' }

console.log(path.parse('./a/b/c/'))
// { root: '', dir: './a/b', base: 'c', ext: '', name: 'c' }console.log(path.parse('/a/b/c/index.html'))
// {
// root: '/',
// dir: '/a/b/c',
// base: 'index.html',
// ext: '.html',
// name: 'index'
// }
console.log(path.parse('/a/b/c'))
// { root: '/', dir: '/a/b', base: 'c', ext: '', name: 'c' }
console.log(path.parse('/a/b/c/'))
// 路径结尾分隔符会被忽略
// { root: '/', dir: '/a/b', base: 'c', ext: '', name: 'c' }
console.log(path.parse('./a/b/c/'))
// { root: '', dir: './a/b', base: 'c', ext: '', name: 'c' }序列化路径
console.log(path.format(path.parse('./a/b/c/'))) // ./a/b\cconsole.log(path.format(path.parse('./a/b/c/'))) // ./a/b\c判断当前路径是否为绝对路径
console.log(path.isAbsolute('foo')) // false
console.log(path.isAbsolute('/foo')) // true
console.log(path.isAbsolute('///foo')) // true

console.log(path.isAbsolute('')) // false
console.log(path.isAbsolute('.')) // false
console.log(path.isAbsolute('../bar')) // falseconsole.log(path.isAbsolute('foo')) // false
console.log(path.isAbsolute('/foo')) // true
console.log(path.isAbsolute('///foo')) // true
console.log(path.isAbsolute('')) // false
console.log(path.isAbsolute('.')) // false
console.log(path.isAbsolute('../bar')) // false拼接路径
console.log(path.join('a/b', 'c', 'index.html')) // a\b\c\index.html
console.log(path.join('/a/b', 'c', 'index.html')) // \a\b\c\index.html

console.log(path.join('/a/b', 'c', '../', 'index.html')) // \a\b\index.html
console.log(path.join('/a/b', 'c', './', 'index.html')) // \a\b\c\index.html
console.log(path.join('/a/b', 'c', '', 'index.html')) // \a\b\c\index.htmlconsole.log(path.join('a/b', 'c', 'index.html')) // a\b\c\index.html
console.log(path.join('/a/b', 'c', 'index.html')) // \a\b\c\index.html
console.log(path.join('/a/b', 'c', '../', 'index.html')) // \a\b\index.html
console.log(path.join('/a/b', 'c', './', 'index.html')) // \a\b\c\index.html
console.log(path.join('/a/b', 'c', '', 'index.html')) // \a\b\c\index.html规范化路径
console.log(path.normalize('a/b/c/d')) // a\b\c\d
console.log(path.normalize('a////b/c../d')) // a\b\c..\d
console.log(path.normalize('a//\\//b/c\\/d')) // a\b\c\d
console.log(path.normalize('a//\\\b/c\\/d')) // a\c\d
console.log(path.normalize('')) // .console.log(path.normalize('a/b/c/d')) // a\b\c\d
console.log(path.normalize('a////b/c../d')) // a\b\c..\d
console.log(path.normalize('a//\\//b/c\\/d')) // a\b\c\d
console.log(path.normalize('a//\\\b/c\\/d')) // a\c\d
console.log(path.normalize('')) // .返回绝对路径
console.log(path.resolve('')) // D:\workspace\notes
console.log(path.resolve('a', 'b')) // D:\workspace\notes\a\b

// resolve([from], to)
// 如果传入多个参数,不要在第二个参数前面添加路径分隔符
console.log(path.resolve('a', '/b')) // D:\b
console.log(path.resolve('/a', '/b')) // D:\b
console.log(path.resolve('/a', 'b')) // D:\a\b
console.log(path.resolve('/a', '../b')) // D:\b

// 正常用法
console.log(path.resolve('index.html')) // D:\workspace\notes\index.htmlconsole.log(path.resolve('')) // D:\workspace\notes
console.log(path.resolve('a', 'b')) // D:\workspace\notes\a\b
// resolve([from], to)
// 如果传入多个参数,不要在第二个参数前面添加路径分隔符
console.log(path.resolve('a', '/b')) // D:\b
console.log(path.resolve('/a', '/b')) // D:\b
console.log(path.resolve('/a', 'b')) // D:\a\b
console.log(path.resolve('/a', '../b')) // D:\b
// 正常用法
console.log(path.resolve('index.html')) // D:\workspace\notes\index.htmlbuffer
基本概念
Buffer 是 node.js 中除 process 之外,另外一个非常重要的全局变量,通常我们称之为 Buffer 缓冲区。
Buffer 可以让 JavaScript 操作二进制数据。
JavaScript 语言起初服务于浏览器平台, Node.js 的出现让我们可以在服务端直接使用 js 进行编程。
我们可以采用 JavaScript 实现 IO 操作,例如文件读写,网络服务中数据传输,在这个过程中我们就使用到了 Buffer。
对于计算机来说,最终都是处理二进制数据,即 IO 行为操作的就是二进制数据。
Stream 流操作并非 node.js 独创的概念,可以用于存储数据,分段处理。当我们进行大数据传输时,就可以使用流操作,这样就可以避免因为操作数据内存过大,出现将内存短时间内占满的情况。
当我们使用流操作配置管道技术,就可以将流中的数据,一段一段的传给下一个端,这样就可以完成大数据传输。例如,当我们观看在线视频时,都是边下载边看的过程。
流操作配合管道可以实现数据分段传输。
数据的端到端传输会有生产者和消费者,中间可以使用流和管道进行数据连接。当进行数据传输时,总会存在等待的过程,等待时的数据就可以存放在 Buffer 中。
在 node.js 中Buffer 就是一片内存空间,Buffer 属于 V8 之外的空间,不占据 V8 堆内存大小。
Buffer 的内存申请不是由 node 来完成的,在使用它的空间分配可以由我们的 js 代码来控制。因此在空间回收时,它还是由 V8 的 GC 进行数据的管理和回收。
特性
- 无须 require, Buffer 是全局变量;
- 实现
node.js平台下的二进制数据操作; - 不占据 V8 堆内存大小,直接由 C++ 进行内存分配;
- 内存使用由 Node 来控制,由 V8 的
GC回收; - 一般匹配 Stream 流来使用,充当数据缓存区(例如文件读写操作)。
创建 Buffer
创建 Buffer 实例:
alloc:创建指定字节大小的 bufferallocUnsafe:创建指定字节大小的 buffer(不安全)form:接收数据,创建 buffer
Node.js v6 版本之前我们可以通过 new 操作实例化 buffer 对象,但是这种操作由于给对象实例权限太大,后续在高版本的 Node.js 进行处理,并不建议直接对 Buffer 进行实例化操作。
alloc
const b1 = Buffer.alloc(10)
// 16 进制数据
console.log(b1) // <Buffer 00 00 00 00 00 00 00 00 00 00>

const b2 = Buffer.allocUnsafe(10)
// 可能存在未回收的空间用来创建新空间
console.log(b2) // <Buffer 08 00 00 00 00 00 00 00 00 00>
const b1 = Buffer.alloc(10)
// 16 进制数据
console.log(b1) // <Buffer 00 00 00 00 00 00 00 00 00 00>
const b2 = Buffer.allocUnsafe(10)
// 可能存在未回收的空间用来创建新空间
console.log(b2) // <Buffer 08 00 00 00 00 00 00 00 00 00>from
// 第一个参数可以接收三种类型,分别是字符串类型、数组类型、或者 buffer 类型
// 第二个参数是字符编码,默认是 utf-8
const b1 = Buffer.from('1')
console.log(b1) // <Buffer 31>

const b2 = Buffer.from('中')
console.log(b2) // <Buffer e4 b8 ad>
console.log(b2.toString()) // 中

const b3 = Buffer.from([1, 2, 3])
console.log(b3) // <Buffer 01 02 03>

const b4 = Buffer.from([1, 2, '中'], 'utf-8')
// 对于数组类型,如果我们想要使用中文,需要事先把中文转成十六进制数字
console.log(b4) // <Buffer 01 02 00>

const b5 = Buffer.from([0xe4, 0xb8, 0xad], 'utf-8')
// 对于数组类型,如果我们想要使用中文,需要事先把中文转成十六进制数字
console.log(b5) //<Buffer e4 b8 ad>
console.log(b5.toString()) // 中

const b6 = Buffer.from([0x60, 0b1001, 12])
console.log(b6) // <Buffer 60 09 0c>
console.log(b6.toString()) // `

const b7 = Buffer.alloc(3)
const b8 = Buffer.from(b7)
console.log(b7) // <Buffer 00 00 00>
console.log(b8) // <Buffer 00 00 00>

b7[0] = 1
// from 使用 buffer 类型,并不是共享空间,而是利用原有长度创建新空间
console.log(b7) // <Buffer 01 00 00>
console.log(b8) // <Buffer 00 00 00>
// 第一个参数可以接收三种类型,分别是字符串类型、数组类型、或者 buffer 类型
// 第二个参数是字符编码,默认是 utf-8
const b1 = Buffer.from('1')
console.log(b1) // <Buffer 31>
const b2 = Buffer.from('中')
console.log(b2) // <Buffer e4 b8 ad>
console.log(b2.toString()) // 中
const b3 = Buffer.from([1, 2, 3])
console.log(b3) // <Buffer 01 02 03>
const b4 = Buffer.from([1, 2, '中'], 'utf-8')
// 对于数组类型,如果我们想要使用中文,需要事先把中文转成十六进制数字
console.log(b4) // <Buffer 01 02 00>
const b5 = Buffer.from([0xe4, 0xb8, 0xad], 'utf-8')
// 对于数组类型,如果我们想要使用中文,需要事先把中文转成十六进制数字
console.log(b5) //<Buffer e4 b8 ad>
console.log(b5.toString()) // 中
const b6 = Buffer.from([0x60, 0b1001, 12])
console.log(b6) // <Buffer 60 09 0c>
console.log(b6.toString()) // `
const b7 = Buffer.alloc(3)
const b8 = Buffer.from(b7)
console.log(b7) // <Buffer 00 00 00>
console.log(b8) // <Buffer 00 00 00>
b7[0] = 1
// from 使用 buffer 类型,并不是共享空间,而是利用原有长度创建新空间
console.log(b7) // <Buffer 01 00 00>
console.log(b8) // <Buffer 00 00 00>Buffer 实例方法
fill:使用数据填充 bufferwrite:向 buffer 中写入数据toString:从 buffer 中提取数据slice:截取 bufferindexOf:在 buffer 中查找数据copy:拷贝 buffer 中的数据
fill
const buffer = Buffer.alloc(6)

// 将给定数据填充到 buffer 中
// 如果给定数据不能全部填充,这时会将数据反复填充
buffer.fill('123')

console.log(buffer) // <Buffer 31 32 33 31 32 33>
console.log(buffer.toString()) // 123123
const buffer = Buffer.alloc(6)
// 将给定数据填充到 buffer 中
// 如果给定数据不能全部填充,这时会将数据反复填充
buffer.fill('123')
console.log(buffer) // <Buffer 31 32 33 31 32 33>
console.log(buffer.toString()) // 123123const buffer = Buffer.alloc(6)
// 如果填充数据超出最大长度,会截断
buffer.fill('123456789')
console.log(buffer) // <Buffer 31 32 33 34 35 36>
console.log(buffer.toString()) // 123const buffer = Buffer.alloc(6)
// 如果填充数据超出最大长度,会截断
buffer.fill('123456789')
console.log(buffer) // <Buffer 31 32 33 34 35 36>
console.log(buffer.toString()) // 123const buffer = Buffer.alloc(6)
// fill 第二个参数代表起始位置
buffer.fill('123', 1)
console.log(buffer) // <Buffer 00 31 32 33 31 32>
console.log(buffer.toString()) // 12312const buffer = Buffer.alloc(6)
// fill 第二个参数代表起始位置
buffer.fill('123', 1)
console.log(buffer) // <Buffer 00 31 32 33 31 32>
console.log(buffer.toString()) // 12312const buffer = Buffer.alloc(6)
// fill 第三个参数代表结束位置
buffer.fill('123', 1, 3)
console.log(buffer) // <Buffer 00 31 32 00 00 00>
console.log(buffer.toString()) // 12const buffer = Buffer.alloc(6)
// fill 第三个参数代表结束位置
buffer.fill('123', 1, 3)
console.log(buffer) // <Buffer 00 31 32 00 00 00>
console.log(buffer.toString()) // 12const buffer = Buffer.alloc(6)
// 7b (16 进制)
buffer.fill(123)
console.log(buffer) // <Buffer 7b 7b 7b 7b 7b 7b>
console.log(buffer.toString()) // {{{{{{const buffer = Buffer.alloc(6)
// 7b (16 进制)
buffer.fill(123)
console.log(buffer) // <Buffer 7b 7b 7b 7b 7b 7b>
console.log(buffer.toString()) // {{{{{{write
const buffer = Buffer.alloc(6)

// 和 fill 不同点在于不会重复写入数据
buffer.write('123')

console.log(buffer) // <Buffer 31 32 33 00 00 00>
console.log(buffer.toString()) // 123
const buffer = Buffer.alloc(6)
// 和 fill 不同点在于不会重复写入数据
buffer.write('123')
console.log(buffer) // <Buffer 31 32 33 00 00 00>
console.log(buffer.toString()) // 123const buffer = Buffer.alloc(6)
// 第二个参数代表从 buffer 哪个位置开始写入
// 第三个参数代表当前要写入的长度
buffer.write('123', 1, 2)
console.log(buffer) // <Buffer 00 31 32 00 00 00>
console.log(buffer.toString()) // 12const buffer = Buffer.alloc(6)
// 第二个参数代表从 buffer 哪个位置开始写入
// 第三个参数代表当前要写入的长度
buffer.write('123', 1, 2)
console.log(buffer) // <Buffer 00 31 32 00 00 00>
console.log(buffer.toString()) // 12toString
以我们指定的编码格式从 buffer 中提取相应的数据。
const buffer = Buffer.from('月落')

console.log(buffer) // <Buffer e6 9c 88 e8 90 bd>
console.log(buffer.toString()) // 月落
const buffer = Buffer.from('月落')
console.log(buffer) // <Buffer e6 9c 88 e8 90 bd>
console.log(buffer.toString()) // 月落const buffer = Buffer.from('月落')
console.log(buffer) // <Buffer e6 9c 88 e8 90 bd>
console.log(buffer.toString('utf-8')) // 月落const buffer = Buffer.from('月落')
console.log(buffer) // <Buffer e6 9c 88 e8 90 bd>
console.log(buffer.toString('utf-8')) // 月落const buffer = Buffer.from('月落')
console.log(buffer) // <Buffer e6 9c 88 e8 90 bd>
// utf-8 编码值,一个汉字三个子节
console.log(buffer.toString('utf-8', 3)) // 落const buffer = Buffer.from('月落')
console.log(buffer) // <Buffer e6 9c 88 e8 90 bd>
// utf-8 编码值,一个汉字三个子节
console.log(buffer.toString('utf-8', 3)) // 落const buffer = Buffer.from('月落')
console.log(buffer) // <Buffer e6 9c 88 e8 90 bd>
console.log(buffer.toString('utf-8', 3, 9)) // 落const buffer = Buffer.from('月落')
console.log(buffer) // <Buffer e6 9c 88 e8 90 bd>
console.log(buffer.toString('utf-8', 3, 9)) // 落slice
可以传入起始位置和结束位置,支持正数和负数。
const buffer1 = Buffer.from('月落')
console.log(buffer1) // <Buffer e6 9c 88 e8 90 bd>
console.log(buffer1.toString()) // 月落

const buffer2 = buffer1.slice()
console.log(buffer2) // <Buffer e6 9c 88 e8 90 bd>
console.log(buffer2.toString()) // 月落

const buffer3 = buffer1.slice(3)
console.log(buffer3) // <Buffer e8 90 bd>
console.log(buffer3.toString()) // 落

const buffer4 = buffer1.slice(-6)
console.log(buffer4) // <Buffer e6 9c 88 e8 90 bd>
console.log(buffer4.toString()) // 月落
const buffer1 = Buffer.from('月落')
console.log(buffer1) // <Buffer e6 9c 88 e8 90 bd>
console.log(buffer1.toString()) // 月落
const buffer2 = buffer1.slice()
console.log(buffer2) // <Buffer e6 9c 88 e8 90 bd>
console.log(buffer2.toString()) // 月落
const buffer3 = buffer1.slice(3)
console.log(buffer3) // <Buffer e8 90 bd>
console.log(buffer3.toString()) // 落
const buffer4 = buffer1.slice(-6)
console.log(buffer4) // <Buffer e6 9c 88 e8 90 bd>
console.log(buffer4.toString()) // 月落indexOf
在 buffer 中查找目标数据。
const buffer = Buffer.from('月落月落月落')
console.log(buffer) // <Buffer e6 9c 88 e8 90 bd e6 9c 88 e8 90 bd e6 9c 88 e8 90 bd>
console.log(buffer.toString()) // 月落月落月落

console.log(buffer.indexOf('月')) // 0
console.log(buffer.indexOf('月', 3)) // 6

console.log(buffer.indexOf('月H', 3)) // -1
const buffer = Buffer.from('月落月落月落')
console.log(buffer) // <Buffer e6 9c 88 e8 90 bd e6 9c 88 e8 90 bd e6 9c 88 e8 90 bd>
console.log(buffer.toString()) // 月落月落月落
console.log(buffer.indexOf('月')) // 0
console.log(buffer.indexOf('月', 3)) // 6
console.log(buffer.indexOf('月H', 3)) // -1copy
拷贝 buffer 数据。
const buffer1 = Buffer.from('月落')
const buffer2 = Buffer.alloc(6)

// 将 buufer1 的数据拷贝到 buffer2 中
buffer1.copy(buffer2)

console.log(buffer1.toString()) // 月落
console.log(buffer2.toString()) // 月落
const buffer1 = Buffer.from('月落')
const buffer2 = Buffer.alloc(6)
// 将 buufer1 的数据拷贝到 buffer2 中
buffer1.copy(buffer2)
console.log(buffer1.toString()) // 月落
console.log(buffer2.toString()) // 月落const buffer1 = Buffer.from('月落')
const buffer2 = Buffer.alloc(6)
// 第二个参数代表需要填充的起始位置
buffer1.copy(buffer2, 3)
console.log(buffer1.toString()) // 月落
console.log(buffer2.toString()) // 月const buffer1 = Buffer.from('月落')
const buffer2 = Buffer.alloc(6)
// 第二个参数代表需要填充的起始位置
buffer1.copy(buffer2, 3)
console.log(buffer1.toString()) // 月落
console.log(buffer2.toString()) // 月const buffer1 = Buffer.from('月落')
const buffer2 = Buffer.alloc(6)
// 第三个参数代表原数据的开始读取位置
buffer1.copy(buffer2, 3, 3)
console.log(buffer1.toString()) // 月落
console.log(buffer2.toString()) // 落const buffer1 = Buffer.from('月落')
const buffer2 = Buffer.alloc(6)
// 第三个参数代表原数据的开始读取位置
buffer1.copy(buffer2, 3, 3)
console.log(buffer1.toString()) // 月落
console.log(buffer2.toString()) // 落const buffer1 = Buffer.from('月落')
const buffer2 = Buffer.alloc(6)
// 第四个参数代表原数据的结束读取位置
buffer1.copy(buffer2, 3, 3, 6)
console.log(buffer1.toString()) // 月落
console.log(buffer2.toString()) // 落const buffer1 = Buffer.from('月落')
const buffer2 = Buffer.alloc(6)
// 第四个参数代表原数据的结束读取位置
buffer1.copy(buffer2, 3, 3, 6)
console.log(buffer1.toString()) // 月落
console.log(buffer2.toString()) // 落const buffer1 = Buffer.from('月落月落')
const buffer2 = Buffer.alloc(9)
// 第四个参数代表原数据的结束读取位置
buffer1.copy(buffer2, 3, 3, 9)
console.log(buffer1.toString()) // 月落月落
console.log(buffer2.toString()) // 落月const buffer1 = Buffer.from('月落月落')
const buffer2 = Buffer.alloc(9)
// 第四个参数代表原数据的结束读取位置
buffer1.copy(buffer2, 3, 3, 9)
console.log(buffer1.toString()) // 月落月落
console.log(buffer2.toString()) // 落月Buffer 静态方法
concat:将多个 buffer 拼接成一个新的 bufferisBuffer:判断当前数据是否为 buffer
concat
const buffer1 = Buffer.from('月落')
const buffer2 = Buffer.from(' heora')

const buffer3 = Buffer.concat([buffer1, buffer2])

console.log(buffer3) // <Buffer e6 9c 88 e8 90 bd 20 68 65 6f 72 61>
console.log(buffer3.toString()) // 月落 heora
const buffer1 = Buffer.from('月落')
const buffer2 = Buffer.from(' heora')
const buffer3 = Buffer.concat([buffer1, buffer2])
console.log(buffer3) // <Buffer e6 9c 88 e8 90 bd 20 68 65 6f 72 61>
console.log(buffer3.toString()) // 月落 heoraconst buffer1 = Buffer.from('月落')
const buffer2 = Buffer.from(' heora')
// 可以使用第二个参数限制 buffer 长度
const buffer3 = Buffer.concat([buffer1, buffer2], 9)
console.log(buffer3) // <Buffer e6 9c 88 e8 90 bd 20 68 65>
console.log(buffer3.toString()) // 月落 heconst buffer1 = Buffer.from('月落')
const buffer2 = Buffer.from(' heora')
// 可以使用第二个参数限制 buffer 长度
const buffer3 = Buffer.concat([buffer1, buffer2], 9)
console.log(buffer3) // <Buffer e6 9c 88 e8 90 bd 20 68 65>
console.log(buffer3.toString()) // 月落 heisBuffer
const buffer1 = Buffer.alloc(3)
console.log(Buffer.isBuffer(buffer1)) // true

const buffer2 = 3
console.log(Buffer.isBuffer(buffer2)) // false
const buffer1 = Buffer.alloc(3)
console.log(Buffer.isBuffer(buffer1)) // true
const buffer2 = 3
console.log(Buffer.isBuffer(buffer2)) // falseBuffer 拆分 - 自定义 split
Buffer 的长度是固定的,当 Buffer 创建后,长度是无法被修改的。
Buffer.prototype.split = function (sep) {
  const len = Buffer.from(sep).length
  const ans = []

  let start = 0
  let offset = 0

  while ((offset = this.indexOf(sep, start)) !== -1) {
    ans.push(this.slice(start, offset))
    start = offset + len
  }

  ans.push(this.slice(start))

  return ans
}Buffer.prototype.split = function (sep) {
const len = Buffer.from(sep).length
const ans = []
let start = 0
let offset = 0
while ((offset = this.indexOf(sep, start)) !== -1) {
ans.push(this.slice(start, offset))
start = offset + len
}
ans.push(this.slice(start))
return ans
}const buffer = Buffer.from('月落爱学习爱工作爱骑行爱健身爱')
const bufferArr = buffer.split('爱')
console.log(bufferArr)
// [
// <Buffer e6 9c 88 e8 90 bd>,
// <Buffer e5 ad a6 e4 b9 a0>,
// <Buffer e5 b7 a5 e4 bd 9c>,
// <Buffer e9 aa 91 e8 a1 8c>,
// <Buffer e5 81 a5 e8 ba ab>,
// <Buffer >
// ]
console.log(bufferArr.map(buf => buf.toString())) // [ '月落', '学习', '工作', '骑行', '健身', '' ]const buffer = Buffer.from('月落爱学习爱工作爱骑行爱健身爱')
const bufferArr = buffer.split('爱')
console.log(bufferArr)
// [
// <Buffer e6 9c 88 e8 90 bd>,
// <Buffer e5 ad a6 e4 b9 a0>,
// <Buffer e5 b7 a5 e4 bd 9c>,
// <Buffer e9 aa 91 e8 a1 8c>,
// <Buffer e5 81 a5 e8 ba ab>,
// <Buffer >
// ]
console.log(bufferArr.map(buf => buf.toString())) // [ '月落', '学习', '工作', '骑行', '健身', '' ]fs
基本概念
Node.js 中存在 Buffer 和 Stream 两个非常重要的概念,一个缓冲区,一个是数据流。
Buffer、Stream、FS 关系:
- Buffer 和 Stream 操作的是二进制数据。
- FS 是内置核心模块,提供文件系统操作的 API。 如果我们想要操作文件中的二进制数据,就需要使用 FS 提供的 API。
模块结构
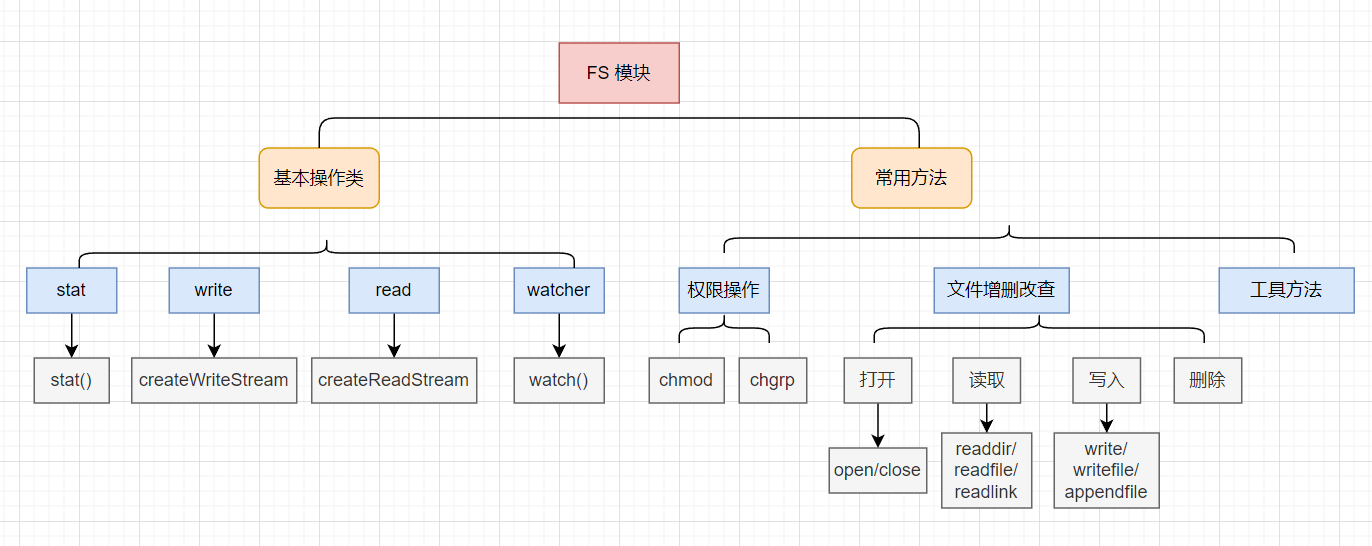
前置知识
权限位
用户对于文件所具备的操作权限。
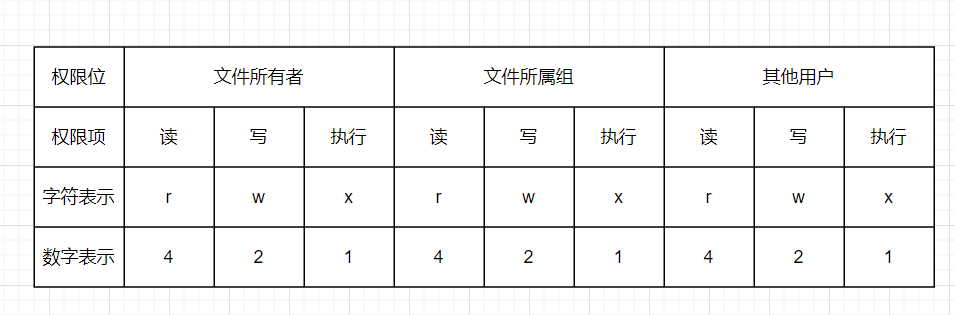
上图代表满级权限 777。
标识位
Node.js 中 flag 表示对文件的操作方式。
- r:表示可读
- w:表示可写
- s:表示同步
- +:表示执行相反操作
- x:表示排它操作
- a:表示追加操作
文件操作符
fd 即操作系统分配给被打开文件的标识。
文件操作
常用 API
Node.js 中 fs 任意 API 都有同步和异步两种操作方式。
- readFile:从指定文件中读取数据
- writeFile:向指定文件中写入数据
- appendFile:以追加的方式向指定文件中写入数据
- copyFile:将某个文件中的数据拷贝至另一文件
- watchFile:对指定文件进行监控
const path = require('path')
const fs = require('fs')

const data_path = path.resolve(__dirname, 'data.txt')

// readFile 读取文件
fs.readFile(data_path, 'utf8', (err, data) => {
  if (!err) {
    console.log(data)
  }
})

// writeFile
// 1. 默认使用覆盖写操作
// 2. 如果路径不存在,会执行创建操作
fs.writeFile(
  data_path,
  'hell node.js',
  {
    mode: 438,
    flag: 'r+',
    encoding: 'utf-8'
  },
  err => {
    if (!err) {
      console.log('write success')
    }
  }
)

// appendFile 追加写入操作
fs.appendFile(data_path, ' yueluo', err => {
  if (!err) {
    console.log('append success')
  }
})

// copyFile 拷贝文件
fs.copyFile(data_path, path.resolve(__dirname, 'test.txt'), () => {
  console.log('copy succes')
})

// watchFile 对目标文件进行监控
fs.watchFile(
  data_path,
  {
    interval: 300 // 每 300 ms 检测一次
  },
  (curr, prev) => {
    if (curr.mtime !== prev.mtime) {
      console.log('data.txt has been modified')

      // 取消文件监控
      fs.unwatchFile(data_path)
    }
  }
)
const path = require('path')
const fs = require('fs')
const data_path = path.resolve(__dirname, 'data.txt')
// readFile 读取文件
fs.readFile(data_path, 'utf8', (err, data) => {
if (!err) {
console.log(data)
}
})
// writeFile
// 1. 默认使用覆盖写操作
// 2. 如果路径不存在,会执行创建操作
fs.writeFile(
data_path,
'hell node.js',
{
mode: 438,
flag: 'r+',
encoding: 'utf-8'
},
err => {
if (!err) {
console.log('write success')
}
}
)
// appendFile 追加写入操作
fs.appendFile(data_path, ' yueluo', err => {
if (!err) {
console.log('append success')
}
})
// copyFile 拷贝文件
fs.copyFile(data_path, path.resolve(__dirname, 'test.txt'), () => {
console.log('copy succes')
})
// watchFile 对目标文件进行监控
fs.watchFile(
data_path,
{
interval: 300 // 每 300 ms 检测一次
},
(curr, prev) => {
if (curr.mtime !== prev.mtime) {
console.log('data.txt has been modified')
// 取消文件监控
fs.unwatchFile(data_path)
}
}
)文件打开与关闭
readFile、writeFile 都是将文件中内容一次性全部读取或者写入到内存中,这种方式对于大体积的文件来讲是不合理的。
因此我们需要一种边读边写或者编写边读的操作方式。
我们需要将文件打开,写入,关闭看作是独立的环节,这也是我们为什么要使用 open 和 close。
const fs = require('fs')
const path = require('path')

const data_path = path.resolve('data.txt')

// open 打开文件
fs.open(data_path, 'r', (err, fd) => {
  console.log(fd)
})

fs.open(data_path, 'r', (err, fd) => {
  console.log(fd)

  // close 关闭文件
  fs.close(fd, err => {
    if (!err) {
      console.log('close sucess')
    }
  })
})
const fs = require('fs')
const path = require('path')
const data_path = path.resolve('data.txt')
// open 打开文件
fs.open(data_path, 'r', (err, fd) => {
console.log(fd)
})
fs.open(data_path, 'r', (err, fd) => {
console.log(fd)
// close 关闭文件
fs.close(fd, err => {
if (!err) {
console.log('close sucess')
}
})
})大文件读写操作
const fs = require('fs')
const path = require('path')

const data_path = path.resolve('data.txt')

{
  const buffer = Buffer.alloc(10)

  // read 读操作就是将数据从磁盘文件写入到 buffer 中
  fs.open(data_path, 'r', (err, fd) => {
    // fd: 定位当前被打开的文件
    // buffer:用于表示当前缓冲区
    // offset:偏移量,表示从 buffer 的哪一个位置开启写入
    // length:长度,表示当前次写入的长度
    // position:表示当前从文件哪个位置开始读取
    fs.read(fd, buffer, 1, 3, 0, (err, readBytes, data) => {
      console.log(readBytes) // 3
      console.log(data) // <Buffer 00 31 32 33 00 00 00 00 00 00>
      console.log(data.toString()) // 123

      // close
      fs.close(fd)
    })

    console.log('----------------------------------')
  })
}

{
  // write 将缓存区内容写入到磁盘文件中
  const buffer = Buffer.from('10987654321')

  fs.open(path.resolve('test.txt'), 'w', (err, fd) => {
    // fd: 定位当前被打开的文件
    // buffer:用于表示当前缓冲区
    // offset:偏移量,表示从 buffer 的哪一个位置开始取数据
    // length:长度,表示当前次写入的长度
    // position:表示当前从文件哪个位置开始执行写操作
    fs.write(fd, buffer, 0, 4, 0, (err, written, buffer) => {
      // 实际写入字节数
      console.log(written)
      // buffer 仅代表文件实际内容
      console.log(buffer)
      console.log(buffer.toString())

      // close
      fs.close(fd)
    })
  })
}
const fs = require('fs')
const path = require('path')
const data_path = path.resolve('data.txt')
{
const buffer = Buffer.alloc(10)
// read 读操作就是将数据从磁盘文件写入到 buffer 中
fs.open(data_path, 'r', (err, fd) => {
// fd: 定位当前被打开的文件
// buffer:用于表示当前缓冲区
// offset:偏移量,表示从 buffer 的哪一个位置开启写入
// length:长度,表示当前次写入的长度
// position:表示当前从文件哪个位置开始读取
fs.read(fd, buffer, 1, 3, 0, (err, readBytes, data) => {
console.log(readBytes) // 3
console.log(data) // <Buffer 00 31 32 33 00 00 00 00 00 00>
console.log(data.toString()) // 123
// close
fs.close(fd)
})
console.log('----------------------------------')
})
}
{
// write 将缓存区内容写入到磁盘文件中
const buffer = Buffer.from('10987654321')
fs.open(path.resolve('test.txt'), 'w', (err, fd) => {
// fd: 定位当前被打开的文件
// buffer:用于表示当前缓冲区
// offset:偏移量,表示从 buffer 的哪一个位置开始取数据
// length:长度,表示当前次写入的长度
// position:表示当前从文件哪个位置开始执行写操作
fs.write(fd, buffer, 0, 4, 0, (err, written, buffer) => {
// 实际写入字节数
console.log(written)
// buffer 仅代表文件实际内容
console.log(buffer)
console.log(buffer.toString())
// close
fs.close(fd)
})
})
}文件拷贝自定义实现
Node.js 已经提供 copyFile API,不过这个 API 是基于 writeFile 和 readFile 的一次性读写操作,针对大体积文件是不合适的。
简单案例
const fs = require('fs')
const path = require('path')

const data_file = path.resolve(__dirname, 'a.txt')
const dest_file = path.resolve(__dirname, 'b.txt')

const buffer = Buffer.alloc(10)

// 1. 打开指定文件,读取内容
fs.open(data_file, 'r', (err, rfd) => {
  // 2. 打开目标文件,用于执行数据写入操作
  fs.open(dest_file, 'w', (err, wfd) => {
    // 3. 从打开文件中读取数据
    fs.read(rfd, buffer, 0, 10, 0, (err, readBytes) => {
      // 4. 将 buffer 中数据写入到目标文件中
      fs.write(wfd, buffer, 0, 10, 0, (err, wriiten) => {
        console.log('write success')
      })
    })
  })
})
const fs = require('fs')
const path = require('path')
const data_file = path.resolve(__dirname, 'a.txt')
const dest_file = path.resolve(__dirname, 'b.txt')
const buffer = Buffer.alloc(10)
// 1. 打开指定文件,读取内容
fs.open(data_file, 'r', (err, rfd) => {
// 2. 打开目标文件,用于执行数据写入操作
fs.open(dest_file, 'w', (err, wfd) => {
// 3. 从打开文件中读取数据
fs.read(rfd, buffer, 0, 10, 0, (err, readBytes) => {
// 4. 将 buffer 中数据写入到目标文件中
fs.write(wfd, buffer, 0, 10, 0, (err, wriiten) => {
console.log('write success')
})
})
})
})代码封装
// 文件拷贝
function copyFile(origin, target, size) {
  const buffer = Buffer.alloc(size)

  let readOffset = 0

  fs.open(origin, 'r', (err, rfd) => {
    fs.open(target, 'w', (err, wfd) => {
      const next = () => {
        fs.read(rfd, buffer, 0, size, readOffset, (err, readBytes) => {
          if (!readBytes) {
            fs.close(rfd, () => {})
            fs.close(wfd, () => {})
            console.log('copy success')
            return
          }

          readOffset += readBytes

          fs.write(wfd, buffer, 0, readBytes, (err, wriiten) => {
            next()
          })
        })
      }
      next()
    })
  })
}

copyFile(data_file, dest_file, 20)
// 文件拷贝
function copyFile(origin, target, size) {
const buffer = Buffer.alloc(size)
let readOffset = 0
fs.open(origin, 'r', (err, rfd) => {
fs.open(target, 'w', (err, wfd) => {
const next = () => {
fs.read(rfd, buffer, 0, size, readOffset, (err, readBytes) => {
if (!readBytes) {
fs.close(rfd, () => {})
fs.close(wfd, () => {})
console.log('copy success')
return
}
readOffset += readBytes
fs.write(wfd, buffer, 0, readBytes, (err, wriiten) => {
next()
})
})
}
next()
})
})
}
copyFile(data_file, dest_file, 20)除了这种方式,我们还可以通过流的方式去操作大文件。
目录操作
常用 API
- access:判断文件或目录是否具有操作权限
- stat:获取目录及文件信息
- mkdir:创建目录
- rmdir:删除目录
- readdir:读取目录中内容
- unlink:删除指定文件
const fs = require('fs')
const path = require('path')

const data_path = path.resolve(__dirname, 'data.txt')

// 1. access
fs.access(data_path, err => {
  if (err) {
    console.log(err)
    return
  }

  console.log('有操作权限')
})

// 2. stat
fs.stat(data_path, (err, statObj) => {
  console.log(statObj.size)
  console.log(statObj.isFile())
  console.log(statObj.isDirectory())
})

// 3. mkdir
// 默认情况下只能创建最后一级路径
fs.mkdir(path.resolve(__dirname, 'a/b/c'), { recursive: true }, err => {
  if (err) {
    console.log(err)
    return
  }

  console.log('mkdir success')
})

// 4. rmdir
// 默认情况下只能删除非空目录,且只删除最后一级目录
fs.rmdir(path.resolve(__dirname, 'a/b/c'), { recursive: true }, err => {
  if (err) {
    console.log(err)
    return
  }

  console.log('remove dir success')
})

// 5. readdir
fs.readdir(path.resolve(__dirname, 'test'), (err, files) => {
  if (err) {
    console.log(err)
    return
  }

  console.log(files)
})

// 6. unlink
fs.unlink(path.resolve(__dirname, 'test/data.txt'), err => {
  if (err) {
    console.log(err)
    return
  }

  console.log('unlink success')
})
const fs = require('fs')
const path = require('path')
const data_path = path.resolve(__dirname, 'data.txt')
// 1. access
fs.access(data_path, err => {
if (err) {
console.log(err)
return
}
console.log('有操作权限')
})
// 2. stat
fs.stat(data_path, (err, statObj) => {
console.log(statObj.size)
console.log(statObj.isFile())
console.log(statObj.isDirectory())
})
// 3. mkdir
// 默认情况下只能创建最后一级路径
fs.mkdir(path.resolve(__dirname, 'a/b/c'), { recursive: true }, err => {
if (err) {
console.log(err)
return
}
console.log('mkdir success')
})
// 4. rmdir
// 默认情况下只能删除非空目录,且只删除最后一级目录
fs.rmdir(path.resolve(__dirname, 'a/b/c'), { recursive: true }, err => {
if (err) {
console.log(err)
return
}
console.log('remove dir success')
})
// 5. readdir
fs.readdir(path.resolve(__dirname, 'test'), (err, files) => {
if (err) {
console.log(err)
return
}
console.log(files)
})
// 6. unlink
fs.unlink(path.resolve(__dirname, 'test/data.txt'), err => {
if (err) {
console.log(err)
return
}
console.log('unlink success')
})创建目录
模拟 API 实现
同步方法
// 递归创建目录
// 1. 接收路径,对路径进行分隔
// 2. 对路径数组进行遍历
// 3. 判断拼接路径是否存在可操作权限
const makeDirSync = dir_path => {
  const items = dir_path.split(path.sep)

  for (let i = 1; i <= items.length; i++) {
    const dir = items.slice(0, i).join(path.sep)

    try {
      fs.accessSync(dir)
    } catch (error) {
      fs.mkdirSync(dir)
    }
  }
}

makeDirSync(path.normalize('a/b/c'))
// 递归创建目录
// 1. 接收路径,对路径进行分隔
// 2. 对路径数组进行遍历
// 3. 判断拼接路径是否存在可操作权限
const makeDirSync = dir_path => {
const items = dir_path.split(path.sep)
for (let i = 1; i <= items.length; i++) {
const dir = items.slice(0, i).join(path.sep)
try {
fs.accessSync(dir)
} catch (error) {
fs.mkdirSync(dir)
}
}
}
makeDirSync(path.normalize('a/b/c'))异步方法
// 异步处理 1

const makeDirAsync = (dir_path, cb) => {
  const items = dir_path.split(path.sep)

  let index = 1

  console.log(items.length, 1)

  const next = () => {
    if (index > items.length) return cb && cb()

    let current = items.slice(0, index++).join(path.sep)

    fs.access(current, err => {
      if (err) {
        fs.mkdir(current, next)
      } else {
        next()
      }
    })
  }

  next()
}

makeDirAsync('c/b/a', () => {
  console.log('create success')
})
// 异步处理 1
const makeDirAsync = (dir_path, cb) => {
const items = dir_path.split(path.sep)
let index = 1
console.log(items.length, 1)
const next = () => {
if (index > items.length) return cb && cb()
let current = items.slice(0, index++).join(path.sep)
fs.access(current, err => {
if (err) {
fs.mkdir(current, next)
} else {
next()
}
})
}
next()
}
makeDirAsync('c/b/a', () => {
console.log('create success')
})// 异步处理 2
const access = util.promisify(fs.access)
const mkdir = util.promisify(fs.mkdir)
const makeDirAsyncWithPromise = async (dir_path, cb) => {
const items = dir_path.split(path.sep)
for (let i = 1; i <= items.length; i++) {
const current = items.slice(0, i).join('/')
try {
await access(current)
} catch (error) {
await mkdir(current)
}
}
cb && cb()
}
makeDirAsyncWithPromise('b/c/d')// 异步处理 2
const access = util.promisify(fs.access)
const mkdir = util.promisify(fs.mkdir)
const makeDirAsyncWithPromise = async (dir_path, cb) => {
const items = dir_path.split(path.sep)
for (let i = 1; i <= items.length; i++) {
const current = items.slice(0, i).join('/')
try {
await access(current)
} catch (error) {
await mkdir(current)
}
}
cb && cb()
}
makeDirAsyncWithPromise('b/c/d')删除目录
模拟 API 实现
// 自定义函数,接收路径,执行删除操作
// 1. 判断当前传入的路径是否为一个文件,删除当前文件
// 2. 如果当前传入的是一个目录,需要继续读取目录中内容,然后再执行删除操作
// 3. 将删除行为定义为一个函数,递归方式进行复用
// 4. 将当前名称拼接成在删除时可使用的路径
const rmdirAsync = (dir_path, cb) => {
  fs.stat(dir_path, (err, statObj) => {
    if (statObj.isDirectory()) {
      fs.readdir(dir_path, (err, files) => {
        const dirs = files.map(item => path.join(dir_path, item))

        let index = 0

        function next() {
          if (index === dirs.length) return fs.rmdir(dir_path, cb)

          const current = dirs[index++]

          rmdirAsync(current, next)
        }

        next()
      })
    } else {
      // remove
      fs.unlink(dir_path, cb)
    }
  })
}
// 自定义函数,接收路径,执行删除操作
// 1. 判断当前传入的路径是否为一个文件,删除当前文件
// 2. 如果当前传入的是一个目录,需要继续读取目录中内容,然后再执行删除操作
// 3. 将删除行为定义为一个函数,递归方式进行复用
// 4. 将当前名称拼接成在删除时可使用的路径
const rmdirAsync = (dir_path, cb) => {
fs.stat(dir_path, (err, statObj) => {
if (statObj.isDirectory()) {
fs.readdir(dir_path, (err, files) => {
const dirs = files.map(item => path.join(dir_path, item))
let index = 0
function next() {
if (index === dirs.length) return fs.rmdir(dir_path, cb)
const current = dirs[index++]
rmdirAsync(current, next)
}
next()
})
} else {
// remove
fs.unlink(dir_path, cb)
}
})
}模块化相关
为什么需要模块化
传统开发常见问题
- 命名冲突和污染
- 代码冗余,无效请求多
- 文件间的依赖关系复杂
项目难以维护不方便复用。
模块与模块化
模块就是小而精且利于维护的代码片段。
模块化开发就是对这些代码片段进行组合使用,从而完成业务逻辑。
模块化历程
早期利用函数、对象、自执行函数实现分块。
模块化规范:
- CommonJS 规范
- 规定每个 js 文件都是一个模块,且每个模块都有自己的作用域
- 模块内部可以使用变量、函数、类等,都是内部私有,外部无法访问
- 提供
module.exports、exports方式导出变量,使用require进行加载 - Node.js 就是使用的 Commonjs 规范
- Commonjs 规范是一个超集,是语言层面上的规范,类似于 ECMAScript 规范
- 模块化规范只是其中一种,它还定义了 IO 流、二进制操作,或者 Buffer 规范等
- Commonjs 规范模块加载都是同步完成的,并不适用于浏览器,因此后面又出现 AMD 异步加载规范
- AMD
- 提供
define、require关键字 - 经典实现就是 RequireJS
- 提供
- CMD 规范
- 整合 CommonJS 和 AMD 特点,专门用来实现浏览器异步加载
- 最经典的就是 CJS
- ES Moudle 规范
- 15 年 TC39 发布,即 ESM
- 正式将模块化纳入到规范中,支持导入导出
模块化规范是前端走向工程化的一环。早期 JavaScript 语言层面并没有模块化规范。
最早都是由程序员自己利用函数、对象、自执行函数实现代码分块管理。
然后经过社区或者个人推动,产出 Commonjs,AMD,CMD,UMD 等模块化规范。分别有自己的特点和优势。
最后在 ES6 中将模块化纳入标准规范。当前常用规范就是 CommonJS 和 ES Module。
CommonJS 规范
not just for browsers any more!
Commonjs 规范主要应用于 Nodejs。它是语言层面上的规范,类似于 ECMAScript,模块化只是其中一部分。
模块化组成部分
- 模块引用
- 模块定义
- 模块标识
Node.js 与 CommnJS
- 任意一个文件都是模块,具有独立作用域
- 使用 require 导入其他模块
- 将模块 ID 传入 require 实现目标模块定位
module 属性
- 任意一个 js 文件都是一个模块,可以直接使用 module 属性
- id:返回模块标识符,一般是一个绝对路径
- filename:返回文件模块的绝对路径
- loaded:返回布尔值,表示模块是否完成加载
- parent:返回当前存放调用当前模块的模块
- children:返回数组,存放当前模块调用的其他模块
- exports:返回当前模块需要暴露的内容
- paths:返回数组,存放不同目录下的
node_modules位置- 分析 node.js 加载流程时可以用到
module.exports 与 exports
module.exports 和 exports 指向同一内存地址。
需要注意的是我们不能给 exports 重新赋值,这样会使引用丢失。
require 属性
- 基本功能是读入并且执行一个模块文件
- resolve:返回模块文件绝对路径
- extensions:依据不同后缀名执行解析操作
- main:返回主模块对象
总结
- CommonJS 规范起初是为了弥补 JS 语言模块化缺陷
- CommonJS 规范是语言层面的规范,主要应用于 Node.js
- CommonJS 规定模块化分为引入、定义、标识符三个部分
- Module 在任何模块中可以被直接使用,包含很多模块信息
- Require 接收标识符,用于加载目标模块
- Exports 与 module.exports 都可以导出模块数据,指向同一引用
- CommonJS 规范定义模块加载是同步行为,正因为这个特点,所以并不适用于浏览器环境
Node.js 与 CommonJS
- 使用 module.exports 与 require 实现模块导入与导出
- module 属性及其常见信息获取
- exports 导出数据及其与 module.exports 区别
- CommonJS 规范下的模块同步加载
// index.js

const obj = require('./m')

console.log(obj)
console.log('index.js process')
console.log(require.main === module) // true
// index.js
const obj = require('./m')
console.log(obj)
console.log('index.js process')
console.log(require.main === module) // true// m.js
const age = 24
const addFn = (x, y) => x + y
// module.exports = {
// age,
// addFn
// }
// 2. module
console.log(module)
// Module {
// id: '/usr/local/workspace/notes/node/core_module/_module/m.js',
// path: '/usr/local/workspace/notes/node/core_module/_module',
// exports: { age: 24, addFn: [Function: addFn] },
// filename: '/usr/local/workspace/notes/node/core_module/_module/m.js',
// loaded: false,
// children: [],
// paths: [
// '/usr/local/workspace/notes/node/core_module/_module/node_modules',
// '/usr/local/workspace/notes/node/core_module/node_modules',
// '/usr/local/workspace/notes/node/node_modules',
// '/usr/local/workspace/notes/node_modules',
// '/usr/local/workspace/node_modules',
// '/usr/local/node_modules',
// '/usr/node_modules',
// '/node_modules'
// ]
// }
// 3. exports
exports.age = age
exports.addFn = addFn
// 注意,不能能给 epxorts 直接赋值
// 这样赋值会导致 exports 和 module.exports 引用关系丢失
// exports = {
// age: 13,
// name: 'heora'
// }
// 4. 同步加载
const name = 'heora'
const time = new Date()
while (new Date() - time < 4000) {}
exports.name = name
console.log('m.js process')
// 5. 判断是否为主模块
console.log(require.main === module) // false// m.js
const age = 24
const addFn = (x, y) => x + y
// module.exports = {
// age,
// addFn
// }
// 2. module
console.log(module)
// Module {
// id: '/usr/local/workspace/notes/node/core_module/_module/m.js',
// path: '/usr/local/workspace/notes/node/core_module/_module',
// exports: { age: 24, addFn: [Function: addFn] },
// filename: '/usr/local/workspace/notes/node/core_module/_module/m.js',
// loaded: false,
// children: [],
// paths: [
// '/usr/local/workspace/notes/node/core_module/_module/node_modules',
// '/usr/local/workspace/notes/node/core_module/node_modules',
// '/usr/local/workspace/notes/node/node_modules',
// '/usr/local/workspace/notes/node_modules',
// '/usr/local/workspace/node_modules',
// '/usr/local/node_modules',
// '/usr/node_modules',
// '/node_modules'
// ]
// }
// 3. exports
exports.age = age
exports.addFn = addFn
// 注意,不能能给 epxorts 直接赋值
// 这样赋值会导致 exports 和 module.exports 引用关系丢失
// exports = {
// age: 13,
// name: 'heora'
// }
// 4. 同步加载
const name = 'heora'
const time = new Date()
while (new Date() - time < 4000) {}
exports.name = name
console.log('m.js process')
// 5. 判断是否为主模块
console.log(require.main === module) // false模块分类及加载流程
模块分类
- 内置模块
- 文件模块
加载速度
- 核心模块:Node 源码编译时写入到二进制文件中
- 文件模块:代码运行时,动态加载
加载流程
概述
- 路径分析:依据标识符确定模块位置
- 标识符
- 路径标识符
- 非路径标识符:常见于核心模块,例如 fs、path
- 标识符
- 文件定位:确定目标模块中具体文件及文件类型
- 项目下存在
m.js模块,导入时使用require("m")语法 - 查找顺序:
m.js=>m.json=>m.node - 如果没有找到上述文件,会将其作为一个包处理,查找 package.json 文件,使用 JSON.parse() 解析
- 查询 main 属性值,如果没有后缀,继续查找
main.js=>main.json=>main.node - 如果 main 属性值指定的文件在补足之后也不存在,node 会将 index 作为目标模块中的具体文件名称
- 首先在当前目录查找,如果没有找到,会向上级查找,如果没有找到,会抛出异常
- 项目下存在
- 编译执行:采用对应的方式完成文件的编译执行
- 将某个具体类型的文件按照相应的方式进行编译和执行
- 创建新对象,按路径载入,完成编译执行
编译执行
JS 文件编译执行
- 使用 fs 模块同步读入目标文件内容
- 对内容进行语法包装,生成可执行 JS 函数
- 调用函数时传入
exports、module、require等属性值
JSON 文件编译执行
- 将读取到的内容通过 JSON.parse() 进行解析
- 将解析结果返回给
exports对象即可
缓存优化原则
- 提高模块加载速度
- 优先查找缓存,当前模块不存在,需要经历一次完整加载流程
- 模块加载完成后,使用路径作为索引进行缓存
总结
- 路径分析:确定目标模块位置
- 文件定位:确定目标模块中的具体文件
- 编译执行:对模块内容进行编译,返回可用
exports对象
VM 模块使用
VM 模块是内置核心模块,在 NodeJS 中,底层 require 实现也用到了这个模块。
它可以创建独立运行的沙箱环境,我们可以通过 VM 模块加载其他模块并执行。
const fs = require('fs')
const vm = require('vm')

const content = fs.readFileSync('test.txt', 'utf-8')
const fs = require('fs')
const vm = require('vm')
const content = fs.readFileSync('test.txt', 'utf-8')// 1. evea
eval(content)
console.log(age)
// eval 可以执行字符串形式代码,但是如果当前文件中还存在另一个 age 变量,就会报错// 1. evea
eval(content)
console.log(age)
// eval 可以执行字符串形式代码,但是如果当前文件中还存在另一个 age 变量,就会报错// 2. new Function
const fn = new Function('age', 'return age + 1')
console.log(fn(age))
// 使用 new Function 也可以执行字符串形式的代码,但是操作比较繁琐// 2. new Function
const fn = new Function('age', 'return age + 1')
console.log(fn(age))
// 使用 new Function 也可以执行字符串形式的代码,但是操作比较繁琐// 3. vm
vm.runInThisContext(content)
console.log(age)
// 当我们使用 runInThisContext 方式运行代码时,函数内部环境和外部是隔离的
// 不能使用局部变量(const、let),可以使用全局变量
// 如果当前文件中存在 age 变量,不会产生冲突// 3. vm
vm.runInThisContext(content)
console.log(age)
// 当我们使用 runInThisContext 方式运行代码时,函数内部环境和外部是隔离的
// 不能使用局部变量(const、let),可以使用全局变量
// 如果当前文件中存在 age 变量,不会产生冲突模块加载模拟实现
以文件模块加载流程为例,梳理 NodeJS 模块加载流程 。
核心逻辑
- 路径分析
- 缓存优化
- 文件定位
- 编译执行
代码实现
const fs = require('fs')
const path = require('path')
const vm = require('vm')

function Module(id) {
  this.id = id
  this.exports = {}
}

Module._resolveFilename = function (filename) {
  const absPath = path.resolve(__dirname, filename)

  // 判断当前路径对应的内容是否存在
  if (fs.existsSync(absPath)) {
    // 如果条件成立,则说明 absPath 对应的内容是存在的
    return absPath
  }

  // 1. 源码中需要对文件进行 .js、.json、.node 补足然后判断,
  // 2. 如果补充完路径判断还不存在,会尝试将它当作目录,然后寻找 package.json 的 main 字段
  // 3. 如果 main 对应的文件也不存在,继续寻找 index,如果还不存在,会按照查找路径向上查找

  // 实际解析流程如上所述,这里仅处理文件的情况,尝试补全后缀进行读取
  const suffix = Object.keys(Module._extensions)

  for (let i = 0; i < suffix.length; i++) {
    const newPath = absPath + suffix[i]

    if (fs.existsSync(newPath)) {
      return newPath
    }
  }

  throw new Error(`${filename} is not exist`)
}

Module._extensions = {
  '.js'(module) {
    // 读取
    let content = fs.readFileSync(module.id, 'utf8')
    // 包装
    content = Module.wrapper[0] + content + Module.wrapper[1]

    // vm
    const compileFn = vm.runInThisContext(content)

    // 准备参数值
    let exports = module.exports
    let filename = module.id
    let dirname = path.dirname(module.id)

    // 调用函数
    compileFn.call(exports, exports, $require, module, filename, dirname)
  },
  '.json'(module) {
    module.exports = JSON.parse(fs.readFileSync(module.id, 'utf-8'))
  }
}

Module.wrapper = ['(function (exports, require, module, __filename, __dirname) {', '})']

Module._cache = {}

Module.prototype.load = function () {
  const extname = path.extname(this.id)

  Module._extensions[extname](this)
}

const $require = filename => {
  // 1. 处理路径
  const modulePath = Module._resolveFilename(filename)

  // 2. 缓存优先
  const cacheModule = Module._cache[modulePath]

  if (cacheModule) return cacheModule.exports

  // 3. 创建空对象加载目标模块
  const module = new Module(modulePath)

  // 4. 缓存已加载过的模块
  Module._cache[modulePath] = module

  // 5. 编译执行过程
  module.load()

  // 6. 返回数据
  return module.exports
}

console.log($require('./data'))
console.log($require('./data02'))
const fs = require('fs')
const path = require('path')
const vm = require('vm')
function Module(id) {
this.id = id
this.exports = {}
}
Module._resolveFilename = function (filename) {
const absPath = path.resolve(__dirname, filename)
// 判断当前路径对应的内容是否存在
if (fs.existsSync(absPath)) {
// 如果条件成立,则说明 absPath 对应的内容是存在的
return absPath
}
// 1. 源码中需要对文件进行 .js、.json、.node 补足然后判断,
// 2. 如果补充完路径判断还不存在,会尝试将它当作目录,然后寻找 package.json 的 main 字段
// 3. 如果 main 对应的文件也不存在,继续寻找 index,如果还不存在,会按照查找路径向上查找
// 实际解析流程如上所述,这里仅处理文件的情况,尝试补全后缀进行读取
const suffix = Object.keys(Module._extensions)
for (let i = 0; i < suffix.length; i++) {
const newPath = absPath + suffix[i]
if (fs.existsSync(newPath)) {
return newPath
}
}
throw new Error(`${filename} is not exist`)
}
Module._extensions = {
'.js'(module) {
// 读取
let content = fs.readFileSync(module.id, 'utf8')
// 包装
content = Module.wrapper[0] + content + Module.wrapper[1]
// vm
const compileFn = vm.runInThisContext(content)
// 准备参数值
let exports = module.exports
let filename = module.id
let dirname = path.dirname(module.id)
// 调用函数
compileFn.call(exports, exports, $require, module, filename, dirname)
},
'.json'(module) {
module.exports = JSON.parse(fs.readFileSync(module.id, 'utf-8'))
}
}
Module.wrapper = ['(function (exports, require, module, __filename, __dirname) {', '})']
Module._cache = {}
Module.prototype.load = function () {
const extname = path.extname(this.id)
Module._extensions[extname](this)
}
const $require = filename => {
// 1. 处理路径
const modulePath = Module._resolveFilename(filename)
// 2. 缓存优先
const cacheModule = Module._cache[modulePath]
if (cacheModule) return cacheModule.exports
// 3. 创建空对象加载目标模块
const module = new Module(modulePath)
// 4. 缓存已加载过的模块
Module._cache[modulePath] = module
// 5. 编译执行过程
module.load()
// 6. 返回数据
return module.exports
}
console.log($require('./data'))
console.log($require('./data02'))// data.js
const name = 'heora'
module.exports = name// data.js
const name = 'heora'
module.exports = name// data02.json
{
"name": "heora",
"age": 24
}// data02.json
{
"name": "heora",
"age": 24
}事件模块
Events 模块是 NodeJS 中非常重要的类,它有一个非常重要的类,即 EventEmitter。对于 NodeJS 来说,它通过 EventEmitter 类实现事件统一管理。
不过在实际开发,我们单独使用该模块的场景也不多,因为 NodeJS 本身就是基于事件驱动来实现异步操作。事件驱动底层的表现就是 EventEmitter 类。
很多核心模块本身就继承了这个类,所以它们也具备事件注册和发布的能力,使用的时候就无需单独引入 Event 模块。
events 与 EventEmitter
- node.js 是基于事件驱动的异步操作架构,内置 events 模块
- events 模块提供了 EventEmitter 类
- node.js 中很多内置核心模块继承自 EventEmitter 类,例如 fs、http 等
EventEmitter 常见 API
- on:添加事件被触发时调用的回调函数
- emit:触发事件,按照注册的顺序同步调用每个事件监听器
- once:添加事件被触发时调用的回调函数,只会执行一次
- off:移除指定监听器
const EventEmitter = require('events')

const event = new EventEmitter()

// on
event.on('event', () => {
  console.log('event trigger 1')
})
event.on('event', () => {
  console.log('event trigger 2')
})

// 相同事件触发多次,会执行多次
event.emit('event')
event.emit('event')

console.log('---------------------')

// once
event.once('event-one', () => {
  console.log('event one trigger 1')
})
event.once('event-one', () => {
  console.log('event one trigger 2')
})

// 相同事件触发多次,只会执行一次
event.emit('event-one')
event.emit('event-one')

console.log('---------------------')

const callback = (...args) => {
  console.log('event off trigger', args)
}

event.on('event-off', callback)

// 函数传参
event.emit('event-off', 1, 2)
// 取消订阅
event.off('event-off', callback)
event.emit('event-off')

console.log('---------------------')

// 使用 function 定义的函数可以正确接收到 this
event.on('test', function () {
  console.log('event test trigger', this)
})

event.emit('test')

console.log('---------------------')
const EventEmitter = require('events')
const event = new EventEmitter()
// on
event.on('event', () => {
console.log('event trigger 1')
})
event.on('event', () => {
console.log('event trigger 2')
})
// 相同事件触发多次,会执行多次
event.emit('event')
event.emit('event')
console.log('---------------------')
// once
event.once('event-one', () => {
console.log('event one trigger 1')
})
event.once('event-one', () => {
console.log('event one trigger 2')
})
// 相同事件触发多次,只会执行一次
event.emit('event-one')
event.emit('event-one')
console.log('---------------------')
const callback = (...args) => {
console.log('event off trigger', args)
}
event.on('event-off', callback)
// 函数传参
event.emit('event-off', 1, 2)
// 取消订阅
event.off('event-off', callback)
event.emit('event-off')
console.log('---------------------')
// 使用 function 定义的函数可以正确接收到 this
event.on('test', function () {
console.log('event test trigger', this)
})
event.emit('test')
console.log('---------------------')很多内置模块已经继承了 EventEmitter 模块,所以我们将来在使用相关模块实例对象时,可以直接调用上述提到的 API。
const fs = require('fs')

const crt = fs.createWriteStream()

crt.on('pipe', () => {})
const fs = require('fs')
const crt = fs.createWriteStream()
crt.on('pipe', () => {})内置模块通常已经预先定义了很多事件,所以我们可以通过事件驱动的方式来完成代码编写。
发布订阅模式
发布订阅模式定义对象间一对多的依赖关系,不同对象之间可以实现解耦。
发布订阅要素
- 缓存队列,存放订阅者信息
- 具有增加、删除订阅的能力
- 状态改变时通知所有订阅者执行监听
发布订阅与观察者模式
发布订阅存在调度中心,观察者不存在。
状态发生改变时,发布订阅无须主动通知,由调度中心决定订阅内容如何执行。
代码实现
class PubSub {
  constructor() {
    this._events = {}
  }

  subscribe(event, callback) {
    if (!this._events[event]) this._events[event] = []

    this._events[event].push(callback)
  }

  publish(event, ...args) {
    const items = this._events[event]

    Array.isArray(items) &&
      items.forEach(function (callback) {
        callback.call(this, ...args)
      })
  }
}

const ps = new PubSub()

ps.subscribe('event', () => {
  console.log('event trigger 01')
})
ps.subscribe('event', () => {
  console.log('event trigger 02')
})

ps.publish('event')
class PubSub {
constructor() {
this._events = {}
}
subscribe(event, callback) {
if (!this._events[event]) this._events[event] = []
this._events[event].push(callback)
}
publish(event, ...args) {
const items = this._events[event]
Array.isArray(items) &&
items.forEach(function (callback) {
callback.call(this, ...args)
})
}
}
const ps = new PubSub()
ps.subscribe('event', () => {
console.log('event trigger 01')
})
ps.subscribe('event', () => {
console.log('event trigger 02')
})
ps.publish('event')EventEmitter 模拟实现
function $Event() {
  this._events = Object.create(null)
}

$Event.prototype.on = function (type, callback) {
  if (!this._events[type]) this._events[type] = []
  this._events[type].push(callback)
}

$Event.prototype.emit = function (type, ...args) {
  if (this._events && Array.isArray(this._events[type])) {
    this._events[type].forEach(callback => {
      callback.call(this, ...args)
    })
  }
}

$Event.prototype.off = function (type, callback) {
  if (this._events && this._events[type]) {
    this._events[type] = this._events[type].filter(
      item => item !== callback && item.link != callback
    )
  }
}

$Event.prototype.once = function (type, callback) {
  const _callback = function (...args) {
    callback.call(this, ...args)
    this.off(type, _callback)
  }
  _callback.link = callback
  this.on(type, _callback)
}

console.log('---------------------------------------')

const ev = new $Event()

const fn = function (...args) {
  console.log(`event01 process ${args}`)
}

ev.on('event01', fn)
ev.on('event01', () => {
  console.log('event01 process')
})

ev.emit('event01', 1, 2)
ev.off('event01', fn)

ev.emit('event01', 1, 2)

console.log('---------------------------------------')

ev.once('event02', fn)
ev.emit('event02', 1, 2)
ev.emit('event02', 1, 2)

console.log('---------------------------------------')

ev.once('event03', fn)
ev.off('event03', fn)
ev.emit('event03', 1, 2)
ev.emit('event03', 1, 2)
function $Event() {
this._events = Object.create(null)
}
$Event.prototype.on = function (type, callback) {
if (!this._events[type]) this._events[type] = []
this._events[type].push(callback)
}
$Event.prototype.emit = function (type, ...args) {
if (this._events && Array.isArray(this._events[type])) {
this._events[type].forEach(callback => {
callback.call(this, ...args)
})
}
}
$Event.prototype.off = function (type, callback) {
if (this._events && this._events[type]) {
this._events[type] = this._events[type].filter(
item => item !== callback && item.link != callback
)
}
}
$Event.prototype.once = function (type, callback) {
const _callback = function (...args) {
callback.call(this, ...args)
this.off(type, _callback)
}
_callback.link = callback
this.on(type, _callback)
}
console.log('---------------------------------------')
const ev = new $Event()
const fn = function (...args) {
console.log(`event01 process ${args}`)
}
ev.on('event01', fn)
ev.on('event01', () => {
console.log('event01 process')
})
ev.emit('event01', 1, 2)
ev.off('event01', fn)
ev.emit('event01', 1, 2)
console.log('---------------------------------------')
ev.once('event02', fn)
ev.emit('event02', 1, 2)
ev.emit('event02', 1, 2)
console.log('---------------------------------------')
ev.once('event03', fn)
ev.off('event03', fn)
ev.emit('event03', 1, 2)
ev.emit('event03', 1, 2)事件环
setTimeout(() => {
  console.log('s1 ')

  Promise.resolve().then(() => {
    console.log('p1')
  })
  Promise.resolve().then(() => {
    console.log('p2')
  })
})

setTimeout(() => {
  console.log('s2')

  Promise.resolve().then(() => {
    console.log('p3')
  })
  Promise.resolve().then(() => {
    console.log('p4')
  })
})setTimeout(() => {
console.log('s1 ')
Promise.resolve().then(() => {
console.log('p1')
})
Promise.resolve().then(() => {
console.log('p2')
})
})
setTimeout(() => {
console.log('s2')
Promise.resolve().then(() => {
console.log('p3')
})
Promise.resolve().then(() => {
console.log('p4')
})
})浏览器中的事件环
事件环执行顺序
- 从上至下执行所有的同步代码
- 执行过程中将遇到的宏任务与微任务添加至相应的队列
- 同步代码执行完毕后,执行满足条件的微任务回调
- 每执行一个宏任务,都会检查当前批次是否有需要执行的微任务队列
- 微任务执行完毕后执行所有满足需求的宏任务回调
- 循环事件环操作
Node.js 中的事件环
组成部分
timers

pending callbacks

idle, prepare

poll

check

close callbacks
timers
pending callbacks
idle, prepare
poll
check
close callbacks- timers: 执行 setTimeout 与 setInterval 回调
- pending callbacks:执行操作系统的回调,例如 tcp udp
- idle,prepare:只在系统内部进行使用
- poll:执行与 I/O 相关回调
- check:执行 setImmediate 中的回调
- close callbacks:执行 close 事件的回调
执行顺序
- 执行同步代码,将不同的任务添加至相应的队列
- 所有同步代码执行后会执行满足条件的微任务
- 所有微任务代码执行后会执行 timer 队列中满足的宏任务
- timer 中的所有宏任务执行完成后就会依次切换队列
- 完成队列切换之前会先清空微任务代码
我们仅需要关心 timers、poll、check 队列。
代码分析
setTimeout(() => {
  console.log('s1')
})

Promise.resolve().then(() => {
  console.log('p1')
})

console.log('start')

process.nextTick(() => {
  console.log('tick')
})

setImmediate(() => {
  console.log('setImmediate')
})

console.log('end')

// start
// end
// tick
// p1
// s1
// setImmediatesetTimeout(() => {
console.log('s1')
})
Promise.resolve().then(() => {
console.log('p1')
})
console.log('start')
process.nextTick(() => {
console.log('tick')
})
setImmediate(() => {
console.log('setImmediate')
})
console.log('end')
// start
// end
// tick
// p1
// s1
// setImmediate对于微任务来说,nextTick 的优先级要高于 Promise。
start end tick p1
s1 - timers,null - poll,setImmeriate - check
执行步骤梳理
通过一段代码分析事件循环执行步骤。
setTimeout(() => {
  console.log('s1')
  Promise.resolve().then(() => {
    console.log('p1')
  })
  process.nextTick(() => {
    console.log('t1')
  })
})

Promise.resolve().then(() => {
  console.log('p2')
})

console.log('start')

setTimeout(() => {
  console.log('s2')
  Promise.resolve().then(() => {
    console.log('p3')
  })
  process.nextTick(() => {
    console.log('t2')
  })
})

console.log('end')

// start
// end
// p2
// s1
// t1
// p1
// s2
// t2
// p3setTimeout(() => {
console.log('s1')
Promise.resolve().then(() => {
console.log('p1')
})
process.nextTick(() => {
console.log('t1')
})
})
Promise.resolve().then(() => {
console.log('p2')
})
console.log('start')
setTimeout(() => {
console.log('s2')
Promise.resolve().then(() => {
console.log('p3')
})
process.nextTick(() => {
console.log('t2')
})
})
console.log('end')
// start
// end
// p2
// s1
// t1
// p1
// s2
// t2
// p3Node 与浏览器事件环对比
- 任务队列数不同
- 浏览器只有两个任务队列
- Node.js 中有 6 个事件队列
- 微任务执行时机
- 二者都会在同步代码执行完毕后执行微任务
- 微任务优先级不同
- 浏览器事件环中,微任务存放于事件队列,先进先出
- Node.js 中 process.nextTick 先于 promise.then
Node.js 常见问题
setTimeout(() => {
  console.log('timeout')
})

setImmediate(() => {
  console.log('immediate')
})setTimeout(() => {
console.log('timeout')
})
setImmediate(() => {
console.log('immediate')
})Node.js 中执行上述代码执行结果并不是唯一的,可能会先输出 timeout,也可能先输出 immediate。
const fs = require('fs')
fs.readFile('./test.txt', () => {
setTimeout(() => {
  console.log('timeout')
})

setImmediate(() => {
  console.log('immediate')
})
})const fs = require('fs')
fs.readFile('./test.txt', () => {
setTimeout(() => {
console.log('timeout')
})
setImmediate(() => {
console.log('immediate')
})
})如果将上述代码包裹在一个 IO 操作中,执行顺序就固定了,结果永远是先输出 immediate,然后再输出 timeout。
这里会优先执行 poll 队列,然后再执行 check 队列,最后才能执行到 timers 事件队列。
默认情况下 setTimeout 与 setImmediate 执行顺序是随机的,因为 setTimeout 后面的延时时间是不固定的。如果将它们放到 I/O 回调中,它们的执行顺序就会变成固定的,永远都是先输出 immediate 然后再输出 timeout。
Stream 模块
基本概念
ls | grep *.js // 流操作的一种应用ls | grep *.js // 流操作的一种应用上述代码将左侧执行的数据交由右侧进行处理,这种通过流操作数据的方式,无论是在空间还是时间上都会存在明显的效率提升。
Node.js 诞生之初就是为了提升 IO 性能,其中文件操作系统和网络模块就实现了流接口。
Node.js 中的流就是处理流式数据的抽象接口,Node.js 的 Stream 模块实现了用于处理流数据的对象。
优势
为什么在应用程序中要用流来处理数据?
- 同步读取资源文件,用户需要等待数据读取完成
- 资源文件最终一次性加载至内存,开销较大
针对上述问题,我们可以用流来操作数据,将资源文件分段处理,或者配合管道进行处理。
流处理数据的优势:
- 时间效率:流的分段处理可以同时操作多个数据 chunk
- 空间效率:同一时间流无需占据大内存空间
- 使用方便:流配置管道,使扩展程序变的更简单
分类
Node.js 内置了 stream,它实现了流操作对象。
- Readable:可读流,能够实现数据的读取
- Writeable:可写流,能够实现数据的写操作
- Duplex:双工流,即可读又可写
- Transform:转换流,可读可写,还能实现数据转换
上述流操作对象是 Stream 实现的四个具体的抽象,所有流都继承自 EventEmitter 模块。
案例
const fs = require('fs')

const rs = fs.createReadStream('test.txt')
const ws = fs.createWriteStream('test1.txt')

rs.pipe(ws)
const fs = require('fs')
const rs = fs.createReadStream('test.txt')
const ws = fs.createWriteStream('test1.txt')
rs.pipe(ws)上述案例就是一个简单的读取写入操作。
四种流类型
可读流
可读流是专门生产供程序消费数据的流。
Node.js 最常见的数据生产方式就是读取磁盘文件或者取网络请求中的内容。
自定义可读流
- 继承 stream 里的 Readable 类
- 重写
_read方法调用 push 产出数据
自定义可读流问题:
- 底层数据读取完成之后如何处理?
- 可以在读取的时候传递 null 值,告知数据已经读取完毕
- 消费者如何获取可读流中的数据?
- Readable 提供两种事件,readable 事件和 data 事件
- Readable 存在两种模式,分别是流动模式和暂停模式,对于使用者来说,两者的区别在于消费数据的时候是否需要主动调用 read 方法来读取数据
 const { Readable } = require('stream')

// 定义数组存放数据,模拟底层数据
const source = ['yueluo', 'heora', 'yzq']

class $Readable extends Readable {
  constructor(source) {
    super()
    this.source = source
  }

  _read() {
    this.push(this.source.shift() || null)
  }
}

const readIns = new $Readable(source)

// readIns.on('readable', () => {
//   let data = null

//   // 打印值可能存在与预期不符的情况
//   // 这其实是因为 read 的工作机制问题
//   // 调用 read 时缓存区已经存在值,所以第一次打印的时候会打印出两个值
//   // read 方法可以传入指定数据长度,这样打印时会和预期会一致
//   // 暂停模式,我们需要手动调用 read 读取数据
//   while ((data = readIns.read()) !== null) {
//     console.log('readable', data.toString())
//   }
// })

// 流动模式,这种读取方式会依次读取数据,更符合预期
readIns.on('data', data => {
  console.log('data', data.toString())
})
const { Readable } = require('stream')
// 定义数组存放数据,模拟底层数据
const source = ['yueluo', 'heora', 'yzq']
class $Readable extends Readable {
constructor(source) {
super()
this.source = source
}
_read() {
this.push(this.source.shift() || null)
}
}
const readIns = new $Readable(source)
// readIns.on('readable', () => {
// let data = null
// // 打印值可能存在与预期不符的情况
// // 这其实是因为 read 的工作机制问题
// // 调用 read 时缓存区已经存在值,所以第一次打印的时候会打印出两个值
// // read 方法可以传入指定数据长度,这样打印时会和预期会一致
// // 暂停模式,我们需要手动调用 read 读取数据
// while ((data = readIns.read()) !== null) {
// console.log('readable', data.toString())
// }
// })
// 流动模式,这种读取方式会依次读取数据,更符合预期
readIns.on('data', data => {
console.log('data', data.toString())
})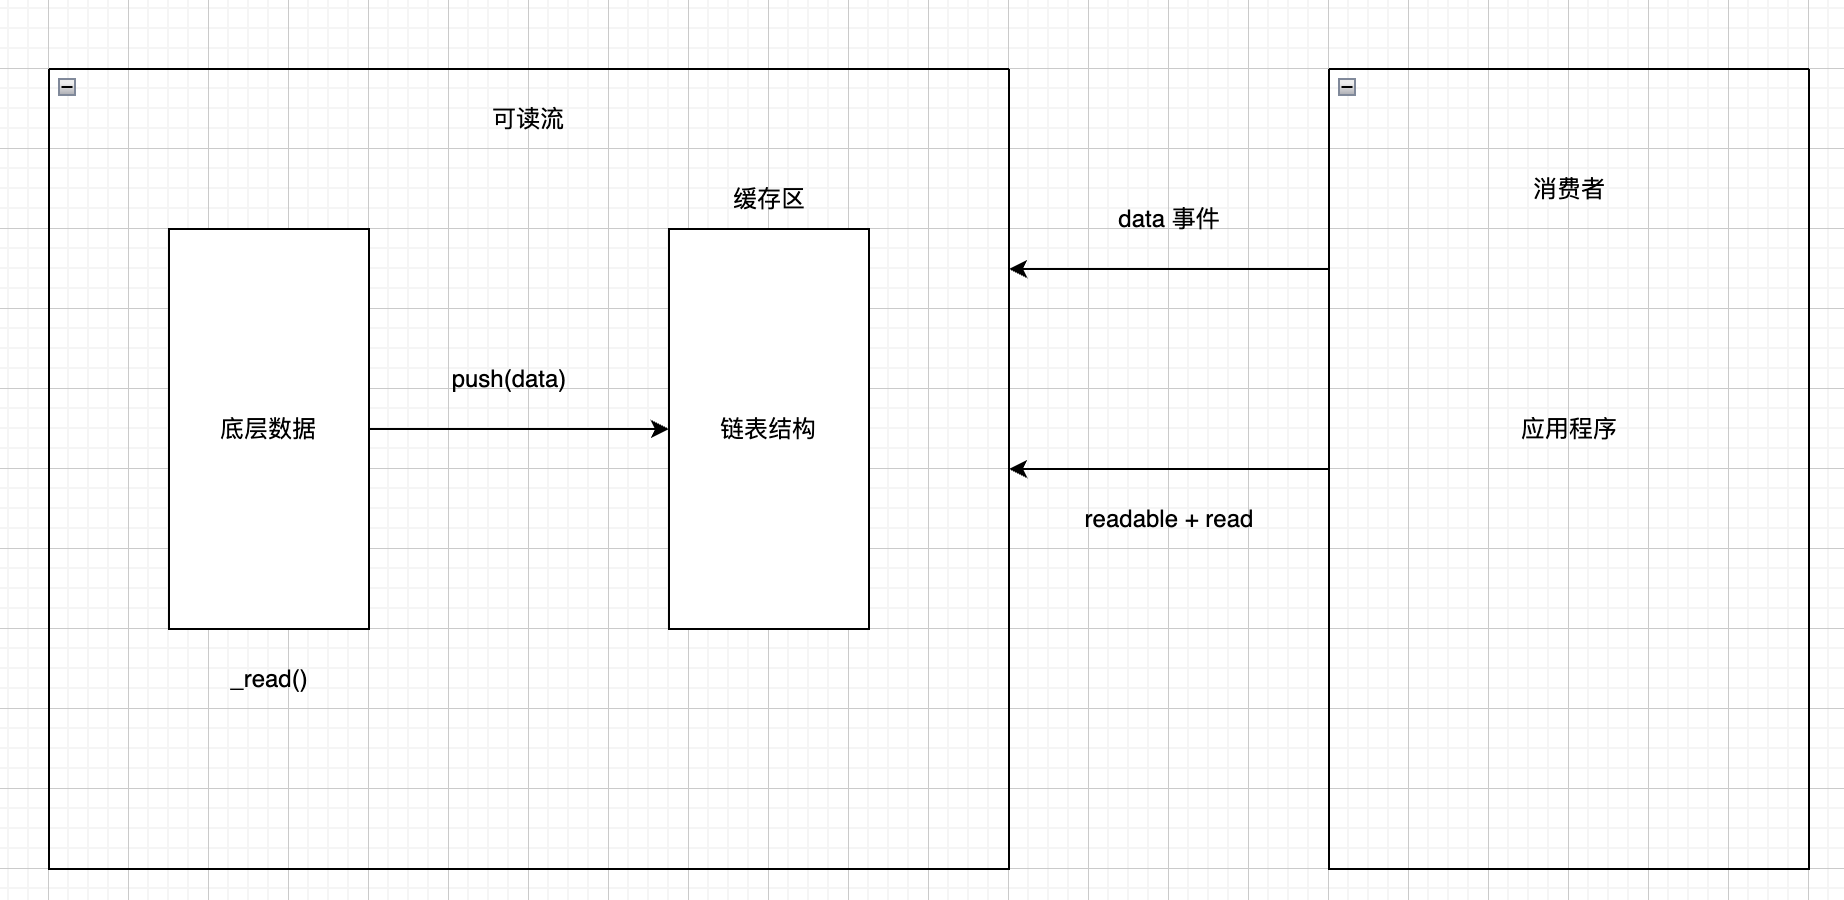
消费数据
- readable 事件:当流中存在可读取数据时触发
- data 事件:当流中数据块传给消费者时触发
总结
- 明确数据生产与消费流程
- 利用 API 实现自定义的可读流
- 明确数据消费的事件使用
可写流
可读流用来生产数据,可写流用来消费数据。通过可写流可以把数据写入到指定的地方, 常见的操作就是往磁盘文件中写入内容或者对 TCP、HTTP 的网络响应进行操作。
基本使用
const fs = require('fs')

// 1. 创建可读流,生产数据
const rs = fs.createReadStream('test.txt')

// 2. 修改字符编码,便于后续使用
rs.setEncoding('utf-8')

// 3. 创建可写流,消费数据
const ws = fs.createWriteStream('test2.txt')

// 4. 监听事件调用方法完成数据的消费
rs.on('data', chunk => {
  // 执行数据写入
  ws.write(chunk)
})
const fs = require('fs')

// 1. 创建可读流,生产数据
const rs = fs.createReadStream('test.txt')

// 2. 修改字符编码,便于后续使用
rs.setEncoding('utf-8')

// 3. 创建可写流,消费数据
const ws = fs.createWriteStream('test2.txt')

// 4. 监听事件调用方法完成数据的消费
rs.on('data', chunk => {
  // 执行数据写入
  ws.write(chunk)
})
自定义可写流
- 继承 stream 模块的 Writeable
- 重写
_write方法,调用write执行写入
const { Writable } = require('stream')

class $Writeable extends Writable {
  constructor() {
    super()
  }

  _write(chunk, _, done) {
    process.stdout.write(chunk.toString() + '-')
    process.nextTick(done)
  }
}

// 创建可写流用于消费数据
const ws = new $Writeable()

ws.write('yzq is a boy', 'utf-8', () => {
  console.log('write success')
})
const { Writable } = require('stream')
class $Writeable extends Writable {
constructor() {
super()
}
_write(chunk, _, done) {
process.stdout.write(chunk.toString() + '-')
process.nextTick(done)
}
}
// 创建可写流用于消费数据
const ws = new $Writeable()
ws.write('yzq is a boy', 'utf-8', () => {
console.log('write success')
})可写流事件
- pipe 事件:可读流调用 pipe() 方法向可写流传输数据时就会触发可写流的 pipe 事件,从而完成最终的数据写入操作
- unpipe 事件:可读流调用 unpipe() 方法时触发,会在 read 方法返回 false,数据又可以继续写入的时候被触发,不会存在内存溢出等问题
双工流和转换流
双工流和转换流(Duplex && Transform)
Node.js 中 stream 是流操作的抽象接口集合。可读、可写、双工、转换是单一抽象具体实现。
流操作的核心功能就是处理数据,Node.js 诞生的初衷就是解决密集型 IO 事务。Node.js 中处理数据模块继承了流和 EventEmitter 模块。
双工流
Duplex 是双工流,既能生产又能消费。
自定义双工流:
- 继承 Duplex 类
- 重写
_read方法,调用 push 生产数据 - 重写
_write方法,调用 write 消费数据
const { Duplex } = require('stream')

const source = ['heora', 'yueluo', 'yzq']

class $Duplex extends Duplex {
  constructor(source) {
    super(source)
    this.source = source
  }

  _read() {
    this.push(this.source.shift() || null)
  }

  _write(chunk, enc, next) {
    if (Buffer.isBuffer(chunk)) {
      chunk = chunk.toString()
    }
    process.stdout.write(chunk + '--')
    process.nextTick(next)
  }
}

const duplex = new $Duplex(source)

duplex.on('data', chunk => {
  console.log(chunk.toString())
})

// duplex.write('test', 'utf-8', () => {
//   console.log('duplex test: readable and writeable')
// })
const { Duplex } = require('stream')
const source = ['heora', 'yueluo', 'yzq']
class $Duplex extends Duplex {
constructor(source) {
super(source)
this.source = source
}
_read() {
this.push(this.source.shift() || null)
}
_write(chunk, enc, next) {
if (Buffer.isBuffer(chunk)) {
chunk = chunk.toString()
}
process.stdout.write(chunk + '--')
process.nextTick(next)
}
}
const duplex = new $Duplex(source)
duplex.on('data', chunk => {
console.log(chunk.toString())
})
// duplex.write('test', 'utf-8', () => {
// console.log('duplex test: readable and writeable')
// })转换流
Transform 也是一个双工流。Duplex 的读和写是相互独立的,它的读操作创建的数据不能被直接当作数据源使用,但是在 Transform 里这种操作是可以的。
自定义实现
- 继承 Transform 类
- 重写
_transform方法,调用 push 和 callback - 重写
_flush方法,处理剩余数据
const { Transform } = require('stream')

class $Transform extends Transform {
  constructor() {
    super()
  }

  _transform(chunk, _, callback) {
    this.push(chunk.toString().toUpperCase())
    callback(null)
  }
}

const transform = new $Transform()

transform.write('a')
transform.write('b')
transform.end('c')

transform.on('data', chunk => {
  console.log(chunk.toString())
})

transform.pipe(process.stdout)
const { Transform } = require('stream')
class $Transform extends Transform {
constructor() {
super()
}
_transform(chunk, _, callback) {
this.push(chunk.toString().toUpperCase())
callback(null)
}
}
const transform = new $Transform()
transform.write('a')
transform.write('b')
transform.end('c')
transform.on('data', chunk => {
console.log(chunk.toString())
})
transform.pipe(process.stdout)总结
- Readable 可读流
- 专门生产数据的流
- 常见的操作就是监听 readable 事件和 data 事件,其中 readable 事件需要我们主动调用 read 事件消耗数据,data 是流动模式,会一直读取数据
- Writeable 可写流
- 专门消费数据的流
- 主要的方式就是调用 write 方法,然后再把数据源中的数据写入到指定位置
- Duplex 双工流
- 既可读又可写
- 读写之间相互独立
- Transform 转换流
- 既可读又可写
- 读写之间可以相互转换,可以自定义转换操作
文件可读流
创建和消费
// data 事件消费数据

const fs = require('fs')

const rs = fs.createReadStream('test.txt', {
  flags: 'r',
  encoding: null,
  fd: null,
  mode: 438,
  autoClose: true,
  start: 0,
  // end: 3,
  highWaterMark: 2
})

rs.on('data', chunk => {
  console.log(chunk.toString())

  rs.pause() // 切换暂停模式

  setTimeout(() => {
    rs.resume() // 切换流动模式
  }, 1000)
})
// data 事件消费数据
const fs = require('fs')
const rs = fs.createReadStream('test.txt', {
flags: 'r',
encoding: null,
fd: null,
mode: 438,
autoClose: true,
start: 0,
// end: 3,
highWaterMark: 2
})
rs.on('data', chunk => {
console.log(chunk.toString())
rs.pause() // 切换暂停模式
setTimeout(() => {
rs.resume() // 切换流动模式
}, 1000)
})const fs = require('fs')
const rs = fs.createReadStream('test.txt', {
flags: 'r',
encoding: null,
fd: null,
mode: 438,
autoClose: true,
start: 0,
// end: 3,
highWaterMark: 4
})
rs.on('readable', () => {
let data
// while ((data = rs.read(2)) !== null) {
// console.log(data.toString())
// }
// while ((data = rs.read(4)) !== null) {
// console.log(data.toString())
// }
while ((data = rs.read(1)) !== null) {
// _readableState 长度与 highWaterMark 密切相关
console.log(data.toString(), rs._readableState.length)
}
})事件与应用
const fs = require('fs')

const rs = fs.createReadStream('test.txt', {
  flags: 'r',
  encoding: null,
  fd: null,
  mode: 438,
  autoClose: true,
  start: 0,
  // end: 3,
  highWaterMark: 4
})

rs.on('open', fd => {
  // open 操作并不是在数据被消费之后才被处理
  // 当我们调用 createReadStream 时就会触发 open 事件
  console.log(fd, 'file open')
})

rs.on('close', () => {
  // 默认情况下并不会被触发
  // 默认情况下为暂停模式,close 必须在数据被消费之后才会被触发
  console.log('file close')
})

let bufferArr = []

rs.on('data', chunk => {
  console.log(chunk)

  bufferArr.push(chunk)
})

rs.on('end', () => {
  // end 在 close 之间被执行
  console.log('file clear')

  console.log(Buffer.concat(bufferArr).toString())
})

rs.on('error', err => {
  console.log('has error', err)
})
const fs = require('fs')
const rs = fs.createReadStream('test.txt', {
flags: 'r',
encoding: null,
fd: null,
mode: 438,
autoClose: true,
start: 0,
// end: 3,
highWaterMark: 4
})
rs.on('open', fd => {
// open 操作并不是在数据被消费之后才被处理
// 当我们调用 createReadStream 时就会触发 open 事件
console.log(fd, 'file open')
})
rs.on('close', () => {
// 默认情况下并不会被触发
// 默认情况下为暂停模式,close 必须在数据被消费之后才会被触发
console.log('file close')
})
let bufferArr = []
rs.on('data', chunk => {
console.log(chunk)
bufferArr.push(chunk)
})
rs.on('end', () => {
// end 在 close 之间被执行
console.log('file clear')
console.log(Buffer.concat(bufferArr).toString())
})
rs.on('error', err => {
console.log('has error', err)
})文件可写流
基础使用
const fs = require('fs')

const ws = fs.createWriteStream('test3.txt', {
  flags: 'w',
  mode: 438,
  fd: null,
  encoding: 'utf8',
  start: 0,
  highWaterMark: 3 // default 16
})

// 因为我们使用过的是 fs 下的可写流
// 所以写入的内容通常是 字符串或者 buffer
ws.write('月落01', () => {
  console.log('write success')
})
ws.write('月落02', () => {
  console.log('write success')
})
const fs = require('fs')
const ws = fs.createWriteStream('test3.txt', {
flags: 'w',
mode: 438,
fd: null,
encoding: 'utf8',
start: 0,
highWaterMark: 3 // default 16
})
// 因为我们使用过的是 fs 下的可写流
// 所以写入的内容通常是 字符串或者 buffer
ws.write('月落01', () => {
console.log('write success')
})
ws.write('月落02', () => {
console.log('write success')
})事件相关
const fs = require('fs')

const ws = fs.createWriteStream('test3.txt', {
  flags: 'w',
  mode: 438,
  fd: null,
  encoding: 'utf8',
  start: 0,
  highWaterMark: 3 // default 16
})

ws.on('open', fd => {
  console.log('file open', fd)
})

ws.write('heora')

// 对于文件可写流来说,只有在调用 end 数据写入操作全部完成之后才会执行
ws.on('close', () => {
  console.log('file close')
})

// end 执行意味数据写入操作完成
// 不能再 end 之后执行写入操作,否则会报错
ws.end()

ws.on('error', () => {
  console.log('file error')
})
const fs = require('fs')
const ws = fs.createWriteStream('test3.txt', {
flags: 'w',
mode: 438,
fd: null,
encoding: 'utf8',
start: 0,
highWaterMark: 3 // default 16
})
ws.on('open', fd => {
console.log('file open', fd)
})
ws.write('heora')
// 对于文件可写流来说,只有在调用 end 数据写入操作全部完成之后才会执行
ws.on('close', () => {
console.log('file close')
})
// end 执行意味数据写入操作完成
// 不能再 end 之后执行写入操作,否则会报错
ws.end()
ws.on('error', () => {
console.log('file error')
})write 执行流程
const fs = require('fs')

const ws = fs.createWriteStream('test.txt', {
  highWaterMark: 3
})

let flag = ws.write('1')
console.log(flag) // true

flag = ws.write('2')
console.log(flag) // true

flag = ws.write('3')
console.log(flag) // false

// 如果 flag 为 false,并不意味当前数据不能被执行写入(flag 值仅代表上游产量问题)

// 1. 第一次调用 write 时,会把数据直接写入到文件中
// 2. 第二次调用 write,会把数据写入到缓存中
// 3. 生产速度和消费速度是不同的,一般情况下生产速度要比消费速度快很多
//    例如 highWaterMark 设置为 3 字节,假设生产者给出 5 个字节执行写入,那么在某个时间点就会超过水位线。
//    一旦超出水位线,write 结果就会返回 false 告知,仅代表警戒作用,不代表会溢出
// 4. 当 flag 之后,并不意味着当前次数据不能被写入,但是我们应该告知数据生产者,当前的消费速度已经跟不上生产速度,
//    所以这个时候,一般我们会将可读流的模式修改为暂停模式
// 5. 当数据生产者暂停之后,消费者会慢慢消费缓存中数据,直到可以再次执行写入操作
// 6. 当缓冲区可以继续写入数据时,应该如何告知生产者? 使用 drain 事件

ws.on('drain', () => {
  console.log('drain trigger')
})
const fs = require('fs')
const ws = fs.createWriteStream('test.txt', {
highWaterMark: 3
})
let flag = ws.write('1')
console.log(flag) // true
flag = ws.write('2')
console.log(flag) // true
flag = ws.write('3')
console.log(flag) // false
// 如果 flag 为 false,并不意味当前数据不能被执行写入(flag 值仅代表上游产量问题)
// 1. 第一次调用 write 时,会把数据直接写入到文件中
// 2. 第二次调用 write,会把数据写入到缓存中
// 3. 生产速度和消费速度是不同的,一般情况下生产速度要比消费速度快很多
// 例如 highWaterMark 设置为 3 字节,假设生产者给出 5 个字节执行写入,那么在某个时间点就会超过水位线。
// 一旦超出水位线,write 结果就会返回 false 告知,仅代表警戒作用,不代表会溢出
// 4. 当 flag 之后,并不意味着当前次数据不能被写入,但是我们应该告知数据生产者,当前的消费速度已经跟不上生产速度,
// 所以这个时候,一般我们会将可读流的模式修改为暂停模式
// 5. 当数据生产者暂停之后,消费者会慢慢消费缓存中数据,直到可以再次执行写入操作
// 6. 当缓冲区可以继续写入数据时,应该如何告知生产者? 使用 drain 事件
ws.on('drain', () => {
console.log('drain trigger')
})可以对上述代码进行调试,阅读其源码实现。
{
  // 使用 IntelliSense 了解相关属性。
  // 悬停以查看现有属性的描述。
  // 欲了解更多信息,请访问: https://go.microsoft.com/fwlink/?linkid=830387
  "version": "0.2.0",
  "configurations": [
    {
      "type": "node",
      "request": "launch",
      "name": "启动程序",
      "skipFiles": [
        // "<node_internals>/**"
      ],
      "program": "${workspaceFolder}/node/core_module/_stream/write_drain.js"
    }
  ]
}
{
// 使用 IntelliSense 了解相关属性。
// 悬停以查看现有属性的描述。
// 欲了解更多信息,请访问: https://go.microsoft.com/fwlink/?linkid=830387
"version": "0.2.0",
"configurations": [
{
"type": "node",
"request": "launch",
"name": "启动程序",
"skipFiles": [
// "<node_internals>/**"
],
"program": "${workspaceFolder}/node/core_module/_stream/write_drain.js"
}
]
}需要注意的是,我们需要注释掉 skipFiles 中的默认配置,只有这样只能单步调试进入源码中。
控制写入速度
实际业务开发中 drain 并不常用,通常我们会使用 pipe 方法。
drain 主要的作用是控制写入速度或按需完成限流。具体的手段就是指定 highWaterMark,然后配置 write 函数的返回值进行使用。
// 假设我们有一组数据,我们需要讲数据写入指定文件
// 1. 一次性写入,调用 write 方法
// 2. 分批写入

const fs = require('fs')

// 1. 一次性写入。针对大内存来说,这种操作是不友好的,会存在短时间溢出,瞬间撑满的情况
// const ws = fs.createWriteStream('test.txt')
// ws.write('月落森森')

// ------------------------

// 2. 分批执行写入
// const ws = fs.createWriteStream('test.txt')

// const source = '月落森森'.split('')

// // 其实还是一次性写入
// const executeWrite = () => {
//   while (source.length) {
//     ws.write(source.shift())
//   }
// }

// executeWrite()

// ------------------------

// 3. 控制写入速度
const ws = fs.createWriteStream('test.txt', {
  highWaterMark: 3
})

const source = '月落森森'.split('')

let falg

const executeWrite = () => {
  falg = true
  while (source.length && falg) {
    falg = ws.write(source.shift())
  }
}

executeWrite()

ws.on('drain', () => {
  console.log('darin trigger')

  setTimeout(executeWrite, 1 * 1000)
})
// 假设我们有一组数据,我们需要讲数据写入指定文件
// 1. 一次性写入,调用 write 方法
// 2. 分批写入
const fs = require('fs')
// 1. 一次性写入。针对大内存来说,这种操作是不友好的,会存在短时间溢出,瞬间撑满的情况
// const ws = fs.createWriteStream('test.txt')
// ws.write('月落森森')
// ------------------------
// 2. 分批执行写入
// const ws = fs.createWriteStream('test.txt')
// const source = '月落森森'.split('')
// // 其实还是一次性写入
// const executeWrite = () => {
// while (source.length) {
// ws.write(source.shift())
// }
// }
// executeWrite()
// ------------------------
// 3. 控制写入速度
const ws = fs.createWriteStream('test.txt', {
highWaterMark: 3
})
const source = '月落森森'.split('')
let falg
const executeWrite = () => {
falg = true
while (source.length && falg) {
falg = ws.write(source.shift())
}
}
executeWrite()
ws.on('drain', () => {
console.log('darin trigger')
setTimeout(executeWrite, 1 * 1000)
})使用 drain 控制写入速度并不是最好的方案,通常我们使用的还是 pipe。
它是一个管道,我们只需要按照相应的类型,把可读流的东西交给可写流、转换流、双工流或自己去进行处理。
背压机制
Node.js 的 stream 已经实现了一种可以保证数据平滑流动过的背压机制。
我们需要了解的是 Node.js 数据读写的过程以及背压机制解决了什么问题,还有就是 pipe 方法内部实现原理。
数据读写可能存在的问题:
const fs = require('fs')

const rs = fs.createReadStream('test1.txt')
const ws = fs.createWriteStream('test2.txt')

rs.on('data', chunk => {
  ws.write(chunk)
})
const fs = require('fs')
const rs = fs.createReadStream('test1.txt')
const ws = fs.createWriteStream('test2.txt')
rs.on('data', chunk => {
ws.write(chunk)
})上述代码的作用就是实现文件拷贝。这样写理论上不存在问题,但是数据读取的速度是远远大于数据写入速度的,消费者的速度往往跟不上生产者的速度。
这样就会出现产能过剩的问题,writeable 内部维护了一个队列,当它不能实时消费上游传递的数据时,它就会尝试把不能被消化掉的数据,先缓存到队列中,但是因为队列大小存在上限。因此读写的过程中,如果不去实现背压机制,那么很有可能就会出现以下问题:
- 内存溢出
- GC 频繁调用
- 影响其他进程工作
基于这些问题我们就存在一套可以使数据平滑流动的机制,这其实就是背压机制。
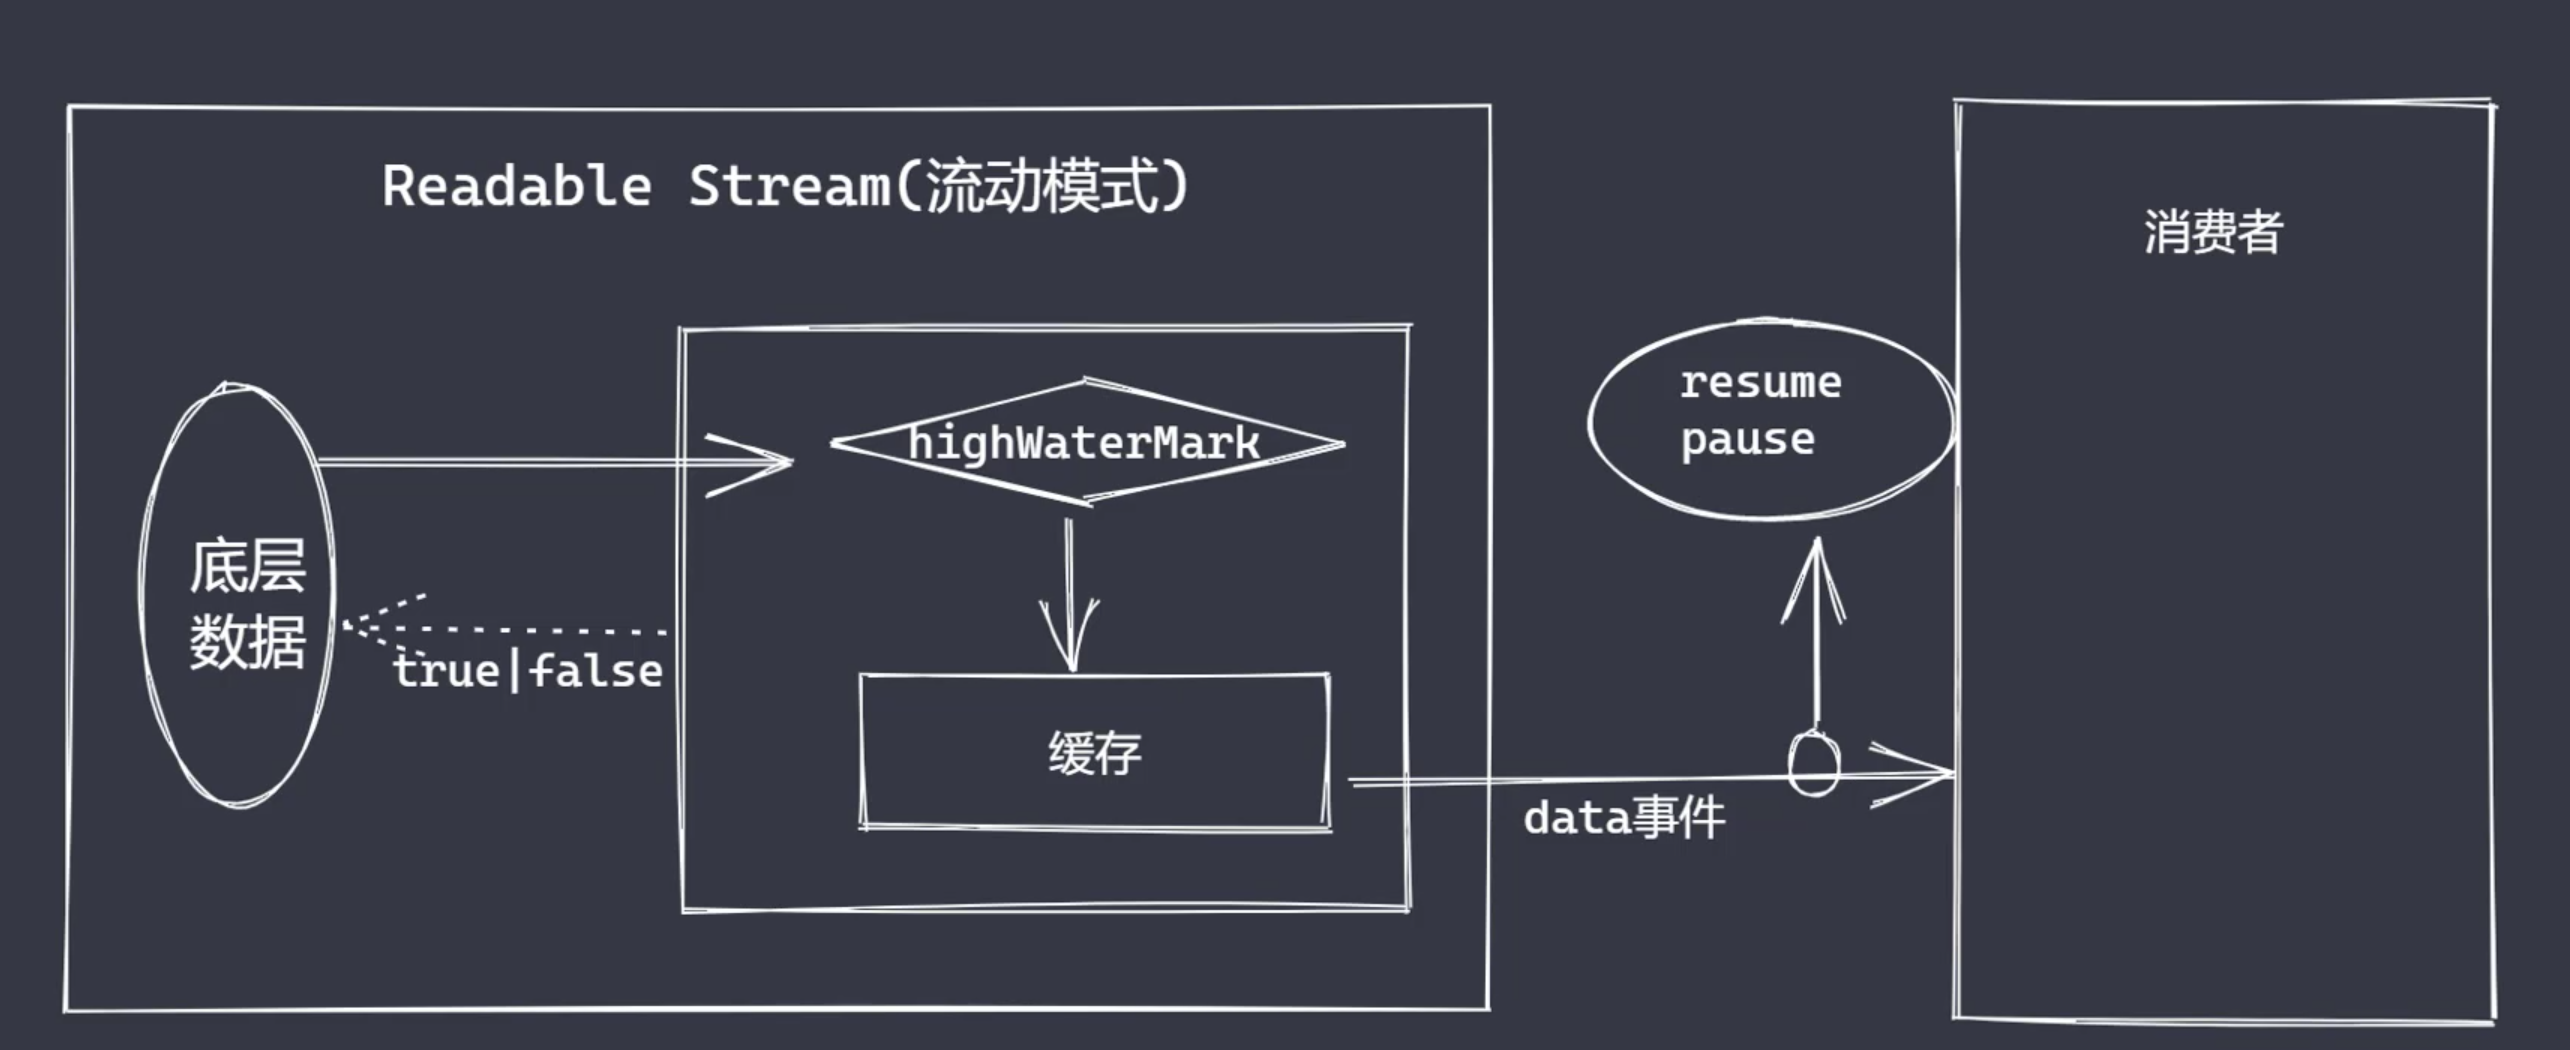
默认 Readable 缓存空间是 16kb,在我们的文件可读流中进行了重新定义,为 64 kb。
从消费者来看,可读流就是一个水池,在它之中装满了想要消费的数据,在池子外部有一个开关,如果我们采用流动模式相当于一直防水,直到流完为止。
如果在这个过程中,用水的人跟不上放水的速度,所以这时用水的人在处理不了的情况下,就会想办法告诉可读流,当前实在处理不了,需要先停一会儿,消化消化。此时,可读流就可以调用 pause 方法将流动模式切换为暂停模式,然后消费者就会慢慢处理缓存的水资源,等水资源消费差不多之后,就会告诉水池可以继续放水。
但是用水的人应该如何通知放水的人?我们先来看一下数据的写操作。
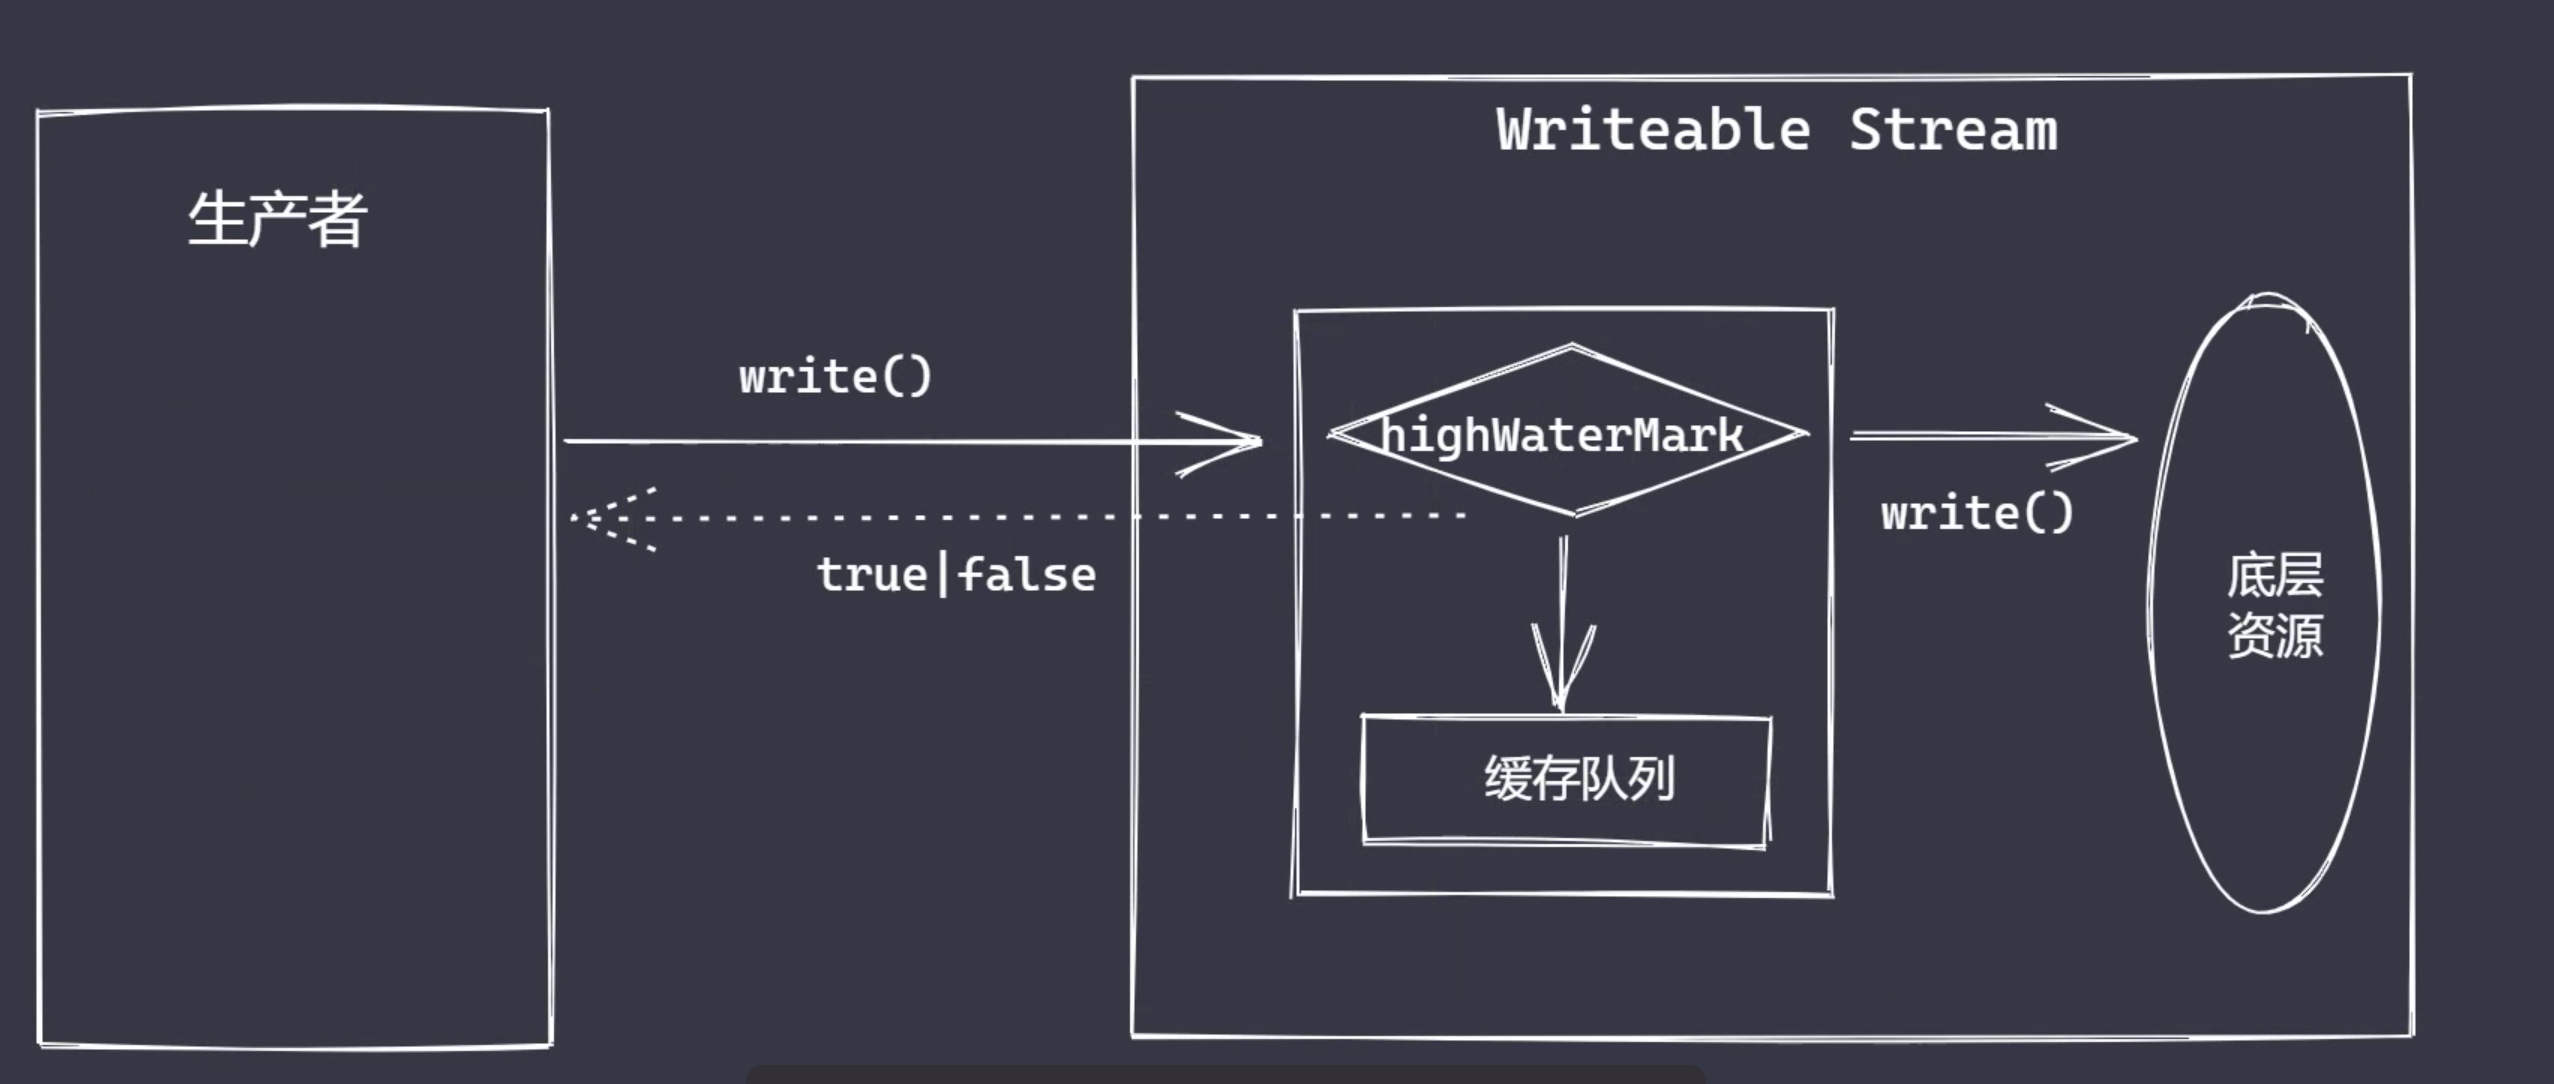
数据从上游生产者传递过来,然后可写流调用 write 方法消费数据,在可写流内部同样存在内存空间充当缓存队列,他同样也具有水位线。如果某个时刻上游的数据超过上限,说明无法消费更多的水资源,此时 write 方法调用之后会返回 false 给上游的生产者,让他暂停放水。等到可写流将缓存中的数据消费差不多之后,就会触发 drain 事件告诉上游的生产者可以继续放水。这个时候就可以调用 resume 方法再次打开阀门即可。如此往复,保证数据的平滑流动,既不会出现内存被撑爆的情况,也不会在某个时刻无水可用。这其实也是 pipe 方法内部的实现原理。
代码实现:
const fs = require('fs')

const rs = fs.createReadStream('test1.txt', {
  highWaterMark: 4 // 默认为 64 kb,文件可写流默认为 16 kb,两者之间存在 4:1 的关系
})
const ws = fs.createWriteStream('test2.txt', {
  highWaterMark: 1
})

// 1. 流动模式,一次性写入
// rs.on('data', chunk => {
//   ws.write(chunk, () => {
//     console.log('write done')
//   })
// })

// ----------------------

let flag = true

rs.on('data', chunk => {
  flag = ws.write(chunk, () => {
    console.log('write done')
  })

  if (!flag) rs.pause()
})

ws.on('drain', () => {
  rs.resume()
})
const fs = require('fs')
const rs = fs.createReadStream('test1.txt', {
highWaterMark: 4 // 默认为 64 kb,文件可写流默认为 16 kb,两者之间存在 4:1 的关系
})
const ws = fs.createWriteStream('test2.txt', {
highWaterMark: 1
})
// 1. 流动模式,一次性写入
// rs.on('data', chunk => {
// ws.write(chunk, () => {
// console.log('write done')
// })
// })
// ----------------------
let flag = true
rs.on('data', chunk => {
flag = ws.write(chunk, () => {
console.log('write done')
})
if (!flag) rs.pause()
})
ws.on('drain', () => {
rs.resume()
})上述代码就是 pipe 方法的实现原理,实际开发过程中我们直接这样使用的机会并不多,除非是我们自己想拿到每一个数组,单独对数据进行处理。 最常用的还是使用 pipe 方法。
const fs = require('fs')

const rs = fs.createReadStream('test1.txt', {
  highWaterMark: 4 // 默认为 64 kb,文件可写流默认为 16 kb,两者之间存在 4:1 的关系
})
const ws = fs.createWriteStream('test2.txt', {
  highWaterMark: 1
})

rs.pipe(ws)
const fs = require('fs')
const rs = fs.createReadStream('test1.txt', {
highWaterMark: 4 // 默认为 64 kb,文件可写流默认为 16 kb,两者之间存在 4:1 的关系
})
const ws = fs.createWriteStream('test2.txt', {
highWaterMark: 1
})
rs.pipe(ws)文件可读流实现
处理错误和文件标志符
const fs = require('fs')

const EventEmitter = require('events')

class $ReadStream extends EventEmitter {
  constructor(path, options = {}) {
    super()
    this.path = path
    this.flags = options.flags || 'r'
    this.mode = options.mode || 438
    this.autoClose = options.autoClose || true
    this.start = options.start || 0
    this.end = options.end
    this.highWaterMark = options.highWaterMark || 64 * 1024

    this.open()
  }

  open() {
    fs.open(this.path, this.flags, this.mode, (err, fd) => {
      if (err) {
        this.emit('error', err)
        return
      }

      this.fd = fd
      this.emit('open', fd)
    })
  }
}

const rs = new $FileReadStream('test.txt')

rs.on('open', fd => {
  console.log('open', fd)
})

rs.on('error', err => {
  console.log('error', err)
})
const fs = require('fs')
const EventEmitter = require('events')
class $ReadStream extends EventEmitter {
constructor(path, options = {}) {
super()
this.path = path
this.flags = options.flags || 'r'
this.mode = options.mode || 438
this.autoClose = options.autoClose || true
this.start = options.start || 0
this.end = options.end
this.highWaterMark = options.highWaterMark || 64 * 1024
this.open()
}
open() {
fs.open(this.path, this.flags, this.mode, (err, fd) => {
if (err) {
this.emit('error', err)
return
}
this.fd = fd
this.emit('open', fd)
})
}
}
const rs = new $FileReadStream('test.txt')
rs.on('open', fd => {
console.log('open', fd)
})
rs.on('error', err => {
console.log('error', err)
})处理数据读取、close、end 事件
const fs = require('fs')

const EventEmitter = require('events')

class $FileReadStream extends EventEmitter {
  constructor(path, options = {}) {
    super()
    this.path = path
    this.flags = options.flags || 'r'
    this.mode = options.mode || 438
    this.autoClose = options.autoClose || true
    this.start = options.start || 0
    this.end = options.end
    this.highWaterMark = options.highWaterMark || 64 * 1024
    this.readOffset = 0

    this.open()

    // all listener
    this.on('newListener', type => {
      switch (type) {
        case 'data':
          this.read()
          break
      }
    })
  }

  open() {
    fs.open(this.path, this.flags, this.mode, (err, fd) => {
      if (err) {
        this.emit('error', err)
        return
      }

      this.fd = fd
      this.emit('open', fd)
    })
  }

  read() {
    if (typeof this.fd !== 'number') {
      return this.once('open', this.read)
    }

    const buf = Buffer.alloc(this.highWaterMark)

    fs.read(this.fd, buf, 0, this.highWaterMark, this.readOffset, (err, readBytes) => {
      if (readBytes) {
        this.readOffset += readBytes
        this.emit('data', buf.slice(0, readBytes))
        this.read()
        return
      }

      this.emit('end')
      this.close()
    })
  }

  close() {
    fs.close(this.fd, () => {
      this.emit('close')
    })
  }
}

// -----------------

const rs = new $FileReadStream('test.txt', {
  highWaterMark: 3
})

// rs.on('open', fd => {
//   console.log('open', fd)
// })

// rs.on('error', err => {
//   console.log('error', err)
// })

rs.on('data', chunk => {
  console.log('data', chunk)
})

rs.on('end', () => {
  console.log('end')
})

rs.on('close', () => {
  console.log('close')
})
const fs = require('fs')
const EventEmitter = require('events')
class $FileReadStream extends EventEmitter {
constructor(path, options = {}) {
super()
this.path = path
this.flags = options.flags || 'r'
this.mode = options.mode || 438
this.autoClose = options.autoClose || true
this.start = options.start || 0
this.end = options.end
this.highWaterMark = options.highWaterMark || 64 * 1024
this.readOffset = 0
this.open()
// all listener
this.on('newListener', type => {
switch (type) {
case 'data':
this.read()
break
}
})
}
open() {
fs.open(this.path, this.flags, this.mode, (err, fd) => {
if (err) {
this.emit('error', err)
return
}
this.fd = fd
this.emit('open', fd)
})
}
read() {
if (typeof this.fd !== 'number') {
return this.once('open', this.read)
}
const buf = Buffer.alloc(this.highWaterMark)
fs.read(this.fd, buf, 0, this.highWaterMark, this.readOffset, (err, readBytes) => {
if (readBytes) {
this.readOffset += readBytes
this.emit('data', buf.slice(0, readBytes))
this.read()
return
}
this.emit('end')
this.close()
})
}
close() {
fs.close(this.fd, () => {
this.emit('close')
})
}
}
// -----------------
const rs = new $FileReadStream('test.txt', {
highWaterMark: 3
})
// rs.on('open', fd => {
// console.log('open', fd)
// })
// rs.on('error', err => {
// console.log('error', err)
// })
rs.on('data', chunk => {
console.log('data', chunk)
})
rs.on('end', () => {
console.log('end')
})
rs.on('close', () => {
console.log('close')
})处理 end 配置
const fs = require('fs')

const EventEmitter = require('events')

class $FileReadStream extends EventEmitter {
  constructor(path, options = {}) {
    super()
    this.path = path
    this.flags = options.flags || 'r'
    this.mode = options.mode || 438
    this.autoClose = options.autoClose || true
    this.start = options.start || 0
    this.end = options.end
    this.highWaterMark = options.highWaterMark || 64 * 1024
    this.readOffset = 0

    this.open()

    // all listener
    this.on('newListener', type => {
      switch (type) {
        case 'data':
          this.read()
          break
      }
    })
  }

  open() {
    fs.open(this.path, this.flags, this.mode, (err, fd) => {
      if (err) {
        this.emit('error', err)
        return
      }

      this.fd = fd
      this.emit('open', fd)
    })
  }

  read() {
    if (typeof this.fd !== 'number') {
      return this.once('open', this.read)
    }

    const buf = Buffer.alloc(this.highWaterMark)

    const howMuchToRead = this.end
      ? Math.min(this.end - this.readOffset + 1, this.highWaterMark)
      : this.highWaterMark

    fs.read(this.fd, buf, 0, howMuchToRead, this.readOffset, (err, readBytes) => {
      if (readBytes) {
        this.readOffset += readBytes
        this.emit('data', buf.slice(0, readBytes))
        this.read()
        return
      }

      this.emit('end')
      this.close()
    })
  }

  close() {
    fs.close(this.fd, () => {
      this.emit('close')
    })
  }
}

// -----------------

const rs = new $FileReadStream('test.txt', {
  end: 7,
  highWaterMark: 3
})

// rs.on('open', fd => {
//   console.log('open', fd)
// })

// rs.on('error', err => {
//   console.log('error', err)
// })

rs.on('data', chunk => {
  console.log('data', chunk)
})

rs.on('end', () => {
  console.log('end')
})

rs.on('close', () => {
  console.log('close')
})
const fs = require('fs')
const EventEmitter = require('events')
class $FileReadStream extends EventEmitter {
constructor(path, options = {}) {
super()
this.path = path
this.flags = options.flags || 'r'
this.mode = options.mode || 438
this.autoClose = options.autoClose || true
this.start = options.start || 0
this.end = options.end
this.highWaterMark = options.highWaterMark || 64 * 1024
this.readOffset = 0
this.open()
// all listener
this.on('newListener', type => {
switch (type) {
case 'data':
this.read()
break
}
})
}
open() {
fs.open(this.path, this.flags, this.mode, (err, fd) => {
if (err) {
this.emit('error', err)
return
}
this.fd = fd
this.emit('open', fd)
})
}
read() {
if (typeof this.fd !== 'number') {
return this.once('open', this.read)
}
const buf = Buffer.alloc(this.highWaterMark)
const howMuchToRead = this.end
? Math.min(this.end - this.readOffset + 1, this.highWaterMark)
: this.highWaterMark
fs.read(this.fd, buf, 0, howMuchToRead, this.readOffset, (err, readBytes) => {
if (readBytes) {
this.readOffset += readBytes
this.emit('data', buf.slice(0, readBytes))
this.read()
return
}
this.emit('end')
this.close()
})
}
close() {
fs.close(this.fd, () => {
this.emit('close')
})
}
}
// -----------------
const rs = new $FileReadStream('test.txt', {
end: 7,
highWaterMark: 3
})
// rs.on('open', fd => {
// console.log('open', fd)
// })
// rs.on('error', err => {
// console.log('error', err)
// })
rs.on('data', chunk => {
console.log('data', chunk)
})
rs.on('end', () => {
console.log('end')
})
rs.on('close', () => {
console.log('close')
})链表
链表结构
文件可写流的 read 方法工作时,有些被写入的内容需要在缓冲区排队等待,遵循先进选出的规则,为了保存这些数据,新版 node 中就采用了链表的结构来存储这些数据。
为什么不采用数组存储数组?
- 数组缺点:
- 数组存储数据的长度具有上限
- 数组存在塌陷问题,需要频繁移动位置
链表是一系列节点的集合,每个节点都具有指向下一个节点的属性。
链表分类:
- 双向链表
- 最常用,查询速度比较快
- 单向链表
- 循环链表
单向链表实现
/**
 * 1. node + head + null
 * 2. head -> null
 * 3. size
 * 4. next element
 * 5. add、delete、set、get、clear
 */

class Node {
  constructor(element, next) {
    this.element = element
    this.next = next
  }
}

class LinkedList {
  constructor() {
    this.head = null
    this.size = 0
  }

  add(index, element) {
    if (arguments.length === 1) {
      element = index
      index = this.size
    }

    if (index < 0 || index > this.size) {
      throw new Error('out of bounds')
    }

    if (index == 0) {
      const head = this.head
      this.head = new Node(element, head)
    } else {
      const prevNode = this._getNode(index - 1)
      prevNode.next = new Node(element, prevNode.next)
    }

    this.size++
  }

  remove(index) {
    if (index === 0) {
      const head = this.head
      this.head = head.next
    } else {
      const prevNode = this._getNode(index - 1)
      prevNode.next = prevNode.next.next
    }

    this.size--
  }

  set(index, element) {
    const node = this._getNode(index)
    node.element = element
  }

  clear() {
    this.head = null
    this.size = 0
  }

  get(index) {
    return this._getNode(index)
  }

  _getNode(index) {
    if (index < 0 || index >= this.size) {
      throw new Error('out of bounds')
    }

    let currentNode = this.head

    for (let i = 0; i < index; i++) {
      currentNode = currentNode.next
    }

    return currentNode
  }
}

// ------------------------

const l1 = new LinkedList()

l1.add('node01')
l1.add('node02')
l1.add(1, 'node3')

// l1.remove(0)
// l1.remove(1)

l1.set(1, 'node3-3')

console.log(l1.get(0))

l1.clear()

console.log(l1)
/**
* 1. node + head + null
* 2. head -> null
* 3. size
* 4. next element
* 5. add、delete、set、get、clear
*/
class Node {
constructor(element, next) {
this.element = element
this.next = next
}
}
class LinkedList {
constructor() {
this.head = null
this.size = 0
}
add(index, element) {
if (arguments.length === 1) {
element = index
index = this.size
}
if (index < 0 || index > this.size) {
throw new Error('out of bounds')
}
if (index == 0) {
const head = this.head
this.head = new Node(element, head)
} else {
const prevNode = this._getNode(index - 1)
prevNode.next = new Node(element, prevNode.next)
}
this.size++
}
remove(index) {
if (index === 0) {
const head = this.head
this.head = head.next
} else {
const prevNode = this._getNode(index - 1)
prevNode.next = prevNode.next.next
}
this.size--
}
set(index, element) {
const node = this._getNode(index)
node.element = element
}
clear() {
this.head = null
this.size = 0
}
get(index) {
return this._getNode(index)
}
_getNode(index) {
if (index < 0 || index >= this.size) {
throw new Error('out of bounds')
}
let currentNode = this.head
for (let i = 0; i < index; i++) {
currentNode = currentNode.next
}
return currentNode
}
}
// ------------------------
const l1 = new LinkedList()
l1.add('node01')
l1.add('node02')
l1.add(1, 'node3')
// l1.remove(0)
// l1.remove(1)
l1.set(1, 'node3-3')
console.log(l1.get(0))
l1.clear()
console.log(l1)链表实现队列
// linked_list.js

class LinkedList {
  remove(index) {
    let curNode = null

    if (index === 0) {
      curNode = this.head

      if (!curNode) return undefined

      this.head = curNode.next
    } else {
      const prevNode = this._getNode(index - 1)

      curNode = prevNode.next
      prevNode.next = curNode.next.next
    }

    this.size--

    return curNode
  }
}
// linked_list.js
class LinkedList {
remove(index) {
let curNode = null
if (index === 0) {
curNode = this.head
if (!curNode) return undefined
this.head = curNode.next
} else {
const prevNode = this._getNode(index - 1)
curNode = prevNode.next
prevNode.next = curNode.next.next
}
this.size--
return curNode
}
}// linked_queue.js
const { LinkedList } = require('./linked_list')
class Queue {
constructor() {
this.linkedList = new LinkedList()
}
push(element) {
this.linkedList.add(element)
}
shift() {
return this.linkedList.remove(0)
}
}
const q = new Queue()
console.log(q)
q.push('node1')
q.push('node2')
console.log(q.shift())
console.log(q.shift())
console.log(q.shift())// linked_queue.js
const { LinkedList } = require('./linked_list')
class Queue {
constructor() {
this.linkedList = new LinkedList()
}
push(element) {
this.linkedList.add(element)
}
shift() {
return this.linkedList.remove(0)
}
}
const q = new Queue()
console.log(q)
q.push('node1')
q.push('node2')
console.log(q.shift())
console.log(q.shift())
console.log(q.shift())文件可写流实现
可写流基础实现
const fs = require('fs')
const EventListener = require('events')

const { Queue } = require('./linked_queue')

class $WriteStream extends EventListener {
  constructor(path, options) {
    super()
    this.path = path
    this.flags = options.flags || 'w'
    this.mode = options.mode || 438
    this.autoClose = options.autoClose || true
    this.start = options.start || 0
    this.encoding = options.encoding || 'uft8'
    this.highWaterMark = options.highWaterMark || 16 * 1024

    this.open()
  }

  open() {
    fs.open(this.path, this.flags, (err, fd) => {
      if (err) {
        this.emit('error', err)
      }

      // normal
      this.fd = fd
      this.emit('open', fd)
    })
  }
}

const ws = new $WriteStream('./test04.txt', {})

ws.on('open', fd => {
  console.log('open file: ', fd)
})
const fs = require('fs')
const EventListener = require('events')
const { Queue } = require('./linked_queue')
class $WriteStream extends EventListener {
constructor(path, options) {
super()
this.path = path
this.flags = options.flags || 'w'
this.mode = options.mode || 438
this.autoClose = options.autoClose || true
this.start = options.start || 0
this.encoding = options.encoding || 'uft8'
this.highWaterMark = options.highWaterMark || 16 * 1024
this.open()
}
open() {
fs.open(this.path, this.flags, (err, fd) => {
if (err) {
this.emit('error', err)
}
// normal
this.fd = fd
this.emit('open', fd)
})
}
}
const ws = new $WriteStream('./test04.txt', {})
ws.on('open', fd => {
console.log('open file: ', fd)
})write 方法实现以及 cache 使用
const fs = require('fs')
const EventListener = require('events')

const { Queue } = require('./linked_queue')

class $WriteStream extends EventListener {
  constructor(path, options) {
    super()
    this.path = path
    this.flags = options.flags || 'w'
    this.mode = options.mode || 438
    this.autoClose = options.autoClose || true
    this.start = options.start || 0
    this.encoding = options.encoding || 'uft8'
    this.highWaterMark = options.highWaterMark || 16 * 1024

    this.open()

    this.writeOffset = this.start
    this.wirtting = false
    this.writeLen = 0
    this.needDrain = false
    this.cache = new Queue()
  }

  open() {
    fs.open(this.path, this.flags, (err, fd) => {
      if (err) {
        this.emit('error', err)
      }

      // normal
      this.fd = fd
      this.emit('open', fd)
    })
  }

  write(chunk, encoding, cb) {
    chunk = Buffer.isBuffer(chunk) ? chunk : Buffer.from(chunk)

    this.writeLen += chunk.length

    const falg = this.writeLen < this.highWaterMark

    this.needDrain = !falg

    if (this.wirtting) {
      // 正在执行写入,需要排队
      this.cache.push({
        chunk,
        encoding,
        cb
      })
    } else {
      this.wirtting = true
      // 正常首次写入
      this._write(chunk, encoding, () => {
        cb()
        // 清空排队内容
        this._clearBuffer()
      })
    }

    return falg
  }

  _write(chunk, encoding, cb) {
    if (typeof this.fd !== 'number') {
      return this.once('open', () => {
        return this._write(chunk, encoding, cb)
      })
    }

    fs.write(this.fd, chunk, this.start, chunk.length, this.writeOffset, (err, written) => {
      this.writeOffset += written
      this.writeLen -= written

      cb && cb()
    })
  }

  _clearBuffer() {
    const data = this.cache.shift()

    if (data) {
      this._write(data.element.chunk, data.element.encoding, () => {
        data.element.cb && data.element.cb()
        this._clearBuffer()
      })
    } else {
      if (this.needDrain) {
        this.needDrain = false
        this.emit('drain')
      }
    }
  }
}

const ws = new $WriteStream('./test04.txt', {
  highWaterMark: 2
})

ws.on('open', fd => {
  console.log('open file: ', fd)
})

let flag = ws.write('1', ' utf8', () => {
  console.log('write success')
})
// console.log('flag: ', flag)

flag = ws.write('23', 'utf8', () => {
  console.log('write success')
})
// console.log('flag: ', flag)

flag = ws.write('月落', 'utf8', () => {
  console.log('write success')
})

ws.on('drain', () => {
  console.log('drain')
})
const fs = require('fs')
const EventListener = require('events')
const { Queue } = require('./linked_queue')
class $WriteStream extends EventListener {
constructor(path, options) {
super()
this.path = path
this.flags = options.flags || 'w'
this.mode = options.mode || 438
this.autoClose = options.autoClose || true
this.start = options.start || 0
this.encoding = options.encoding || 'uft8'
this.highWaterMark = options.highWaterMark || 16 * 1024
this.open()
this.writeOffset = this.start
this.wirtting = false
this.writeLen = 0
this.needDrain = false
this.cache = new Queue()
}
open() {
fs.open(this.path, this.flags, (err, fd) => {
if (err) {
this.emit('error', err)
}
// normal
this.fd = fd
this.emit('open', fd)
})
}
write(chunk, encoding, cb) {
chunk = Buffer.isBuffer(chunk) ? chunk : Buffer.from(chunk)
this.writeLen += chunk.length
const falg = this.writeLen < this.highWaterMark
this.needDrain = !falg
if (this.wirtting) {
// 正在执行写入,需要排队
this.cache.push({
chunk,
encoding,
cb
})
} else {
this.wirtting = true
// 正常首次写入
this._write(chunk, encoding, () => {
cb()
// 清空排队内容
this._clearBuffer()
})
}
return falg
}
_write(chunk, encoding, cb) {
if (typeof this.fd !== 'number') {
return this.once('open', () => {
return this._write(chunk, encoding, cb)
})
}
fs.write(this.fd, chunk, this.start, chunk.length, this.writeOffset, (err, written) => {
this.writeOffset += written
this.writeLen -= written
cb && cb()
})
}
_clearBuffer() {
const data = this.cache.shift()
if (data) {
this._write(data.element.chunk, data.element.encoding, () => {
data.element.cb && data.element.cb()
this._clearBuffer()
})
} else {
if (this.needDrain) {
this.needDrain = false
this.emit('drain')
}
}
}
}
const ws = new $WriteStream('./test04.txt', {
highWaterMark: 2
})
ws.on('open', fd => {
console.log('open file: ', fd)
})
let flag = ws.write('1', ' utf8', () => {
console.log('write success')
})
// console.log('flag: ', flag)
flag = ws.write('23', 'utf8', () => {
console.log('write success')
})
// console.log('flag: ', flag)
flag = ws.write('月落', 'utf8', () => {
console.log('write success')
})
ws.on('drain', () => {
console.log('drain')
})pipe 方法实现
文件读写操作的终极语法糖,无论是文件可写流还是可读流,核心目的还是为了完成数据读取和数据写入,本质还是执行文件拷贝行为。
基础使用
const fs = require('fs')

const rs = fs.createReadStream('./test04.txt', {
  highWaterMark: 4 // default: 64kb
})
const ws = fs.createWriteStream('./test05.txt', {
  highWaterMark: 1 // default: 16kb
})

rs.pipe(ws)
const fs = require('fs')
const rs = fs.createReadStream('./test04.txt', {
highWaterMark: 4 // default: 64kb
})
const ws = fs.createWriteStream('./test05.txt', {
highWaterMark: 1 // default: 16kb
})
rs.pipe(ws)自定义实现
const fs = require('fs')
const EventEmitter = require('events')

class $ReadStream extends EventEmitter {
  pipe(ws) {
    this.on('data', data => {
      const flag = ws.write(data)

      console.log(data)

      if (!flag) {
        this.pause()
      }
    })

    ws.on('drain', () => {
      this.resume()
    })
  }
}
const fs = require('fs')
const EventEmitter = require('events')
class $ReadStream extends EventEmitter {
pipe(ws) {
this.on('data', data => {
const flag = ws.write(data)
console.log(data)
if (!flag) {
this.pause()
}
})
ws.on('drain', () => {
this.resume()
})
}
}const fs = require('fs')
const { $ReadStream } = require('./read_stream')
const rs = new $ReadStream('./test04.txt', {
highWaterMark: 4 // default: 64kb
})
const ws = fs.createWriteStream('./test05.txt')
rs.pipe(ws)const fs = require('fs')
const { $ReadStream } = require('./read_stream')
const rs = new $ReadStream('./test04.txt', {
highWaterMark: 4 // default: 64kb
})
const ws = fs.createWriteStream('./test05.txt')
rs.pipe(ws)