Vite 源码实现
架构原理
Vite 底层使用两个构建引擎,Esbuild 和 Rollup。
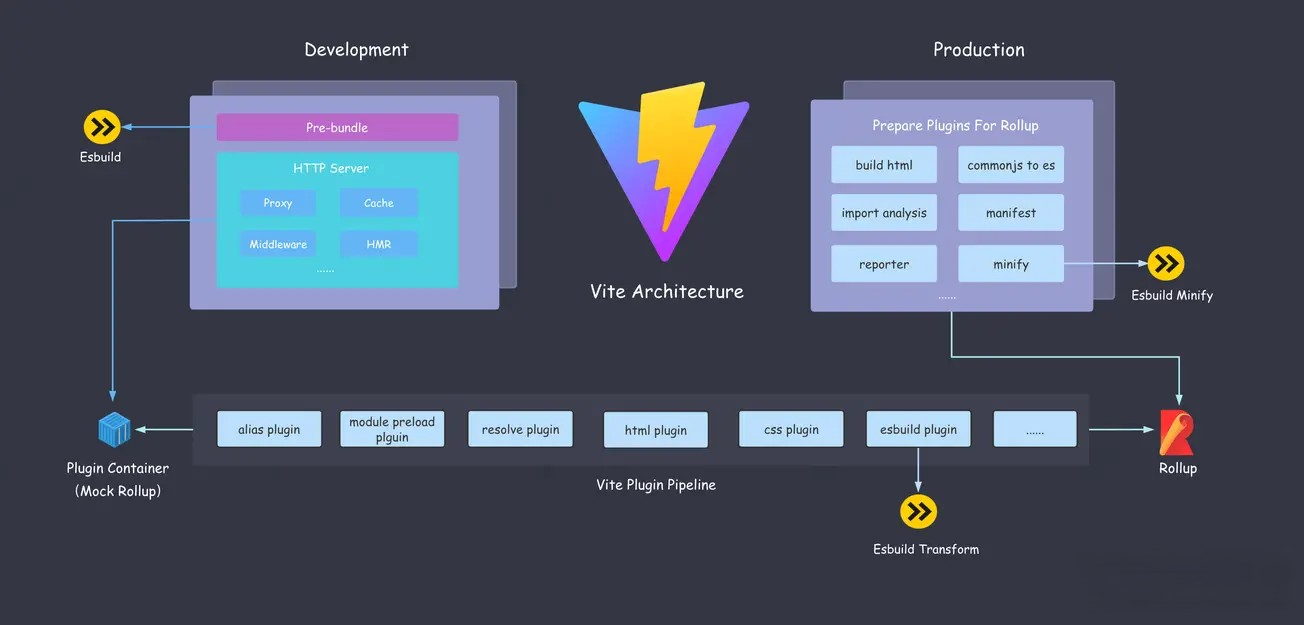
EsBuild
依赖预构建阶段,作为 bundler(打包工具) 使用
语法转译,将 Esbuild 作为 transformer 使用
- TS 或者 JSX 文件转译,生产环境和开发环境都会执行
- 替换原来的 Babel 和 TSC 功能
代码压缩,作为压缩工具使用
- 在生产环境通过插件的形式融入到 Rollup 的打包流程
- JS 和 CSS 代码压缩
Vite 利用 EsBuild 各个垂直方向的能力(Bundler、Transformer、Minifier),给 Vite 的高性能提供了有利的保证。
Vite 3.0 支持通过配置将 EsBuild 预构建同时用于开发环境和生产环境,默认不会开启,属于实验性质的特性。
Rollup
- 生产环境下,Vite 利用 Rollup 打包,并基于 Rollup 本身的打包能力进行扩展和优化。
- CSS 代码分割
- 将异步模块 CSS 代码抽离成单独文件,提高线上产物的缓存复用率
- 自动预加载
- 为 入口 chunk 的依赖自动生成
<link rel="modulepreload" >,提前下载资源,优化页面性能 - 关于 modulepreload
- 为 入口 chunk 的依赖自动生成
- 异步 chunk 加载优化
- 自动预加载公共依赖,优化 Rollup 产物依赖加载方式
- CSS 代码分割
- 兼容插件机制
- 无论是开发阶段还是生产环境,Vite 都根植于 Rollup 的插件机制和生态
在 Vite 中,无论是插件机制还是打包手段,都基于 Rollup 来实现,可以说 Vite 是对于 Rollup 的一种场景化的深度拓展。
插件流水线
在开发阶段 Vite 实现了一个按需加载的服务器,每一个文件都会经历一系列的编译流程,然后再将编译结果响应给浏览器。 在生产环境中,Vite 同样会执行一系列编译过程,将编译结果交给 Rollup 进行模块打包。
这一系列的编译过程指的就是 Vite 的插件工作流水线(Pipeline),插件功能是 Vite 构建的核心。
在生产环境中 Vite 直接调用 Rollup 进行打包,由 Rollup 调度各种插件。 在开发环境中,Vite 模拟了 Rollup 的插件机制,设计了一个 PluginContainer 对象来调度各个插件。
PluginContainer 的实现主要分为两部分:
- 实现 Rollup 插件钩子的调度
- 实现插件钩子内部的 Context 上下文对象
Vite 插件的具体执行顺序如下:
- 别名插件:
vite:pre-alias和@rollup/plugin-alias,用于路径别名替换。 - 用户自定义 pre 插件,即带有
enforce: "pre"属性的自定义插件。 - vite 核心构建插件。
- 用户自定义普通插件,即不带有
enforce属性的自定义插件。 - vite 生产环境插件和用户插件中带有
enforce: "post"属性的插件。 - 开发阶段特有的插件,包括环境变量注入插件
clientInjectionsPlugin和 import 语句分析及重写插件importAnalysisPlugin。
Vite 内置的插件包括四大类:
- 别名插件
- 核心构建插件
- 生产环境特有插件
- 开发环境特有插件
关于更多插件流水线内容,可以查看 这篇文章。
源码实现
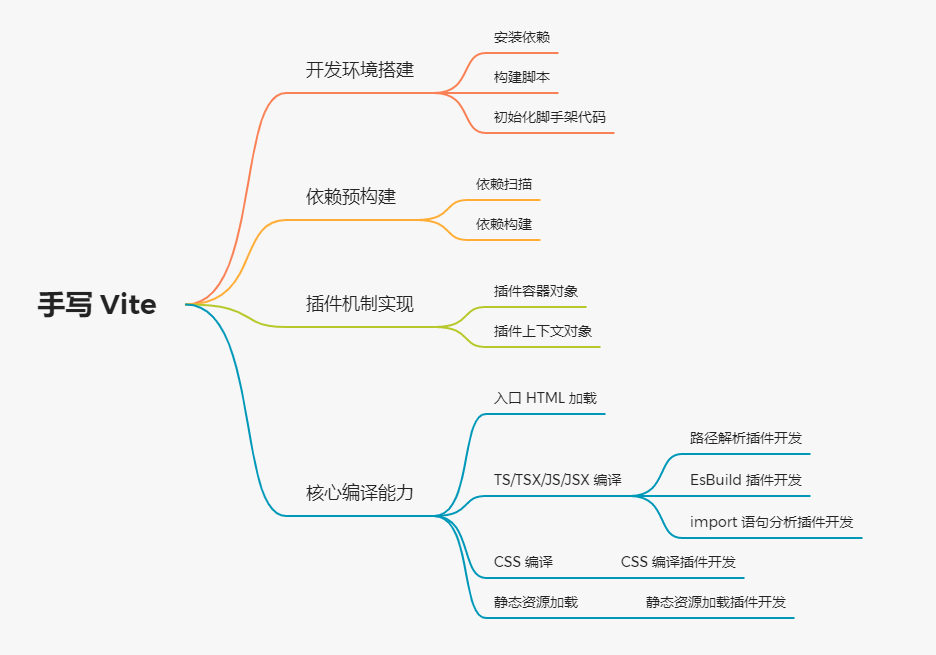
开发环境搭建
安装依赖
pnpm init -ypnpm init -ypnpm i cac chokidar connect debug es-module-lexer esbuild fs-extra magic-string picocolors resolve rollup sirv ws --savepnpm i cac chokidar connect debug es-module-lexer esbuild fs-extra magic-string picocolors resolve rollup sirv ws --savepnpm i @types/connect @types/debug @types/fs-extra @types/resolve @types/ws tsup --save-devpnpm i @types/connect @types/debug @types/fs-extra @types/resolve @types/ws tsup --save-dev这里我们使用 tsup 进行项目的构建(Vite 本身使用 Rollup 进行打包), tsup 能够实现库打包的功能,并且内置 esbuild 进行提速,性能上更加强悍。
配置 scripts 脚本
// package.json

"scripts": {
  "start": "tsup --watch",
  "build": "tsup --minify"
}
// package.json
"scripts": {
"start": "tsup --watch",
"build": "tsup --minify"
}新建 tsconfig.json 和 tsup.config.ts 配置文件
// tsconfig.json

{
  "compilerOptions": {
    // 支持 commonjs 模块的 default import,如 import path from 'path'
    // 否则只能通过 import * as path from 'path' 进行导入
    "esModuleInterop": true,
    "target": "ES2020",
    "moduleResolution": "node",
    "module": "ES2020",
    "strict": true
  }
}
// tsconfig.json
{
"compilerOptions": {
// 支持 commonjs 模块的 default import,如 import path from 'path'
// 否则只能通过 import * as path from 'path' 进行导入
"esModuleInterop": true,
"target": "ES2020",
"moduleResolution": "node",
"module": "ES2020",
"strict": true
}
}// tsup.config.ts
import { defineConfig } from "tsup";
export default defineConfig({
// 后续会增加 entry
entry: {
index: "src/node/cli.ts",
},
// 产物格式,包含 esm 和 cjs 格式
format: ["esm", "cjs"],
// 目标语法
target: "es2020",
// 生成 sourcemap
sourcemap: true,
// 没有拆包的需求,关闭拆包能力
splitting: false,
})// tsup.config.ts
import { defineConfig } from "tsup";
export default defineConfig({
// 后续会增加 entry
entry: {
index: "src/node/cli.ts",
},
// 产物格式,包含 esm 和 cjs 格式
format: ["esm", "cjs"],
// 目标语法
target: "es2020",
// 生成 sourcemap
sourcemap: true,
// 没有拆包的需求,关闭拆包能力
splitting: false,
})新建 src/node/cli.ts文件,进行 cli 的初始化:
// src/node/cli.ts

import cac from "cac"

const cli = cac()

// [] 中的内容为可选参数,也就是说仅输入 `vite` 命令下会执行下面的逻辑
cli
  .command("[root]", "Run the development server")
  .alias("serve")
  .alias("dev")
  .action(async () => {
    console.log('测试 cli~')
  })

cli.help()

cli.parse()
// src/node/cli.ts
import cac from "cac"
const cli = cac()
// [] 中的内容为可选参数,也就是说仅输入 `vite` 命令下会执行下面的逻辑
cli
.command("[root]", "Run the development server")
.alias("serve")
.alias("dev")
.action(async () => {
console.log('测试 cli~')
})
cli.help()
cli.parse()现在你可以执行 pnpm start 来编译这个 custom-vite 项目,tsup 会生成产物目录 dist,然后你可以新建 bin/vite 文件来引用产物:
#!/usr/bin/env node

require("../dist/index.js")
#!/usr/bin/env node
require("../dist/index.js")同时,你需要在 package.json 中注册 vite命令,配置如下:
"bin": {
  "vite": "bin/vite"
}"bin": {
"vite": "bin/vite"
}现在,我们就可以在业务项目中使用 vite 这个命令了。这里有一个示例的 playground 项目,你可以拿来进行测试,点击查看项目。
playground 项目 package.json 如下:
{
  "name": "playground",
  "private": true,
  "version": "0.0.0",
  "scripts": {
    "dev": "vite"
  },
  "dependencies": {
    "react": "17",
    "react-dom": "17"
  },
  "devDependencies": {
    "@types/react": "17",
    "@types/react-dom": "17",
    "@vitejs/plugin-react": "^1.3.0",
    "vite": "../custom-vite",
    "typescript": "^4.6.3"
  }
}
{
"name": "playground",
"private": true,
"version": "0.0.0",
"scripts": {
"dev": "vite"
},
"dependencies": {
"react": "17",
"react-dom": "17"
},
"devDependencies": {
"@types/react": "17",
"@types/react-dom": "17",
"@vitejs/plugin-react": "^1.3.0",
"vite": "../custom-vite",
"typescript": "^4.6.3"
}
}将 playground 项目放在 vite 同级目录中,然后执行 pnpm i,vite 命令会自动安装到测试项目的 node_modules/.bin目录中。
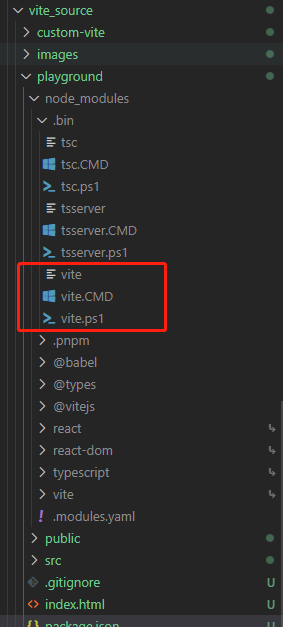
接着我们在 playground 项目中执行 pnpm dev 命令(内部执行 vite),可以看到如下的 log 信息:
测试 cli~测试 cli~接着,我们把 console.log 语句换成服务启动的逻辑:
import cac from "cac"
+ import { startDevServer } from "./server"

const cli = cac()

cli
  .command("[root]", "Run the development server")
  .alias("serve")
  .alias("dev")
  .action(async () => {
-    console.log('测试 cli~')
+   await startDevServer()
  })

cli.help()

cli.parse()
import cac from "cac"
+ import { startDevServer } from "./server"
const cli = cac()
cli
.command("[root]", "Run the development server")
.alias("serve")
.alias("dev")
.action(async () => {
- console.log('测试 cli~')
+ await startDevServer()
})
cli.help()
cli.parse()接着新建 src/node/server/index.ts,内容如下:
// connect 是一个具有中间件机制的轻量级 Node.js 框架。
// 既可以单独作为服务器,也可以接入到任何具有中间件机制的框架中,如 Koa、Express
import connect from "connect"
// picocolors 是一个用来在命令行显示不同颜色文本的工具
import { blue, green } from "picocolors"

export async function startDevServer() {
  const app = connect()
  const root = process.cwd()
  const startTime = Date.now()

  app.listen(3000, async () => {
    console.log(
      green("🚀 No-Bundle 服务已经成功启动!"),
      `耗时: ${Date.now() - startTime}ms`
    )
    console.log(`> 本地访问路径: ${blue("http://localhost:3000")}`)
  })
}
// connect 是一个具有中间件机制的轻量级 Node.js 框架。
// 既可以单独作为服务器,也可以接入到任何具有中间件机制的框架中,如 Koa、Express
import connect from "connect"
// picocolors 是一个用来在命令行显示不同颜色文本的工具
import { blue, green } from "picocolors"
export async function startDevServer() {
const app = connect()
const root = process.cwd()
const startTime = Date.now()
app.listen(3000, async () => {
console.log(
green("🚀 No-Bundle 服务已经成功启动!"),
`耗时: ${Date.now() - startTime}ms`
)
console.log(`> 本地访问路径: ${blue("http://localhost:3000")}`)
})
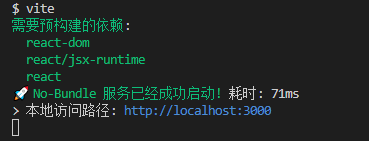
}再次执行 pnpm dev,你可以发现终端出现如下的启动日志:

依赖预构建
现在我们来进入依赖预构建阶段的开发。
首先我们新建 src/node/optimizer/index.ts 来存放依赖预构建的逻辑:
export async function optimize(root: string) {
  // 1. 确认入口
  // 2. 从入口处扫描依赖
  // 3. 预构建依赖
}
export async function optimize(root: string) {
// 1. 确认入口
// 2. 从入口处扫描依赖
// 3. 预构建依赖
}然后在服务入口中引入预构建的逻辑:
import connect from "connect"
import { blue, green } from "picocolors"

+import { optimize } from '../optimizer'

export async function startDevServer() {
  const app = connect()
  const root = process.cwd()
  const startTime = Date.now()

  app.listen(3000, async () => {
+    await optimize(root)

    console.log(
      green("🚀 No-Bundle 服务已经成功启动!"),
      `耗时: ${Date.now() - startTime}ms`
    )
    console.log(`> 本地访问路径: ${blue("http://localhost:3000")}`)
  })
}
import connect from "connect"
import { blue, green } from "picocolors"
+import { optimize } from '../optimizer'
export async function startDevServer() {
const app = connect()
const root = process.cwd()
const startTime = Date.now()
app.listen(3000, async () => {
+ await optimize(root)
console.log(
green("🚀 No-Bundle 服务已经成功启动!"),
`耗时: ${Date.now() - startTime}ms`
)
console.log(`> 本地访问路径: ${blue("http://localhost:3000")}`)
})
}接着我们来开发依赖预构建的功能,从上面的代码注释你也可以看出,我们需要完成三部分的逻辑:
- 确定预构建入口
- 从入口开始扫描出用到的依赖
- 对依赖进行预构建
首先是确定入口,为了方便理解,我们直接约定入口为 src 目录下的 main.tsx 文件:
import path from 'path'

export async function optimize(root: string) {
  // 1. 确认入口
  const entry = path.resolve(root, 'src/main.tsx')

  // 2. 从入口处扫描依赖
  // 3. 预构建依赖
}
import path from 'path'
export async function optimize(root: string) {
// 1. 确认入口
const entry = path.resolve(root, 'src/main.tsx')
// 2. 从入口处扫描依赖
// 3. 预构建依赖
}第二步是扫描依赖:
import path from 'path'
import { build } from "esbuild";
import { green } from 'picocolors'
import { scanPlugin } from './scanPlugin'

export async function optimize(root: string) {
  // 1. 确认入口
  const entry = path.resolve(root, 'src/main.tsx')

  // 2. 从入口处扫描依赖
  const deps = new Set<string>()

  await build({
    entryPoints: [entry],
    bundle: true,
    write: false,
    plugins: [ scanPlugin(deps) ]
  })

  console.log(
    `${green("需要预构建的依赖")}:\n${[...deps]
    .map(green)
    .map((item) => `  ${item}`)
    .join("\n")}`
  )

  // 3. 预构建依赖
}
import path from 'path'
import { build } from "esbuild";
import { green } from 'picocolors'
import { scanPlugin } from './scanPlugin'
export async function optimize(root: string) {
// 1. 确认入口
const entry = path.resolve(root, 'src/main.tsx')
// 2. 从入口处扫描依赖
const deps = new Set<string>()
await build({
entryPoints: [entry],
bundle: true,
write: false,
plugins: [ scanPlugin(deps) ]
})
console.log(
`${green("需要预构建的依赖")}:\n${[...deps]
.map(green)
.map((item) => ` ${item}`)
.join("\n")}`
)
// 3. 预构建依赖
}依赖扫描需要我们借助 Esbuild 插件来完成,最后会记录到 deps 这个集合中。
接下来我们开发基于 Esbuild 的依赖扫描插件,你需要在 optimzier 目录中新建 scanPlguin.ts 文件,内容如下:
import { Plugin } from "esbuild"
import { BARE_IMPORT_RE, EXTERNAL_TYPES } from "../constants"

export function scanPlugin(deps: Set<string>): Plugin {
  return {
    name: "esbuild:scan-deps",
    setup(build) {
      // 忽略的文件类型
      build.onResolve(
        { filter: new RegExp(`\\.(${EXTERNAL_TYPES.join("|")})$`) },
        (resolveInfo) => {
          return {
            path: resolveInfo.path,
            // 打上 external 标记
            external: true,
          }
        }
      )
      // 记录依赖
      build.onResolve(
        {
          filter: BARE_IMPORT_RE,
        },
        (resolveInfo) => {
          const { path: id } = resolveInfo
          // 推入 deps 集合中
          deps.add(id)
          return {
            path: id,
            external: true,
          }
        }
      )
    }
  }
}
import { Plugin } from "esbuild"
import { BARE_IMPORT_RE, EXTERNAL_TYPES } from "../constants"
export function scanPlugin(deps: Set<string>): Plugin {
return {
name: "esbuild:scan-deps",
setup(build) {
// 忽略的文件类型
build.onResolve(
{ filter: new RegExp(`\\.(${EXTERNAL_TYPES.join("|")})$`) },
(resolveInfo) => {
return {
path: resolveInfo.path,
// 打上 external 标记
external: true,
}
}
)
// 记录依赖
build.onResolve(
{
filter: BARE_IMPORT_RE,
},
(resolveInfo) => {
const { path: id } = resolveInfo
// 推入 deps 集合中
deps.add(id)
return {
path: id,
external: true,
}
}
)
}
}
}文件中用到了一些常量,在 src/node/constants.ts 中定义,内容如下:
export const EXTERNAL_TYPES = [
  "css",
  "less",
  "sass",
  "scss",
  "styl",
  "stylus",
  "pcss",
  "postcss",
  "vue",
  "svelte",
  "marko",
  "astro",
  "png",
  "jpe?g",
  "gif",
  "svg",
  "ico",
  "webp",
  "avif",
]

export const BARE_IMPORT_RE = /^[\w@][^:]/
export const EXTERNAL_TYPES = [
"css",
"less",
"sass",
"scss",
"styl",
"stylus",
"pcss",
"postcss",
"vue",
"svelte",
"marko",
"astro",
"png",
"jpe?g",
"gif",
"svg",
"ico",
"webp",
"avif",
]
export const BARE_IMPORT_RE = /^[\w@][^:]/插件的逻辑非常简单,即把一些无关的资源进行 external,不让 esbuild 处理,防止 Esbuild 报错,同时将 bare import 的路径视作第三方包,推入 deps 集合中。
现在,我们在 playground 项目根路径中执行 pnpm dev,可以发现依赖扫描已经成功执行:
当我们收集到所有的依赖信息之后,就可以对每个依赖进行打包,完成依赖预构建了:
当我们收集到所有的依赖信息之后,就可以对每个依赖进行打包,完成依赖预构建了:
// ...
import { preBundlePlugin } from "./preBundlePlugin";
import { PRE_BUNDLE_DIR } from "../constants";

export async function optimize(root: string) {
  // 1. 确认入口
  const entry = path.resolve(root, 'src/main.tsx')

  // 2. 从入口处扫描依赖
	// ...

  // 3. 预构建依赖
  await build({
    entryPoints: [...deps],
    write: true,
    bundle: true,
    format: 'esm',
    splitting: true,
   outdir: path.resolve(root, PRE_BUNDLE_DIR),
    plugins: [preBundlePlugin(deps)]
  })
}
// ...
import { preBundlePlugin } from "./preBundlePlugin";
import { PRE_BUNDLE_DIR } from "../constants";
export async function optimize(root: string) {
// 1. 确认入口
const entry = path.resolve(root, 'src/main.tsx')
// 2. 从入口处扫描依赖
// ...
// 3. 预构建依赖
await build({
entryPoints: [...deps],
write: true,
bundle: true,
format: 'esm',
splitting: true,
outdir: path.resolve(root, PRE_BUNDLE_DIR),
plugins: [preBundlePlugin(deps)]
})
}在此,我们引入了一个新的常量 PRE_BUNDLE_DIR,定义如下:
import path from 'path'

// ...

export const BARE_IMPORT_RE = /^[\w@][^:]/

// 预构建产物默认存放在 node_modules 中的 .vite 目录中
export const PRE_BUNDLE_DIR = path.join("node_modules", ".vite")
import path from 'path'
// ...
export const BARE_IMPORT_RE = /^[\w@][^:]/
// 预构建产物默认存放在 node_modules 中的 .vite 目录中
export const PRE_BUNDLE_DIR = path.join("node_modules", ".vite")接着,我们继续开发预构建的 Esbuild 插件:
// src/node/utils.ts

import path from 'path'
import os from 'os'

export function slash(p: string): string {
  return p.replace(/\\/g, '/')
}
export const isWindows = os.platform() === 'win32'

export function normalizePath(id: string): string {
  return path.posix.normalize(isWindows ? slash(id) : id)
}
// src/node/utils.ts
import path from 'path'
import os from 'os'
export function slash(p: string): string {
return p.replace(/\\/g, '/')
}
export const isWindows = os.platform() === 'win32'
export function normalizePath(id: string): string {
return path.posix.normalize(isWindows ? slash(id) : id)
}// src/node/optimizer/preBundlePlugin.ts
import { Loader, Plugin } from "esbuild"
import { BARE_IMPORT_RE } from "../constants"
// 用来分析 es 模块 import/export 语句的库
import { init, parse } from "es-module-lexer"
import path from "path"
// 一个实现了 node 路径解析算法的库
import resolve from "resolve"
// 一个更加好用的文件操作库
import fs from "fs-extra"
// 用来开发打印 debug 日志的库
import createDebug from "debug"
import{ normalizePath } from '../utils'
const debug = createDebug("dev")
export function preBundlePlugin(deps: Set<string>): Plugin {
return {
name: "esbuild:pre-bundle",
setup(build) {
build.onResolve(
{
filter: BARE_IMPORT_RE,
},
(resolveInfo) => {
const { path: id, importer } = resolveInfo
const isEntry = !importer
// 命中需要预编译的依赖
if (deps.has(id)) {
// 若为入口,则标记 dep 的
return isEntry
? {
path: id,
namespace: "dep",
}
: {
// 因为走到 onResolve 了,所以这里的 path 就是绝对路径了
path: resolve.sync(id, { basedir: process.cwd() }),
}
}
}
)
// 拿到标记后的依赖,构造代理模块,交给 esbuild 打包
build.onLoad(
{
filter: /.*/,
namespace: "dep",
},
async (loadInfo) => {
await init
const id = loadInfo.path
const root = process.cwd()
const entryPath = resolve.sync(id, { basedir: root })
const code = await fs.readFile(entryPath, "utf-8")
const [imports, exports] = await parse(code)
let relativePath = normalizePath(path.relative(root, entryPath))
if (
!relativePath.startsWith('./') &&
!relativePath.startsWith('../') &&
relativePath !== '.'
) {
relativePath = `./${relativePath}`
}
let proxyModule = []
// cjs
if (!imports.length && !exports.length) {
// 构造代理模块
const res = require(entryPath)
const specifiers = Object.keys(res)
proxyModule.push(
`export { ${specifiers.join(",")} } from "${relativePath}"`,
`export default require("${relativePath}")`
)
} else {
// esm 格式比较好处理,export * 或者 export default 即可
if (exports.includes("default")) {
proxyModule.push(`import d from "${relativePath}"export default d`)
}
proxyModule.push(`export * from "${relativePath}"`)
}
debug("代理模块内容: %o", proxyModule.join("\n"))
const loader = path.extname(entryPath).slice(1)
return {
loader: loader as Loader,
contents: proxyModule.join("\n"),
resolveDir: root,
}
}
)
}
}
}// src/node/optimizer/preBundlePlugin.ts
import { Loader, Plugin } from "esbuild"
import { BARE_IMPORT_RE } from "../constants"
// 用来分析 es 模块 import/export 语句的库
import { init, parse } from "es-module-lexer"
import path from "path"
// 一个实现了 node 路径解析算法的库
import resolve from "resolve"
// 一个更加好用的文件操作库
import fs from "fs-extra"
// 用来开发打印 debug 日志的库
import createDebug from "debug"
import{ normalizePath } from '../utils'
const debug = createDebug("dev")
export function preBundlePlugin(deps: Set<string>): Plugin {
return {
name: "esbuild:pre-bundle",
setup(build) {
build.onResolve(
{
filter: BARE_IMPORT_RE,
},
(resolveInfo) => {
const { path: id, importer } = resolveInfo
const isEntry = !importer
// 命中需要预编译的依赖
if (deps.has(id)) {
// 若为入口,则标记 dep 的
return isEntry
? {
path: id,
namespace: "dep",
}
: {
// 因为走到 onResolve 了,所以这里的 path 就是绝对路径了
path: resolve.sync(id, { basedir: process.cwd() }),
}
}
}
)
// 拿到标记后的依赖,构造代理模块,交给 esbuild 打包
build.onLoad(
{
filter: /.*/,
namespace: "dep",
},
async (loadInfo) => {
await init
const id = loadInfo.path
const root = process.cwd()
const entryPath = resolve.sync(id, { basedir: root })
const code = await fs.readFile(entryPath, "utf-8")
const [imports, exports] = await parse(code)
let relativePath = normalizePath(path.relative(root, entryPath))
if (
!relativePath.startsWith('./') &&
!relativePath.startsWith('../') &&
relativePath !== '.'
) {
relativePath = `./${relativePath}`
}
let proxyModule = []
// cjs
if (!imports.length && !exports.length) {
// 构造代理模块
const res = require(entryPath)
const specifiers = Object.keys(res)
proxyModule.push(
`export { ${specifiers.join(",")} } from "${relativePath}"`,
`export default require("${relativePath}")`
)
} else {
// esm 格式比较好处理,export * 或者 export default 即可
if (exports.includes("default")) {
proxyModule.push(`import d from "${relativePath}"export default d`)
}
proxyModule.push(`export * from "${relativePath}"`)
}
debug("代理模块内容: %o", proxyModule.join("\n"))
const loader = path.extname(entryPath).slice(1)
return {
loader: loader as Loader,
contents: proxyModule.join("\n"),
resolveDir: root,
}
}
)
}
}
}对于 CommonJS 格式的依赖,单纯用 export default require('入口路径') 是有局限性的,比如对于 React 而言,用这样的方式生成的产物最后只有 default 导出:
// esbuild 的打包产物
// ...
export default react_default
// esbuild 的打包产物
// ...
export default react_default那么用户在使用这个依赖的时候,必须这么使用:
// ✅ 正确
import React from 'react'

const { useState } = React

// ❌ 报错
import { useState } from 'react'
// ✅ 正确
import React from 'react'
const { useState } = React
// ❌ 报错
import { useState } from 'react'那为什么上述会报错的语法在 Vite 是可以正常使用的呢?原因是 Vite 在做 import 语句分析的时候,自动将你的代码进行改写了:
// 原来的写法
import { useState } from 'react'

// Vite 的 importAnalysis 插件转换后的写法类似下面这样
import react_default from '/node_modules/.vite/react.js'

const { useState } = react_default
// 原来的写法
import { useState } from 'react'
// Vite 的 importAnalysis 插件转换后的写法类似下面这样
import react_default from '/node_modules/.vite/react.js'
const { useState } = react_default那么,还有没有别的方案来解决这个问题?其实,上述的插件代码中已经用另一个方案解决了这个问题,我们不妨把目光集中在下面这段代码中:
if (!imports.length && !exports.length) {
  // 构造代理模块
  // 通过 require 拿到模块的导出对象
  const res = require(entryPath)
  // 用 Object.keys 拿到所有的具名导出
  const specifiers = Object.keys(res)
  // 构造 export 语句交给 Esbuild 打包
  proxyModule.push(
    `export { ${specifiers.join(",")} } from "${entryPath}"`,
    `export default require("${entryPath}")`
  )
}
if (!imports.length && !exports.length) {
// 构造代理模块
// 通过 require 拿到模块的导出对象
const res = require(entryPath)
// 用 Object.keys 拿到所有的具名导出
const specifiers = Object.keys(res)
// 构造 export 语句交给 Esbuild 打包
proxyModule.push(
`export { ${specifiers.join(",")} } from "${entryPath}"`,
`export default require("${entryPath}")`
)
}如此一来,Esbuild 预构建的产物中便会包含 CommonJS 模块中所有的导出信息:
// 预构建产物导出代码
export {
  react_default as default,
  useState,
  useEffect,
  // 省略其它导出
}
// 预构建产物导出代码
export {
react_default as default,
useState,
useEffect,
// 省略其它导出
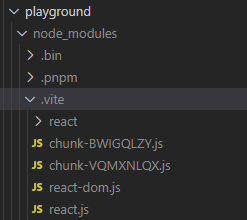
}接下来让我们来测试一下预构建整体的功能。在 playground 项目中执行 pnpm dev,接着去项目的 node_modules 目录中,可以发现.vite 目录下新增的react、react-dom的预构建产物:
插件机制开发
完成了依赖预构建的功能之后,我们开始着手实现插件容器和插件上下文对象。
首先,你可以新建 src/node/pluginContainer.ts 文件,增加如下的类型定义:
import type {
  LoadResult,
  PartialResolvedId,
  SourceDescription,
  PluginContext as RollupPluginContext,
  ResolvedId,
} from "rollup";

export interface PluginContainer {
  resolveId(id: string, importer?: string): Promise<PartialResolvedId | null>;
  load(id: string): Promise<LoadResult | null>;
  transform(code: string, id: string): Promise<SourceDescription | null>;
}
import type {
LoadResult,
PartialResolvedId,
SourceDescription,
PluginContext as RollupPluginContext,
ResolvedId,
} from "rollup";
export interface PluginContainer {
resolveId(id: string, importer?: string): Promise<PartialResolvedId | null>;
load(id: string): Promise<LoadResult | null>;
transform(code: string, id: string): Promise<SourceDescription | null>;
}另外,由于插件容器需要接收 Vite 插件作为初始化参数,因此我们需要提前声明插件的类型,你可以继续新建 src/node/plugin.ts 来声明如下的插件类型:
import { LoadResult, PartialResolvedId, SourceDescription } from "rollup";
import { ServerContext } from "./server";
export type ServerHook = (
server: ServerContext
) => (() => void) | void | Promise<(() => void) | void>;
// 仅实现以下这几个钩子
export interface Plugin {
name: string;
configureServer?: ServerHook;
resolveId?: (
id: string,
importer?: string
) => Promise<PartialResolvedId | null> | PartialResolvedId | null;
load?: (id: string) => Promise<LoadResult | null> | LoadResult | null;
transform?: (
code: string,
id: string
) => Promise<SourceDescription | null> | SourceDescription | null;
transformIndexHtml?: (raw: string) => Promise<string> | string;
}import { LoadResult, PartialResolvedId, SourceDescription } from "rollup";
import { ServerContext } from "./server";
export type ServerHook = (
server: ServerContext
) => (() => void) | void | Promise<(() => void) | void>;
// 仅实现以下这几个钩子
export interface Plugin {
name: string;
configureServer?: ServerHook;
resolveId?: (
id: string,
importer?: string
) => Promise<PartialResolvedId | null> | PartialResolvedId | null;
load?: (id: string) => Promise<LoadResult | null> | LoadResult | null;
transform?: (
code: string,
id: string
) => Promise<SourceDescription | null> | SourceDescription | null;
transformIndexHtml?: (raw: string) => Promise<string> | string;
}对于其中的 ServerContext,我们暂时不用过于关心,只需要在 server/index.ts 中简单声明一下类型即可:
// src/node/server/index.ts
// 增加如下类型声明
export interface ServerContext {}// src/node/server/index.ts
// 增加如下类型声明
export interface ServerContext {}接着,我们来实现插件机制的具体逻辑,主要集中在 createPluginContainer 函数中:
import type {
  LoadResult,
  PartialResolvedId,
  SourceDescription,
  PluginContext as RollupPluginContext,
  ResolvedId,
} from "rollup";

export interface PluginContainer {
  resolveId(id: string, importer?: string): Promise<PartialResolvedId | null>;
  load(id: string): Promise<LoadResult | null>;
  transform(code: string, id: string): Promise<SourceDescription | null>;
}
export const createPluginContainer = (plugins: Plugin[]): PluginContainer => {
// 插件上下文对象
// @ts-ignore
class Context implements RollupPluginContext {
// 这里仅实现上下文对象的 resolve 方法
async resolve(id: string, importer?: string) {
let out = await pluginContainer.resolveId(id, importer)
if (typeof out === "string") out = { id: out }
return out as ResolvedId | null
}
}
// 插件容器
const pluginContainer: PluginContainer = {
async resolveId(id: string, importer?: string) {
const ctx = new Context() as any
for (const plugin of plugins) {
if (plugin.resolveId) {
const newId = await plugin.resolveId.call(ctx as any, id, importer)
if (newId) {
id = typeof newId === "string" ? newId : newId.id
return { id }
}
}
}
return null
},
async load(id) {
const ctx = new Context() as any
for (const plugin of plugins) {
if (plugin.load) {
const result = await plugin.load.call(ctx, id)
if (result) {
return result
}
}
}
return null
},
async transform(code, id) {
const ctx = new Context() as any
for (const plugin of plugins) {
if (plugin.transform) {
const result = await plugin.transform.call(ctx, code, id)
if (!result) continue
if (typeof result === "string") {
code = result
} else if (result.code) {
code = result.code
}
}
}
return { code }
}
}
return pluginContainer
}import type {
LoadResult,
PartialResolvedId,
SourceDescription,
PluginContext as RollupPluginContext,
ResolvedId,
} from "rollup";
export interface PluginContainer {
resolveId(id: string, importer?: string): Promise<PartialResolvedId | null>;
load(id: string): Promise<LoadResult | null>;
transform(code: string, id: string): Promise<SourceDescription | null>;
}
export const createPluginContainer = (plugins: Plugin[]): PluginContainer => {
// 插件上下文对象
// @ts-ignore
class Context implements RollupPluginContext {
// 这里仅实现上下文对象的 resolve 方法
async resolve(id: string, importer?: string) {
let out = await pluginContainer.resolveId(id, importer)
if (typeof out === "string") out = { id: out }
return out as ResolvedId | null
}
}
// 插件容器
const pluginContainer: PluginContainer = {
async resolveId(id: string, importer?: string) {
const ctx = new Context() as any
for (const plugin of plugins) {
if (plugin.resolveId) {
const newId = await plugin.resolveId.call(ctx as any, id, importer)
if (newId) {
id = typeof newId === "string" ? newId : newId.id
return { id }
}
}
}
return null
},
async load(id) {
const ctx = new Context() as any
for (const plugin of plugins) {
if (plugin.load) {
const result = await plugin.load.call(ctx, id)
if (result) {
return result
}
}
}
return null
},
async transform(code, id) {
const ctx = new Context() as any
for (const plugin of plugins) {
if (plugin.transform) {
const result = await plugin.transform.call(ctx, code, id)
if (!result) continue
if (typeof result === "string") {
code = result
} else if (result.code) {
code = result.code
}
}
}
return { code }
}
}
return pluginContainer
}接着,我们来完善一下之前的服务器逻辑:
// src/node/server/index.ts

import connect from "connect"
import { blue, green } from "picocolors"

import { optimize } from '../optimizer'
import { resolvePlugins } from '../plugins'
import { Plugin } from "../plugin";
import { createPluginContainer, PluginContainer } from '../pluginContainer'

export interface ServerContext {
  root: string;
  pluginContainer: PluginContainer;
  app: connect.Server;
  plugins: Plugin[]
}

export async function startDevServer() {
  const app = connect()
  const root = process.cwd()
  const startTime = Date.now()

  const plugins = resolvePlugins()
  const pluginContainer = createPluginContainer(plugins)

  const serverContext: ServerContext = {
    root: process.cwd(),
    app,
    pluginContainer,
    plugins
  }

  for (const plugin of plugins) {
    if (plugin.configureServer) {
      await plugin.configureServer(serverContext)
    }
  }

  app.listen(3000, async () => {
    await optimize(root)

    console.log(
      green("🚀 No-Bundle 服务已经成功启动!"),
      `耗时: ${Date.now() - startTime}ms`
    )
    console.log(`> 本地访问路径: ${blue("http://localhost:3000")}`)
  })
}
// src/node/server/index.ts
import connect from "connect"
import { blue, green } from "picocolors"
import { optimize } from '../optimizer'
import { resolvePlugins } from '../plugins'
import { Plugin } from "../plugin";
import { createPluginContainer, PluginContainer } from '../pluginContainer'
export interface ServerContext {
root: string;
pluginContainer: PluginContainer;
app: connect.Server;
plugins: Plugin[]
}
export async function startDevServer() {
const app = connect()
const root = process.cwd()
const startTime = Date.now()
const plugins = resolvePlugins()
const pluginContainer = createPluginContainer(plugins)
const serverContext: ServerContext = {
root: process.cwd(),
app,
pluginContainer,
plugins
}
for (const plugin of plugins) {
if (plugin.configureServer) {
await plugin.configureServer(serverContext)
}
}
app.listen(3000, async () => {
await optimize(root)
console.log(
green("🚀 No-Bundle 服务已经成功启动!"),
`耗时: ${Date.now() - startTime}ms`
)
console.log(`> 本地访问路径: ${blue("http://localhost:3000")}`)
})
}其中 resolvePlugins 方法我们还未定义,你可以新建 src/node/plugins/index.ts 文件,内容如下:
import { Plugin } from "../plugin";

export function resolvePlugins(): Plugin[] {
  return [];
}
import { Plugin } from "../plugin";
export function resolvePlugins(): Plugin[] {
return [];
}核心编译能力
入口 HTML 加载
现在我们基于如上的插件机制,来实现 Vite 的核心编译能力。
首先要考虑的就是入口 HTML 如何编译和加载的问题,这里我们可以通过一个服务中间件,配合插件机制来实现。具体而言,你可以新建src/node/server/middlewares/indexHtml.ts,内容如下:
import { NextHandleFunction } from "connect"
import path from "path"
import { pathExists, readFile } from "fs-extra"
import { ServerContext } from "../index"

export function indexHtmlMiddware(
  serverContext: ServerContext
): NextHandleFunction {
  return async (req, res, next) => {
    if (req.url === "/") {
      const { root } = serverContext

      // 默认使用项目根目录下的 index.html
      const indexHtmlPath = path.join(root, "index.html")

      if (await pathExists(indexHtmlPath)) {
        const rawHtml = await readFile(indexHtmlPath, "utf8")

        let html = rawHtml

        // 通过执行插件的 transformIndexHtml 方法来对 HTML 进行自定义的修改
        for (const plugin of serverContext.plugins) {
          if (plugin.transformIndexHtml) {
            html = await plugin.transformIndexHtml(html)
          }
        }

        res.statusCode = 200
        res.setHeader("Content-Type", "text/html")
        return res.end(html)
      }
    }

    return next()
  }
}
import { NextHandleFunction } from "connect"
import path from "path"
import { pathExists, readFile } from "fs-extra"
import { ServerContext } from "../index"
export function indexHtmlMiddware(
serverContext: ServerContext
): NextHandleFunction {
return async (req, res, next) => {
if (req.url === "/") {
const { root } = serverContext
// 默认使用项目根目录下的 index.html
const indexHtmlPath = path.join(root, "index.html")
if (await pathExists(indexHtmlPath)) {
const rawHtml = await readFile(indexHtmlPath, "utf8")
let html = rawHtml
// 通过执行插件的 transformIndexHtml 方法来对 HTML 进行自定义的修改
for (const plugin of serverContext.plugins) {
if (plugin.transformIndexHtml) {
html = await plugin.transformIndexHtml(html)
}
}
res.statusCode = 200
res.setHeader("Content-Type", "text/html")
return res.end(html)
}
}
return next()
}
}然后在服务中应用这个中间件:
import connect from "connect"
import { blue, green } from "picocolors"

import { optimize } from '../optimizer'
import { resolvePlugins } from '../plugins'
import { Plugin } from "../plugin";
import { createPluginContainer, PluginContainer } from '../pluginContainer'

import { indexHtmlMiddware } from './middlewares/indexHtml'

// ...

export async function startDevServer() {
  const app = connect()
  const root = process.cwd()
  const startTime = Date.now()

  const plugins = resolvePlugins()
  const pluginContainer = createPluginContainer(plugins)

  // ...

  // 处理入口 HTML 资源
  app.use(indexHtmlMiddware(serverContext))

	// ...
}
import connect from "connect"
import { blue, green } from "picocolors"
import { optimize } from '../optimizer'
import { resolvePlugins } from '../plugins'
import { Plugin } from "../plugin";
import { createPluginContainer, PluginContainer } from '../pluginContainer'
import { indexHtmlMiddware } from './middlewares/indexHtml'
// ...
export async function startDevServer() {
const app = connect()
const root = process.cwd()
const startTime = Date.now()
const plugins = resolvePlugins()
const pluginContainer = createPluginContainer(plugins)
// ...
// 处理入口 HTML 资源
app.use(indexHtmlMiddware(serverContext))
// ...
}接下来通过 pnpm dev 启动项目,然后访问 http://localhost:3000,从网络面板中你可以查看到 HTML 的内容已经成功返回:
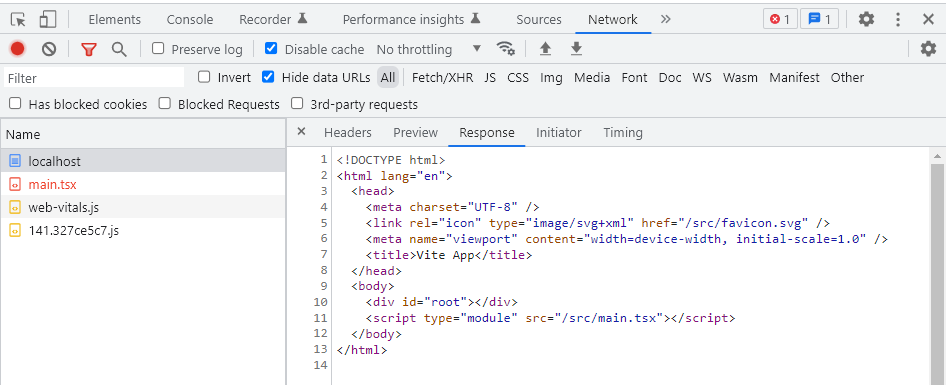
不过当前的页面并没有任何内容,因为 HTML 中引入的 TSX 文件并没有被正确编译。接下来,我们就来处理 TSX 文件的编译工作。
JS/TS/JSX/TSX 编译能力
首先新增一个中间件 src/node/server/middlewares/transform.ts,内容如下:
// src/node/server/middlewares/transform.ts

import { NextHandleFunction } from "connect"
import {
  isJSRequest,
  cleanUrl,
} from "../../utils"
import { ServerContext } from "../index"
import createDebug from "debug"

const debug = createDebug("dev")

export async function transformRequest(
  url: string,
  serverContext: ServerContext
) {
  const { pluginContainer } = serverContext

  url = cleanUrl(url)

  // 简单来说,就是依次调用插件容器的 resolveId、load、transform 方法
  const resolvedResult = await pluginContainer.resolveId(url)

  let transformResult

  if (resolvedResult?.id) {
    let code = await pluginContainer.load(resolvedResult.id)
    if (typeof code === "object" && code !== null) {
      code = code.code
    }
    if (code) {
      transformResult = await pluginContainer.transform(
        code as string,
        resolvedResult?.id
      )
    }
  }
  return transformResult
}

export function transformMiddleware(
  serverContext: ServerContext
): NextHandleFunction {
  return async (req, res, next) => {
    if (req.method !== "GET" || !req.url) {
      return next()
    }

    const url = req.url

    debug("transformMiddleware: %s", url)

    // transform JS request
    if (isJSRequest(url)) {
      // 核心编译函数
      let result = await transformRequest(url, serverContext)

      if (!result) {
        return next()
      }
      if (result && typeof result !== "string") {
        result = result.code
      }

      // 编译完成,返回响应给浏览器
      res.statusCode = 200
      res.setHeader("Content-Type", "application/javascript")

      return res.end(result)
    }

    next()
  }
}
// src/node/server/middlewares/transform.ts
import { NextHandleFunction } from "connect"
import {
isJSRequest,
cleanUrl,
} from "../../utils"
import { ServerContext } from "../index"
import createDebug from "debug"
const debug = createDebug("dev")
export async function transformRequest(
url: string,
serverContext: ServerContext
) {
const { pluginContainer } = serverContext
url = cleanUrl(url)
// 简单来说,就是依次调用插件容器的 resolveId、load、transform 方法
const resolvedResult = await pluginContainer.resolveId(url)
let transformResult
if (resolvedResult?.id) {
let code = await pluginContainer.load(resolvedResult.id)
if (typeof code === "object" && code !== null) {
code = code.code
}
if (code) {
transformResult = await pluginContainer.transform(
code as string,
resolvedResult?.id
)
}
}
return transformResult
}
export function transformMiddleware(
serverContext: ServerContext
): NextHandleFunction {
return async (req, res, next) => {
if (req.method !== "GET" || !req.url) {
return next()
}
const url = req.url
debug("transformMiddleware: %s", url)
// transform JS request
if (isJSRequest(url)) {
// 核心编译函数
let result = await transformRequest(url, serverContext)
if (!result) {
return next()
}
if (result && typeof result !== "string") {
result = result.code
}
// 编译完成,返回响应给浏览器
res.statusCode = 200
res.setHeader("Content-Type", "application/javascript")
return res.end(result)
}
next()
}
}// src/node/server/index.ts
export async function startDevServer() {
// ...
// 核心编译逻辑
app.use(transformMiddleware(serverContext))
// 处理入口 HTML 资源
app.use(indexHtmlMiddware(serverContext))
app.listen(3000, async () => {
await optimize(root)
console.log(
green("🚀 No-Bundle 服务已经成功启动!"),
`耗时: ${Date.now() - startTime}ms`
)
console.log(`> 本地访问路径: ${blue("http://localhost:3000")}`)
})
}// src/node/server/index.ts
export async function startDevServer() {
// ...
// 核心编译逻辑
app.use(transformMiddleware(serverContext))
// 处理入口 HTML 资源
app.use(indexHtmlMiddware(serverContext))
app.listen(3000, async () => {
await optimize(root)
console.log(
green("🚀 No-Bundle 服务已经成功启动!"),
`耗时: ${Date.now() - startTime}ms`
)
console.log(`> 本地访问路径: ${blue("http://localhost:3000")}`)
})
}同时,我们也需要补充如下的工具函数和常量定义:
// src/node/utils.ts

import path from 'path'
import os from 'os'
import { JS_TYPES_RE, HASH_RE, QEURY_RE } from './constants.ts'

// ...

export const isJSRequest = (id: string): boolean => {
  id = cleanUrl(id)
  if (JS_TYPES_RE.test(id)) {
    return true
  }
  if (!path.extname(id) && !id.endsWith("/")) {
    return true
  }
  return false
}

export const cleanUrl = (url: string): string =>
  url.replace(HASH_RE, "").replace(QEURY_RE, "")
// src/node/utils.ts
import path from 'path'
import os from 'os'
import { JS_TYPES_RE, HASH_RE, QEURY_RE } from './constants.ts'
// ...
export const isJSRequest = (id: string): boolean => {
id = cleanUrl(id)
if (JS_TYPES_RE.test(id)) {
return true
}
if (!path.extname(id) && !id.endsWith("/")) {
return true
}
return false
}
export const cleanUrl = (url: string): string =>
url.replace(HASH_RE, "").replace(QEURY_RE, "")// src/node/constants.ts
import path from 'path'
// ...
export const JS_TYPES_RE = /\.(?:j|t)sx?$|\.mjs$/
export const QEURY_RE = /\?.*$/s
export const HASH_RE = /#.*$/s// src/node/constants.ts
import path from 'path'
// ...
export const JS_TYPES_RE = /\.(?:j|t)sx?$|\.mjs$/
export const QEURY_RE = /\?.*$/s
export const HASH_RE = /#.*$/s从如上的核心编译函数 transformRequest可以看出,Vite 对于 JS/TS/JSX/TSX 文件的编译流程主要是依次调用插件容器的如下方法:
- resolveId
- load
- transform
其中会经历众多插件的处理逻辑,那么,对于 TSX 文件的编译逻辑,也分散到了各个插件当中,具体来说主要包含以下的插件:
- 路径解析插件
- Esbuild 语法编译插件
- import 分析插件
接下来,我们就开始依次实现这些插件。
路径解析插件
当浏览器解析到如下的标签时:
<script type="module" src="/src/main.tsx"></script><script type="module" src="/src/main.tsx"></script>会自动发送一个路径为 /src/main.tsx 的请求,但如果服务端不做任何处理,是无法定位到源文件的,随之会返回 404 状态码:

因此,我们需要开发一个路径解析插件,对请求的路径进行处理,使之能转换真实文件系统中的路径。
你可以新建文件 src/node/plugins/resolve.ts,内容如下:
import resolve from "resolve"
import path from "path"
import { pathExists } from "fs-extra"

import { Plugin } from "../plugin"
import { ServerContext } from "../server/index"
import { DEFAULT_EXTERSIONS } from "../constants"
import { cleanUrl } from "../utils"

export function resolvePlugin(): Plugin {
  let serverContext: ServerContext
  return {
    name: "vite:resolve",
    configureServer(s) {
      // 保存服务端上下文
      serverContext = s
    },
    async resolveId(id: string, importer?: string) {
      // 1. 绝对路径
      if (path.isAbsolute(id)) {
        if (await pathExists(id)) {
          return { id }
        }
        // 加上 root 路径前缀,处理 /src/main.tsx 的情况
        id = path.join(serverContext.root, id)
        if (await pathExists(id)) {
          return { id }
        }
      }
      // 2. 相对路径
      else if (id.startsWith(".")) {
        if (!importer) {
          throw new Error("`importer` should not be undefined")
        }
        const hasExtension = path.extname(id).length > 1
        let resolvedId: string
        // 2.1 包含文件名后缀
        // 如 ./App.tsx
        if (hasExtension) {
          resolvedId = resolve.sync(id, { basedir: path.dirname(importer) })
          if (await pathExists(resolvedId)) {
            // return { id: resolvedId }
            return { id }
          }
        }
        // 2.2 不包含文件名后缀
        // 如 ./App
        else {
          // ./App -> ./App.tsx
          for (const extname of DEFAULT_EXTERSIONS) {
            try {
              const withExtension = `${id}${extname}`
              resolvedId = resolve.sync(withExtension, {
                basedir: path.dirname(importer),
              })
              if (await pathExists(resolvedId)) {
                // return { id: resolvedId }
                return { id: withExtension }
              }
            } catch (e) {
              continue
            }
          }
        }
      }
      return null
    }
  }
}
import resolve from "resolve"
import path from "path"
import { pathExists } from "fs-extra"
import { Plugin } from "../plugin"
import { ServerContext } from "../server/index"
import { DEFAULT_EXTERSIONS } from "../constants"
import { cleanUrl } from "../utils"
export function resolvePlugin(): Plugin {
let serverContext: ServerContext
return {
name: "vite:resolve",
configureServer(s) {
// 保存服务端上下文
serverContext = s
},
async resolveId(id: string, importer?: string) {
// 1. 绝对路径
if (path.isAbsolute(id)) {
if (await pathExists(id)) {
return { id }
}
// 加上 root 路径前缀,处理 /src/main.tsx 的情况
id = path.join(serverContext.root, id)
if (await pathExists(id)) {
return { id }
}
}
// 2. 相对路径
else if (id.startsWith(".")) {
if (!importer) {
throw new Error("`importer` should not be undefined")
}
const hasExtension = path.extname(id).length > 1
let resolvedId: string
// 2.1 包含文件名后缀
// 如 ./App.tsx
if (hasExtension) {
resolvedId = resolve.sync(id, { basedir: path.dirname(importer) })
if (await pathExists(resolvedId)) {
// return { id: resolvedId }
return { id }
}
}
// 2.2 不包含文件名后缀
// 如 ./App
else {
// ./App -> ./App.tsx
for (const extname of DEFAULT_EXTERSIONS) {
try {
const withExtension = `${id}${extname}`
resolvedId = resolve.sync(withExtension, {
basedir: path.dirname(importer),
})
if (await pathExists(resolvedId)) {
// return { id: resolvedId }
return { id: withExtension }
}
} catch (e) {
continue
}
}
}
}
return null
}
}
}这样对于 /src/main.tsx,在插件中会转换为文件系统中的真实路径,从而让模块在 load 钩子中能够正常加载(加载逻辑在 Esbuild 语法编译插件实现)。
接着我们来补充一下目前缺少的常量:
// src/node/constants.ts
export const DEFAULT_EXTERSIONS = [".tsx", ".ts", ".jsx", "js"]
// src/node/constants.ts
export const DEFAULT_EXTERSIONS = [".tsx", ".ts", ".jsx", "js"]Esbuild 语法编译插件
这个插件的作用比较好理解,就是将 JS/TS/JSX/TSX 编译成浏览器可以识别的 JS 语法,可以利用 Esbuild 的 Transform API 来实现。
你可以新建src/node/plugins/esbuild.ts文件,内容如下:
import esbuild from "esbuild"
import path from "path"
import { readFile } from "fs-extra"

import { Plugin } from "../plugin"
import { isJSRequest } from "../utils"

export function esbuildTransformPlugin(): Plugin {
  return {
    name: "vite:esbuild-transform",
    // 加载模块
    async load(id) {
      if (isJSRequest(id)) {
        try {
          const code = await readFile(id, "utf-8")
          return code
        } catch (e) {
          return null
        }
      }
    },
    async transform(code, id) {
      if (isJSRequest(id)) {
        const extname = path.extname(id).slice(1)
        const { code: transformedCode, map } = await esbuild.transform(code, {
          target: "esnext",
          format: "esm",
          sourcemap: true,
          loader: extname as "js" | "ts" | "jsx" | "tsx",
        })
        return {
          code: transformedCode,
          map,
        }
      }
      return null
    }
  }
}
import esbuild from "esbuild"
import path from "path"
import { readFile } from "fs-extra"
import { Plugin } from "../plugin"
import { isJSRequest } from "../utils"
export function esbuildTransformPlugin(): Plugin {
return {
name: "vite:esbuild-transform",
// 加载模块
async load(id) {
if (isJSRequest(id)) {
try {
const code = await readFile(id, "utf-8")
return code
} catch (e) {
return null
}
}
},
async transform(code, id) {
if (isJSRequest(id)) {
const extname = path.extname(id).slice(1)
const { code: transformedCode, map } = await esbuild.transform(code, {
target: "esnext",
format: "esm",
sourcemap: true,
loader: extname as "js" | "ts" | "jsx" | "tsx",
})
return {
code: transformedCode,
map,
}
}
return null
}
}
}import 分析插件
在将 TSX 转换为浏览器可以识别的语法之后,是不是就可以直接返回给浏览器执行了呢?
显然不是,我们还考虑如下的一些问题:
- 对于第三方依赖路径(bare import),需要重写为预构建产物路径;
- 对于绝对路径和相对路径,需要借助之前的路径解析插件进行解析。
接下来,我们就在 import 分析插件中一一解决这些问题:
import { pathExists } from "fs-extra"
import resolve from "resolve"
import path from "path"
// magic-string 用来作字符串编辑
import MagicString from "magic-string"
import { init, parse } from "es-module-lexer"

import {
  BARE_IMPORT_RE,
  DEFAULT_EXTERSIONS,
  PRE_BUNDLE_DIR,
} from "../constants"
import {
  cleanUrl,
  isJSRequest,
  normalizePath
} from "../utils"

import { Plugin } from "../plugin"
import { ServerContext } from "../server/index"

export function importAnalysisPlugin(): Plugin {
  let serverContext: ServerContext
  return {
    name: "vite:import-analysis",
    configureServer(s) {
      // 保存服务端上下文
      serverContext = s
    },
    async transform(code: string, id: string) {
      // 只处理 JS 相关的请求
      if (!isJSRequest(id)) {
        return null
      }
      await init
      // 解析 import 语句
      const [imports] = parse(code)
      const ms = new MagicString(code)
      // 对每一个 import 语句依次进行分析
      for (const importInfo of imports) {
        // 举例说明: const str = `import React from 'react'`
        // str.slice(s, e) => 'react'
        const { s: modStart, e: modEnd, n: modSource } = importInfo

        if (!modSource) continue
        // 第三方库: 路径重写到预构建产物的路径
        if (BARE_IMPORT_RE.test(modSource)) {
          // const bundlePath = path.join(
          //   serverContext.root,
          //   PRE_BUNDLE_DIR,
          //   `${modSource}.js`
          // )
          const bundlePath = normalizePath(
            path.join('/', PRE_BUNDLE_DIR, `${modSource}.js`)
          )
          ms.overwrite(modStart, modEnd, bundlePath)
        } else if (modSource.startsWith(".") || modSource.startsWith("/")) {
          // 直接调用插件上下文的 resolve 方法,会自动经过路径解析插件的处理
          const resolved = await this.resolve(modSource, id)
          if (resolved) {
            ms.overwrite(modStart, modEnd, resolved.id)
          }
        }
      }

      return {
        code: ms.toString(),
        // 生成 SourceMap
        map: ms.generateMap(),
      }
    }
  }
}
import { pathExists } from "fs-extra"
import resolve from "resolve"
import path from "path"
// magic-string 用来作字符串编辑
import MagicString from "magic-string"
import { init, parse } from "es-module-lexer"
import {
BARE_IMPORT_RE,
DEFAULT_EXTERSIONS,
PRE_BUNDLE_DIR,
} from "../constants"
import {
cleanUrl,
isJSRequest,
normalizePath
} from "../utils"
import { Plugin } from "../plugin"
import { ServerContext } from "../server/index"
export function importAnalysisPlugin(): Plugin {
let serverContext: ServerContext
return {
name: "vite:import-analysis",
configureServer(s) {
// 保存服务端上下文
serverContext = s
},
async transform(code: string, id: string) {
// 只处理 JS 相关的请求
if (!isJSRequest(id)) {
return null
}
await init
// 解析 import 语句
const [imports] = parse(code)
const ms = new MagicString(code)
// 对每一个 import 语句依次进行分析
for (const importInfo of imports) {
// 举例说明: const str = `import React from 'react'`
// str.slice(s, e) => 'react'
const { s: modStart, e: modEnd, n: modSource } = importInfo
if (!modSource) continue
// 第三方库: 路径重写到预构建产物的路径
if (BARE_IMPORT_RE.test(modSource)) {
// const bundlePath = path.join(
// serverContext.root,
// PRE_BUNDLE_DIR,
// `${modSource}.js`
// )
const bundlePath = normalizePath(
path.join('/', PRE_BUNDLE_DIR, `${modSource}.js`)
)
ms.overwrite(modStart, modEnd, bundlePath)
} else if (modSource.startsWith(".") || modSource.startsWith("/")) {
// 直接调用插件上下文的 resolve 方法,会自动经过路径解析插件的处理
const resolved = await this.resolve(modSource, id)
if (resolved) {
ms.overwrite(modStart, modEnd, resolved.id)
}
}
}
return {
code: ms.toString(),
// 生成 SourceMap
map: ms.generateMap(),
}
}
}
}现在,我们便完成了 JS 代码的 import 分析工作。接下来,我们把上面实现的三个插件进行注册:
// src/node/plugin/index.ts

import { Plugin } from "../plugin"

import { esbuildTransformPlugin } from "./esbuild"
import { importAnalysisPlugin } from "./importAnalysis"
import { resolvePlugin } from "./resolve"

export function resolvePlugins(): Plugin[] {
  return [resolvePlugin(), esbuildTransformPlugin(), importAnalysisPlugin()]
}
// src/node/plugin/index.ts
import { Plugin } from "../plugin"
import { esbuildTransformPlugin } from "./esbuild"
import { importAnalysisPlugin } from "./importAnalysis"
import { resolvePlugin } from "./resolve"
export function resolvePlugins(): Plugin[] {
return [resolvePlugin(), esbuildTransformPlugin(), importAnalysisPlugin()]
}然后在 playground 项目下执行 pnpm dev,在浏览器里面访问 http://localhost:3000,你可以在网络面板中发现 main.tsx 的内容以及被编译为下面这样:
import React from "/node_modules/.vite/react.js";
import ReactDOM from "/node_modules/.vite/react-dom.js";
import App from "./App.tsx";
ReactDOM.render(/* @__PURE__ */ React.createElement(App, null), document.getElementById("root"));
import React from "/node_modules/.vite/react.js";
import ReactDOM from "/node_modules/.vite/react-dom.js";
import App from "./App.tsx";
ReactDOM.render(/* @__PURE__ */ React.createElement(App, null), document.getElementById("root"));同时,页面内容也能被渲染出来:

目前为止我们就基本上完成对 JS/TS/JSX/TSX 文件的编译。
测试还没有处理静态资源,如果使用提供的案例,需要注释掉 css、svg 的资源。
CSS 编译插件
首先,我们可以看看项目中 CSS 代码是如何被引入的:
// playground/src/main.tsx
import "./index.css"
// playground/src/main.tsx
import "./index.css"为了让 CSS 能够在 no-bundle 服务中正常加载,我们需要将其包装成浏览器可以识别的模块格式,也就是 JS 模块,其中模块加载和转换的逻辑我们可以通过插件来实现。当然,首先我们需要在 transform 中间件中允许对 CSS 的请求进行处理,代码如下:
// src/node/server/middlewares/transform.ts
+ import { isCSSRequest } from '../../utils'
export function transformMiddleware(
serverContext: ServerContext
): NextHandleFunction {
return async (req, res, next) => {
if (req.method !== "GET" || !req.url) {
return next()
}
const url = req.url
debug("transformMiddleware: %s", url)
// transform JS request
- if (isJSRequest(url)) {
+ if (isJSRequest(url) || isCSSRequest(url)) {
// ...
}
next()
};
}// src/node/server/middlewares/transform.ts
+ import { isCSSRequest } from '../../utils'
export function transformMiddleware(
serverContext: ServerContext
): NextHandleFunction {
return async (req, res, next) => {
if (req.method !== "GET" || !req.url) {
return next()
}
const url = req.url
debug("transformMiddleware: %s", url)
// transform JS request
- if (isJSRequest(url)) {
+ if (isJSRequest(url) || isCSSRequest(url)) {
// ...
}
next()
};
}然后我们来补充对应的工具函数:
// src/node/utils.ts
export const isCSSRequest = (id: string): boolean =>
cleanUrl(id).endsWith(".css")// src/node/utils.ts
export const isCSSRequest = (id: string): boolean =>
cleanUrl(id).endsWith(".css")现在我们来开发 CSS 的编译插件,你可以新建 src/node/plugins/css.ts 文件,内容如下:
import { readFile } from "fs-extra"
import { Plugin } from "../plugin"
export function cssPlugin(): Plugin {
return {
name: "vite:css",
load(id) {
// 加载
if (id.endsWith(".css")) {
return readFile(id, "utf-8")
}
},
// 转换逻辑
async transform(code, id) {
if (id.endsWith(".css")) {
// 包装成 JS 模块
const jsContent = `
const css = "${code.replace(/\n/g, "")}"
const style = document.createElement("style")
style.setAttribute("type", "text/css")
style.innerHTML = css
document.head.appendChild(style)
export default css`.trim()
return {
code: jsContent,
}
}
return null
}
}
}import { readFile } from "fs-extra"
import { Plugin } from "../plugin"
export function cssPlugin(): Plugin {
return {
name: "vite:css",
load(id) {
// 加载
if (id.endsWith(".css")) {
return readFile(id, "utf-8")
}
},
// 转换逻辑
async transform(code, id) {
if (id.endsWith(".css")) {
// 包装成 JS 模块
const jsContent = `
const css = "${code.replace(/\n/g, "")}"
const style = document.createElement("style")
style.setAttribute("type", "text/css")
style.innerHTML = css
document.head.appendChild(style)
export default css`.trim()
return {
code: jsContent,
}
}
return null
}
}
}这个插件的逻辑比较简单,主要是将封装一层 JS 样板代码,将 CSS 包装成一个 ES 模块,当浏览器执行这个模块的时候,会通过一个 style 标签将 CSS 代码作用到页面中,从而使样式代码生效。
接着我们来注册这个 CSS 插件:
// src/node/plugins/index.ts
import { Plugin } from "../plugin"
import { resolvePlugin } from "./resolve"
import { esbuildTransformPlugin } from "./esbuild"
import { importAnalysisPlugin } from "./importAnalysis"
import { cssPlugin } from "./css"
export function resolvePlugins(): Plugin[] {
return [
resolvePlugin(),
esbuildTransformPlugin(),
importAnalysisPlugin(),
cssPlugin()
]
}// src/node/plugins/index.ts
import { Plugin } from "../plugin"
import { resolvePlugin } from "./resolve"
import { esbuildTransformPlugin } from "./esbuild"
import { importAnalysisPlugin } from "./importAnalysis"
import { cssPlugin } from "./css"
export function resolvePlugins(): Plugin[] {
return [
resolvePlugin(),
esbuildTransformPlugin(),
importAnalysisPlugin(),
cssPlugin()
]
}现在,你可以通过 pnpm dev 来启动 playground 项目,不过在启动之前,需要保证 TSX 文件已经引入了对应的 CSS 文件:
// playground/src/main.tsx
import "./index.css"
// playground/src/App.tsx
import "./App.css"// playground/src/main.tsx
import "./index.css"
// playground/src/App.tsx
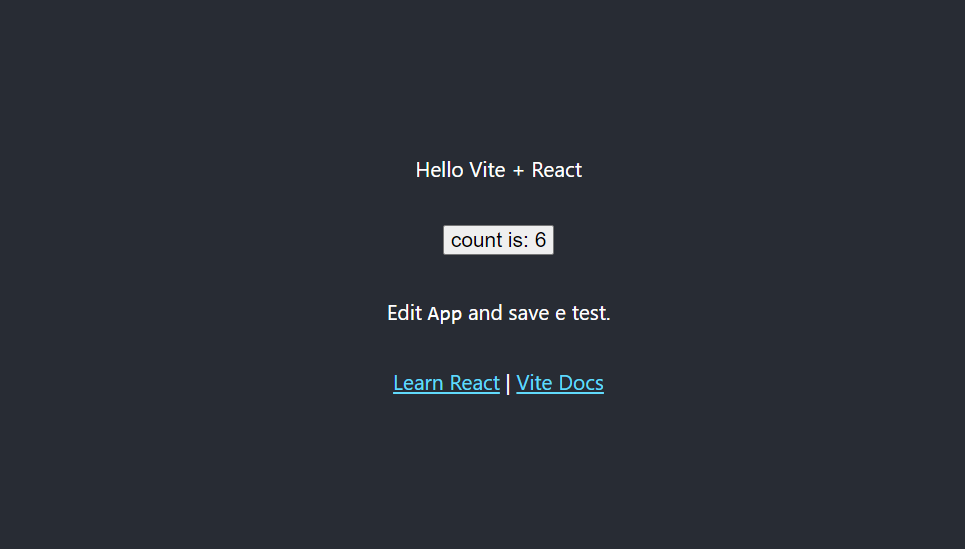
import "./App.css"在启动项目后,打开浏览器进行访问,可以看到样式已经正常生效。
静态资源加载
在完成 CSS 加载之后,我们现在继续完成静态资源的加载。 以 playground 项目为例,我们来支持 svg 文件的加载。首先,我们看看 svg 文件是如何被引入并使用的:
// playground/src/App.tsx

import { useState } from "react";
import React from "react";
import logo from "./logo.svg";
import "./App.css";

function App() {
  const [count, setCount] = useState(0);

  return (
    <div className="App">
      <header className="App-header">
        <img className="App-logo" src={logo} alt="" />
      </header>
    </div>
  );
}

export default App;
// playground/src/App.tsx
import { useState } from "react";
import React from "react";
import logo from "./logo.svg";
import "./App.css";
function App() {
const [count, setCount] = useState(0);
return (
<div className="App">
<header className="App-header">
<img className="App-logo" src={logo} alt="" />
</header>
</div>
);
}
export default App;从如上的代码我们可以分析出静态资源的两种请求:
- import 请求。如
import logo from "./logo.svg"。 - 资源内容请求。如 img 标签将资源 url 填入 src,那么浏览器会请求具体的资源内容。
因此,接下来为了实现静态资源的加载,我们需要做两手准备:
- 对静态资源的 import 请求返回资源的 url;
- 对于具体内容的请求,读取静态资源的文件内容,并响应给浏览器。
首先处理 import 请求,我们可以在 TSX 的 import 分析插件中,给静态资源相关的 import 语句做一个标记:
// src/node/plugins/importAnalysis.ts

// ...

export function importAnalysisPlugin(): Plugin {
  let serverContext: ServerContext
  return {
    name: "vite:import-analysis",
 		// ...
    async transform(code: string, id: string) {
      // 只处理 JS 相关的请求
      if (!isJSRequest(id)) {
        return null
      }
      await init
      // 解析 import 语句
      const [imports] = parse(code)
      const ms = new MagicString(code)
      // 对每一个 import 语句依次进行分析
      for (const importInfo of imports) {
   			// ...

        // 静态资源
        if (modSource.endsWith(".svg")) {
          // 加上 ?import 后缀
          const prefix = id.split('\\').at(-2)
          const resolvedUrl = normalizePath(path.join('/', prefix, modSource))

          ms.overwrite(modStart, modEnd, `${resolvedUrl}?import`)
          continue
        }

        // ...
      }

      return {
        code: ms.toString(),
        // 生成 SourceMap
        map: ms.generateMap(),
      }
    }
  }
}
// src/node/plugins/importAnalysis.ts
// ...
export function importAnalysisPlugin(): Plugin {
let serverContext: ServerContext
return {
name: "vite:import-analysis",
// ...
async transform(code: string, id: string) {
// 只处理 JS 相关的请求
if (!isJSRequest(id)) {
return null
}
await init
// 解析 import 语句
const [imports] = parse(code)
const ms = new MagicString(code)
// 对每一个 import 语句依次进行分析
for (const importInfo of imports) {
// ...
// 静态资源
if (modSource.endsWith(".svg")) {
// 加上 ?import 后缀
const prefix = id.split('\\').at(-2)
const resolvedUrl = normalizePath(path.join('/', prefix, modSource))
ms.overwrite(modStart, modEnd, `${resolvedUrl}?import`)
continue
}
// ...
}
return {
code: ms.toString(),
// 生成 SourceMap
map: ms.generateMap(),
}
}
}
}编译后的 App.tsx 内容如下:
接着浏览器会发出带有 ?import 后缀的请求,我们在 transform 中间件进行处理:
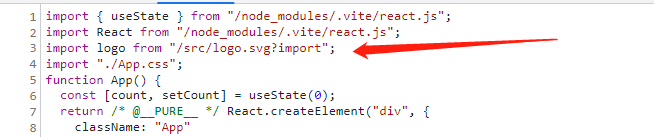
接着浏览器会发出带有 ?import 后缀的请求,我们在 transform 中间件进行处理:
// src/node/server/middlewares/transform.ts
+ import { isImportRequest } from '../../utils';

export function transformMiddleware(
  serverContext: ServerContext
): NextHandleFunction {
  return async (req, res, next) => {
    if (req.method !== "GET" || !req.url) {
      return next()
    }

    const url = req.url

    debug("transformMiddleware: %s", url)

    // transform JS request
-    if (isJSRequest(url) || isCSSRequest(url)) {
+    if (isJSRequest(url) || isCSSRequest(url) || isImportRequest(url)) {
      // ....
     }

    next()
  }
}
// src/node/server/middlewares/transform.ts
+ import { isImportRequest } from '../../utils';
export function transformMiddleware(
serverContext: ServerContext
): NextHandleFunction {
return async (req, res, next) => {
if (req.method !== "GET" || !req.url) {
return next()
}
const url = req.url
debug("transformMiddleware: %s", url)
// transform JS request
- if (isJSRequest(url) || isCSSRequest(url)) {
+ if (isJSRequest(url) || isCSSRequest(url) || isImportRequest(url)) {
// ....
}
next()
}
}然后补充对应的工具函数:
// src/node/utils.ts
export const isImportRequest = (url: string): boolean =>
  url.endsWith("?import")

export const removeImportQuery = (url: string): string =>
  url.replace(/\?import$/, "")
// src/node/utils.ts
export const isImportRequest = (url: string): boolean =>
url.endsWith("?import")
export const removeImportQuery = (url: string): string =>
url.replace(/\?import$/, "")此时,我们就可以开发静态资源插件了。新建 src/node/plugins/assets.ts,内容如下:
import { Plugin } from "../plugin"
import { cleanUrl, removeImportQuery, isWindows } from "../utils"

export function assetPlugin(): Plugin {
  return {
    name: "vite:asset",
    async load(id) {
      let cleanedId = removeImportQuery(cleanUrl(id))
      // 这里仅处理 svg
      if (cleanedId.endsWith(".svg")) {
        if (isWindows) {
          cleanedId = cleanedId.replace('D:\\', '').replace(/\\/g, '\\\\')
        }

        return {
          // 包装成一个 JS 模块
          code: `export default "${cleanedId}"`
        }
      }
    }
  }
}
import { Plugin } from "../plugin"
import { cleanUrl, removeImportQuery, isWindows } from "../utils"
export function assetPlugin(): Plugin {
return {
name: "vite:asset",
async load(id) {
let cleanedId = removeImportQuery(cleanUrl(id))
// 这里仅处理 svg
if (cleanedId.endsWith(".svg")) {
if (isWindows) {
cleanedId = cleanedId.replace('D:\\', '').replace(/\\/g, '\\\\')
}
return {
// 包装成一个 JS 模块
code: `export default "${cleanedId}"`
}
}
}
}
}接着来注册这个插件:
import { Plugin } from "../plugin"

import { resolvePlugin } from "./resolve"
import { esbuildTransformPlugin } from "./esbuild"
import { importAnalysisPlugin } from "./importAnalysis"
import { cssPlugin } from "./css"
import { assetPlugin } from "./assets"

export function resolvePlugins(): Plugin[] {
  return [
    resolvePlugin(),
    esbuildTransformPlugin(),
    importAnalysisPlugin(),
    cssPlugin(),
    assetPlugin()
  ]
}
import { Plugin } from "../plugin"
import { resolvePlugin } from "./resolve"
import { esbuildTransformPlugin } from "./esbuild"
import { importAnalysisPlugin } from "./importAnalysis"
import { cssPlugin } from "./css"
import { assetPlugin } from "./assets"
export function resolvePlugins(): Plugin[] {
return [
resolvePlugin(),
esbuildTransformPlugin(),
importAnalysisPlugin(),
cssPlugin(),
assetPlugin()
]
}目前我们处理完了静态资源的 import 请求,接着我们还需要处理非 import 请求,返回资源的具体内容。我们可以通过一个中间件来进行处理:
// src/node/server/middlewares/static.ts

import { NextHandleFunction } from "connect"
import { isImportRequest } from "../../utils"
// 一个用于加载静态资源的中间件
import sirv from "sirv"

export function staticMiddleware(): NextHandleFunction {
  const serveFromRoot = sirv("/", { dev: true })
  return async (req, res, next) => {
    if (!req.url) {
      return
    }
    // 不处理 import 请求
    if (isImportRequest(req.url)) {
      return
    }
    serveFromRoot(req, res, next)
  }
}
// src/node/server/middlewares/static.ts
import { NextHandleFunction } from "connect"
import { isImportRequest } from "../../utils"
// 一个用于加载静态资源的中间件
import sirv from "sirv"
export function staticMiddleware(): NextHandleFunction {
const serveFromRoot = sirv("/", { dev: true })
return async (req, res, next) => {
if (!req.url) {
return
}
// 不处理 import 请求
if (isImportRequest(req.url)) {
return
}
serveFromRoot(req, res, next)
}
}然后在服务中注册这个中间件:
// src/node/server/index.ts

// ...

import { indexHtmlMiddware } from './middlewares/indexHtml'
import { transformMiddleware } from "./middlewares/transform"
import { staticMiddleware } from "./middlewares/static"

// ...

export async function startDevServer() {
	// ...

  // 核心编译逻辑
  app.use(transformMiddleware(serverContext))
  // 处理入口 HTML 资源
  app.use(indexHtmlMiddware(serverContext))
  // 处理静态资源
  app.use(staticMiddleware())

  app.listen(3000, async () => {
    await optimize(root)

    console.log(
      green("🚀 No-Bundle 服务已经成功启动!"),
      `耗时: ${Date.now() - startTime}ms`
    )
    console.log(`> 本地访问路径: ${blue("http://localhost:3000")}`)
  })
}
// src/node/server/index.ts
// ...
import { indexHtmlMiddware } from './middlewares/indexHtml'
import { transformMiddleware } from "./middlewares/transform"
import { staticMiddleware } from "./middlewares/static"
// ...
export async function startDevServer() {
// ...
// 核心编译逻辑
app.use(transformMiddleware(serverContext))
// 处理入口 HTML 资源
app.use(indexHtmlMiddware(serverContext))
// 处理静态资源
app.use(staticMiddleware())
app.listen(3000, async () => {
await optimize(root)
console.log(
green("🚀 No-Bundle 服务已经成功启动!"),
`耗时: ${Date.now() - startTime}ms`
)
console.log(`> 本地访问路径: ${blue("http://localhost:3000")}`)
})
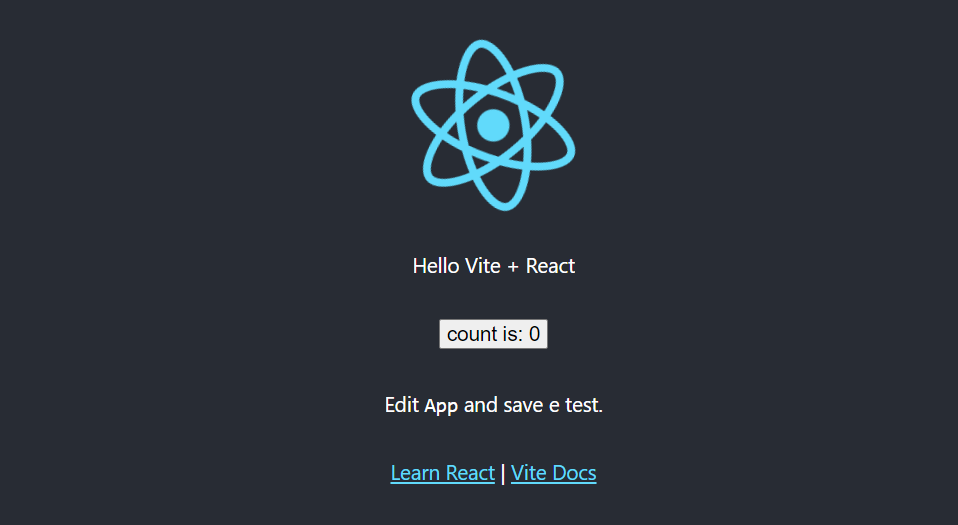
}现在,你可以通过 pnpm dev 启动 playground 项目,在浏览器中访问,可以发现 svg 图片已经能够成功显示了:
其实不光是 svg 文件,几乎所有格式的静态资源都可以按照如上的思路进行处理:
- 通过加入
?import后缀标识 import 请求,返回将静态资源封装成一个 JS 模块,即export default xxx的形式,导出资源的真实地址。 - 对非 import 请求,响应静态资源的具体内容,通过
Content-Type响应头告诉浏览器资源的类型(这部分工作 sirv 中间件已经帮我们做了)。